{% hint style="info" %}
We are adding new documentation for more integrations every week. For help with integrating your data or if a particular application/data source isn't listed here, contact your customer success manager.
{% endhint %}
# Accounting & ERP
Drivetrain integrates with 20+ Accounting & ERP tools. Right now, you can integrate the following tools directly by following the instructions provided below:
* [Business Central](/integration-guide/readme/accounting-and-erp/integrating-with-business-central)
* [Campfire](/integration-guide/readme/accounting-and-erp/integrating-with-campfire)
* [Certinia](/integration-guide/readme/accounting-and-erp/integrating-with-certinia)
* [NetSuite](/integration-guide/readme/accounting-and-erp/integrating-with-netsuite)
* [Odoo](/integration-guide/readme/accounting-and-erp/integrating-with-odoo)
* [QuickBooks](/integration-guide/readme/accounting-and-erp/integrating-with-quickbooks)
* [Ramp](/integration-guide/readme/accounting-and-erp/integrating-with-ramp)
* [Rillet](/integration-guide/readme/accounting-and-erp/integrating-with-rillet)
* [Sage Intacct](/integration-guide/readme/accounting-and-erp/integrating-with-sage-intacct)
* [Tally](/integration-guide/readme/accounting-and-erp/integrating-with-tally)
* [Xero](/integration-guide/readme/accounting-and-erp/integrating-with-xero)
* [Zoho Books](/integration-guide/readme/accounting-and-erp/integrating-with-zoho-books)
For other accounting tools and ERP systems, contact your customer success manager to help you get them connected.
# Integrating with Business Central
[Prerequisites](#prerequisites)
[Azure (Entra ID) App Registration](#a.-azure-entra-id-app-registration)
[Step 1: Register a new application](#step-1-register-a-new-application)
[Step 2: Copy Application ID and Tenant ID](#step-2-copy-application-id-and-tenant-id)
[Step 3: Add a Client Secret](#step-3-add-a-client-secret)
[Step 4: Add API Permissions](#step-4-add-api-permissions)
[Business Central Setup](#b.-business-central-register-the-app-and-assign-read-only-permission)
[Drivetrain Setup](#drivetrain-setup)
### Prerequisites
To connect **Business Central** to **Drivetrain**, you need:
1\. An **active Microsoft 365 account** with access to **Business Central** and **Azure**.
2\. Permission to register applications and grant admin consent in Azure (typically **Global** **Administrator or Application Administrator**).
3\. **Admin** privileges in Drivetrain.
### A. Azure (Entra ID) App Registration
#### Step 1: Register a new application
1\. Sign in to the [Azure portal](https://portal.azure.com/).
2\. Go to **Microsoft Entra ID > App registrations > + New registration.**
3\. Fill in the following:
• **Name:** Drivetrain Integration (or any name you prefer)
• **Supported account types:** Select Accounts in this organizational directory only (Single tenant)
• **Redirect URI:** Leave blank. Drivetrain uses server-to-server authentication, which does not use a redirect.
4\. Click **Register**.
#### Step 2: Copy Application ID and Tenant ID
1\. On the app's Overview page, copy and save these two values. You will provide both to Drivetrain later:
• **Application (client) ID**
• **Directory (tenant) ID**
#### Step 3: Add a Client Secret
1\. In the left navigation, go to **Certificates & secrets > + New client secret.**
2\. Fill in the following:
• **Description:** Drivetrain connector
• **Expires:** Pick a duration that fits your rotation policy (e.g., 24 months).
3\. Click **Add.**
4\. Immediately copy the **secret's Value** (not the Secret ID). It will not be shown again. This is the third value to share with Drivetrain.
#### Step 4: Add API Permissions
1\. In the left navigation, go to **API permissions > + Add a permission.**
2\. Select **APIs my organization uses** (or Microsoft APIs, depending on your tenant) and search for Dynamics 365 Business Central and select it.
3\. Choose **Application permissions** (not Delegated).
4\. Tick `API.ReadWrite.All` and click **Add permissions.**
5\. Back on the API permissions page, click **Grant admin consent for {your tenant name}**, then click **Yes** to **confirm**. The status column should turn green and read **"Granted for {tenant}".**
{% hint style="info" %}
`API.ReadWrite.All` is the only **Entra-level permission** Microsoft publishes for the Business Central API surface. There is no separate read-only variant. By itself, it only allows the app to call the API. Whether it can read or write any actual data is controlled entirely by the Business Central permission set you assign in Section B. The Drivetrain app will be assigned a read-only permission set, so it cannot perform writes.
{% endhint %}
### B. Business Central - Register the App and Assign Read-Only Permission
{% hint style="warning" %}
This step is required. Azure consent alone does not grant the app any access to Business Central data.
{% endhint %}
1\. Sign in to **Business Central** as a user with permission to manage Microsoft Entra applications (typically a **SUPER user**).
2\. Use the search icon (Alt+Q) and search for Microsoft Entra Applications (older name: Azure Active Directory Applications). Open it.
3\. Click **+ New.**
4\. Fill in the following:
• **Client ID:** Paste the Application (client) ID from Step A2.
• **Description:** Drivetrain connector
• **State:** Enabled
5\. In the **User Permission Sets** section on the same page, click **+ New line** and assign the following:
• **D365 READ** - Grants read-only access across core Business Central tables.
6\. **Save** **the page.**
### C. What to Share with Drivetrain
Once both layers are configured, share the following three values with Drivetrain through a secure channel:
| Value | Where to find it |
| ------------- | --------------------------------------------------------------------------- |
| Tenant ID | Azure > App registrations > your app > Overview > "Directory (tenant) ID" |
| Client ID | Azure > App registrations > your app > Overview > "Application (client) ID" |
| Client secret | The Value you copied in Step A3 |
You will also separately tell Drivetrain:
• **Your environment name** (e.g., Production, or your sandbox name).
### Drivetrain Setup
#### Add the Business Central Connector
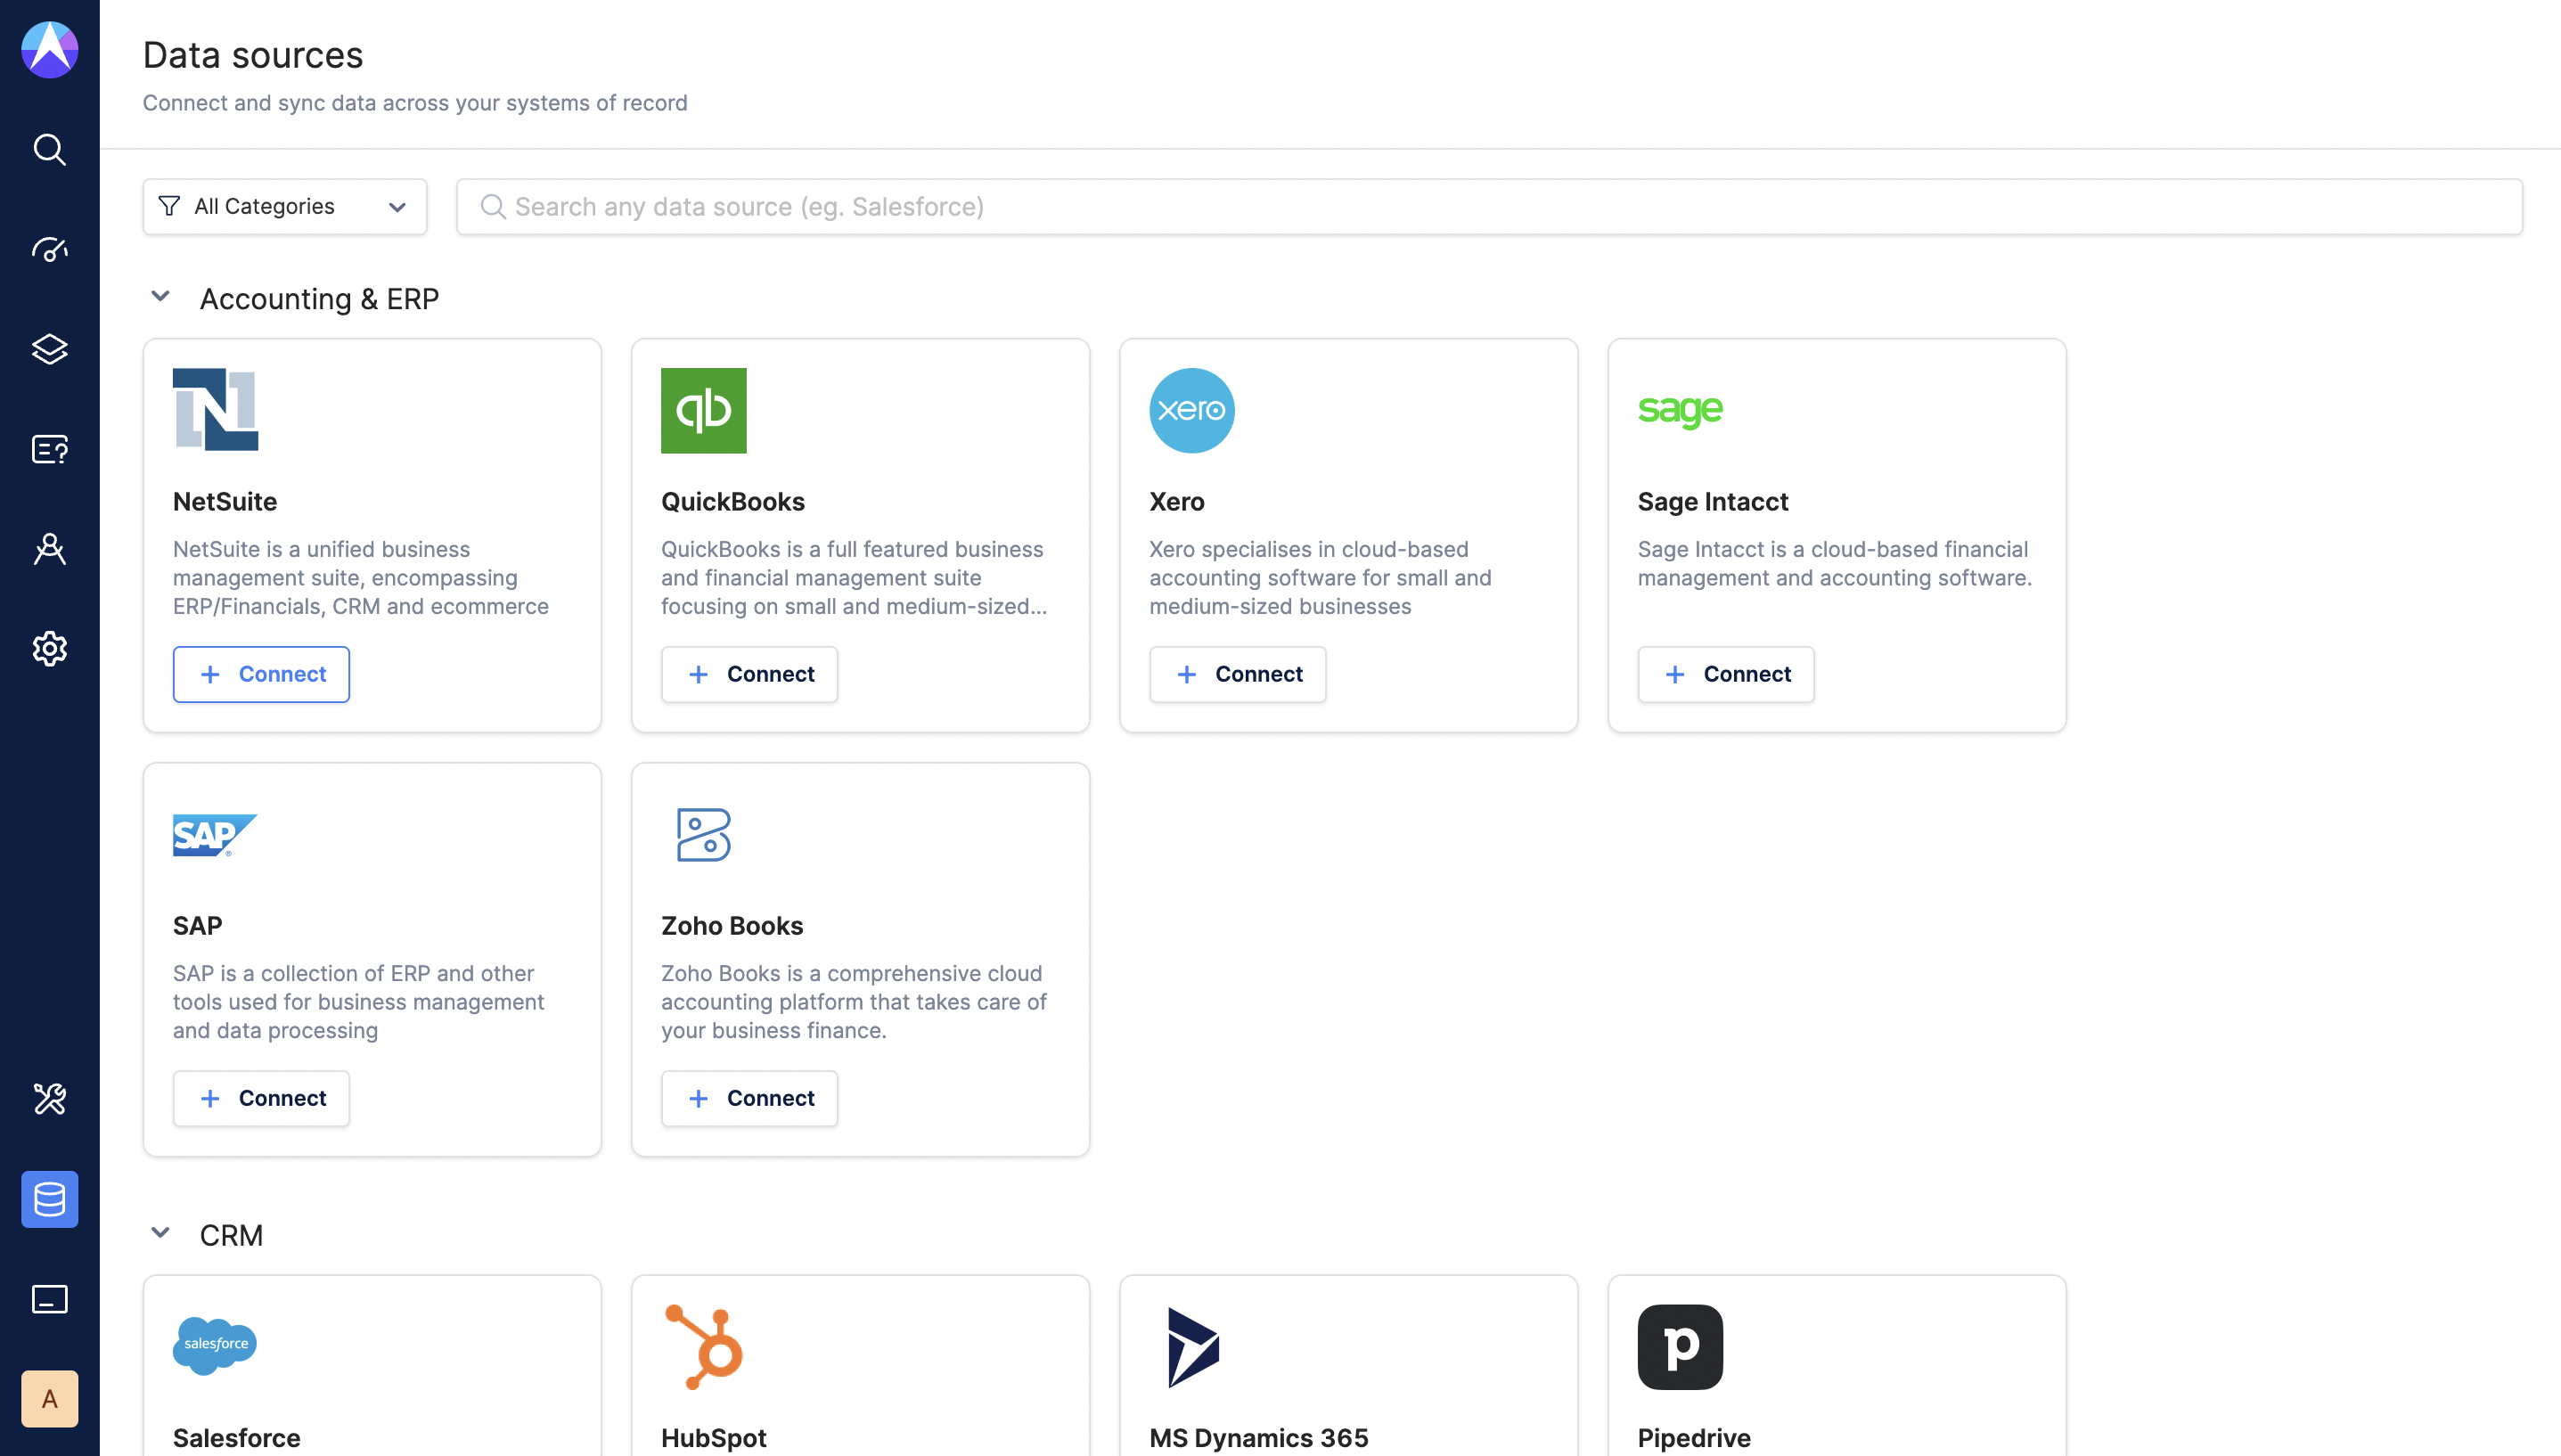
1\. Once you log in to Drivetrain, click on **+** to add a new connector on the **Data page.**
2\. Select **Microsoft Dynamics 365 Business Central** under the Accounting & ERP category.
3\. Enter the **Tenant ID**, **Client ID**, and **Client Secret** collected during the steps above and click **Next**.
4\. Enter the **Environment name** (optional, by default: Production) and click Next.
5\. Click **Finish setup** once the configuration is complete.
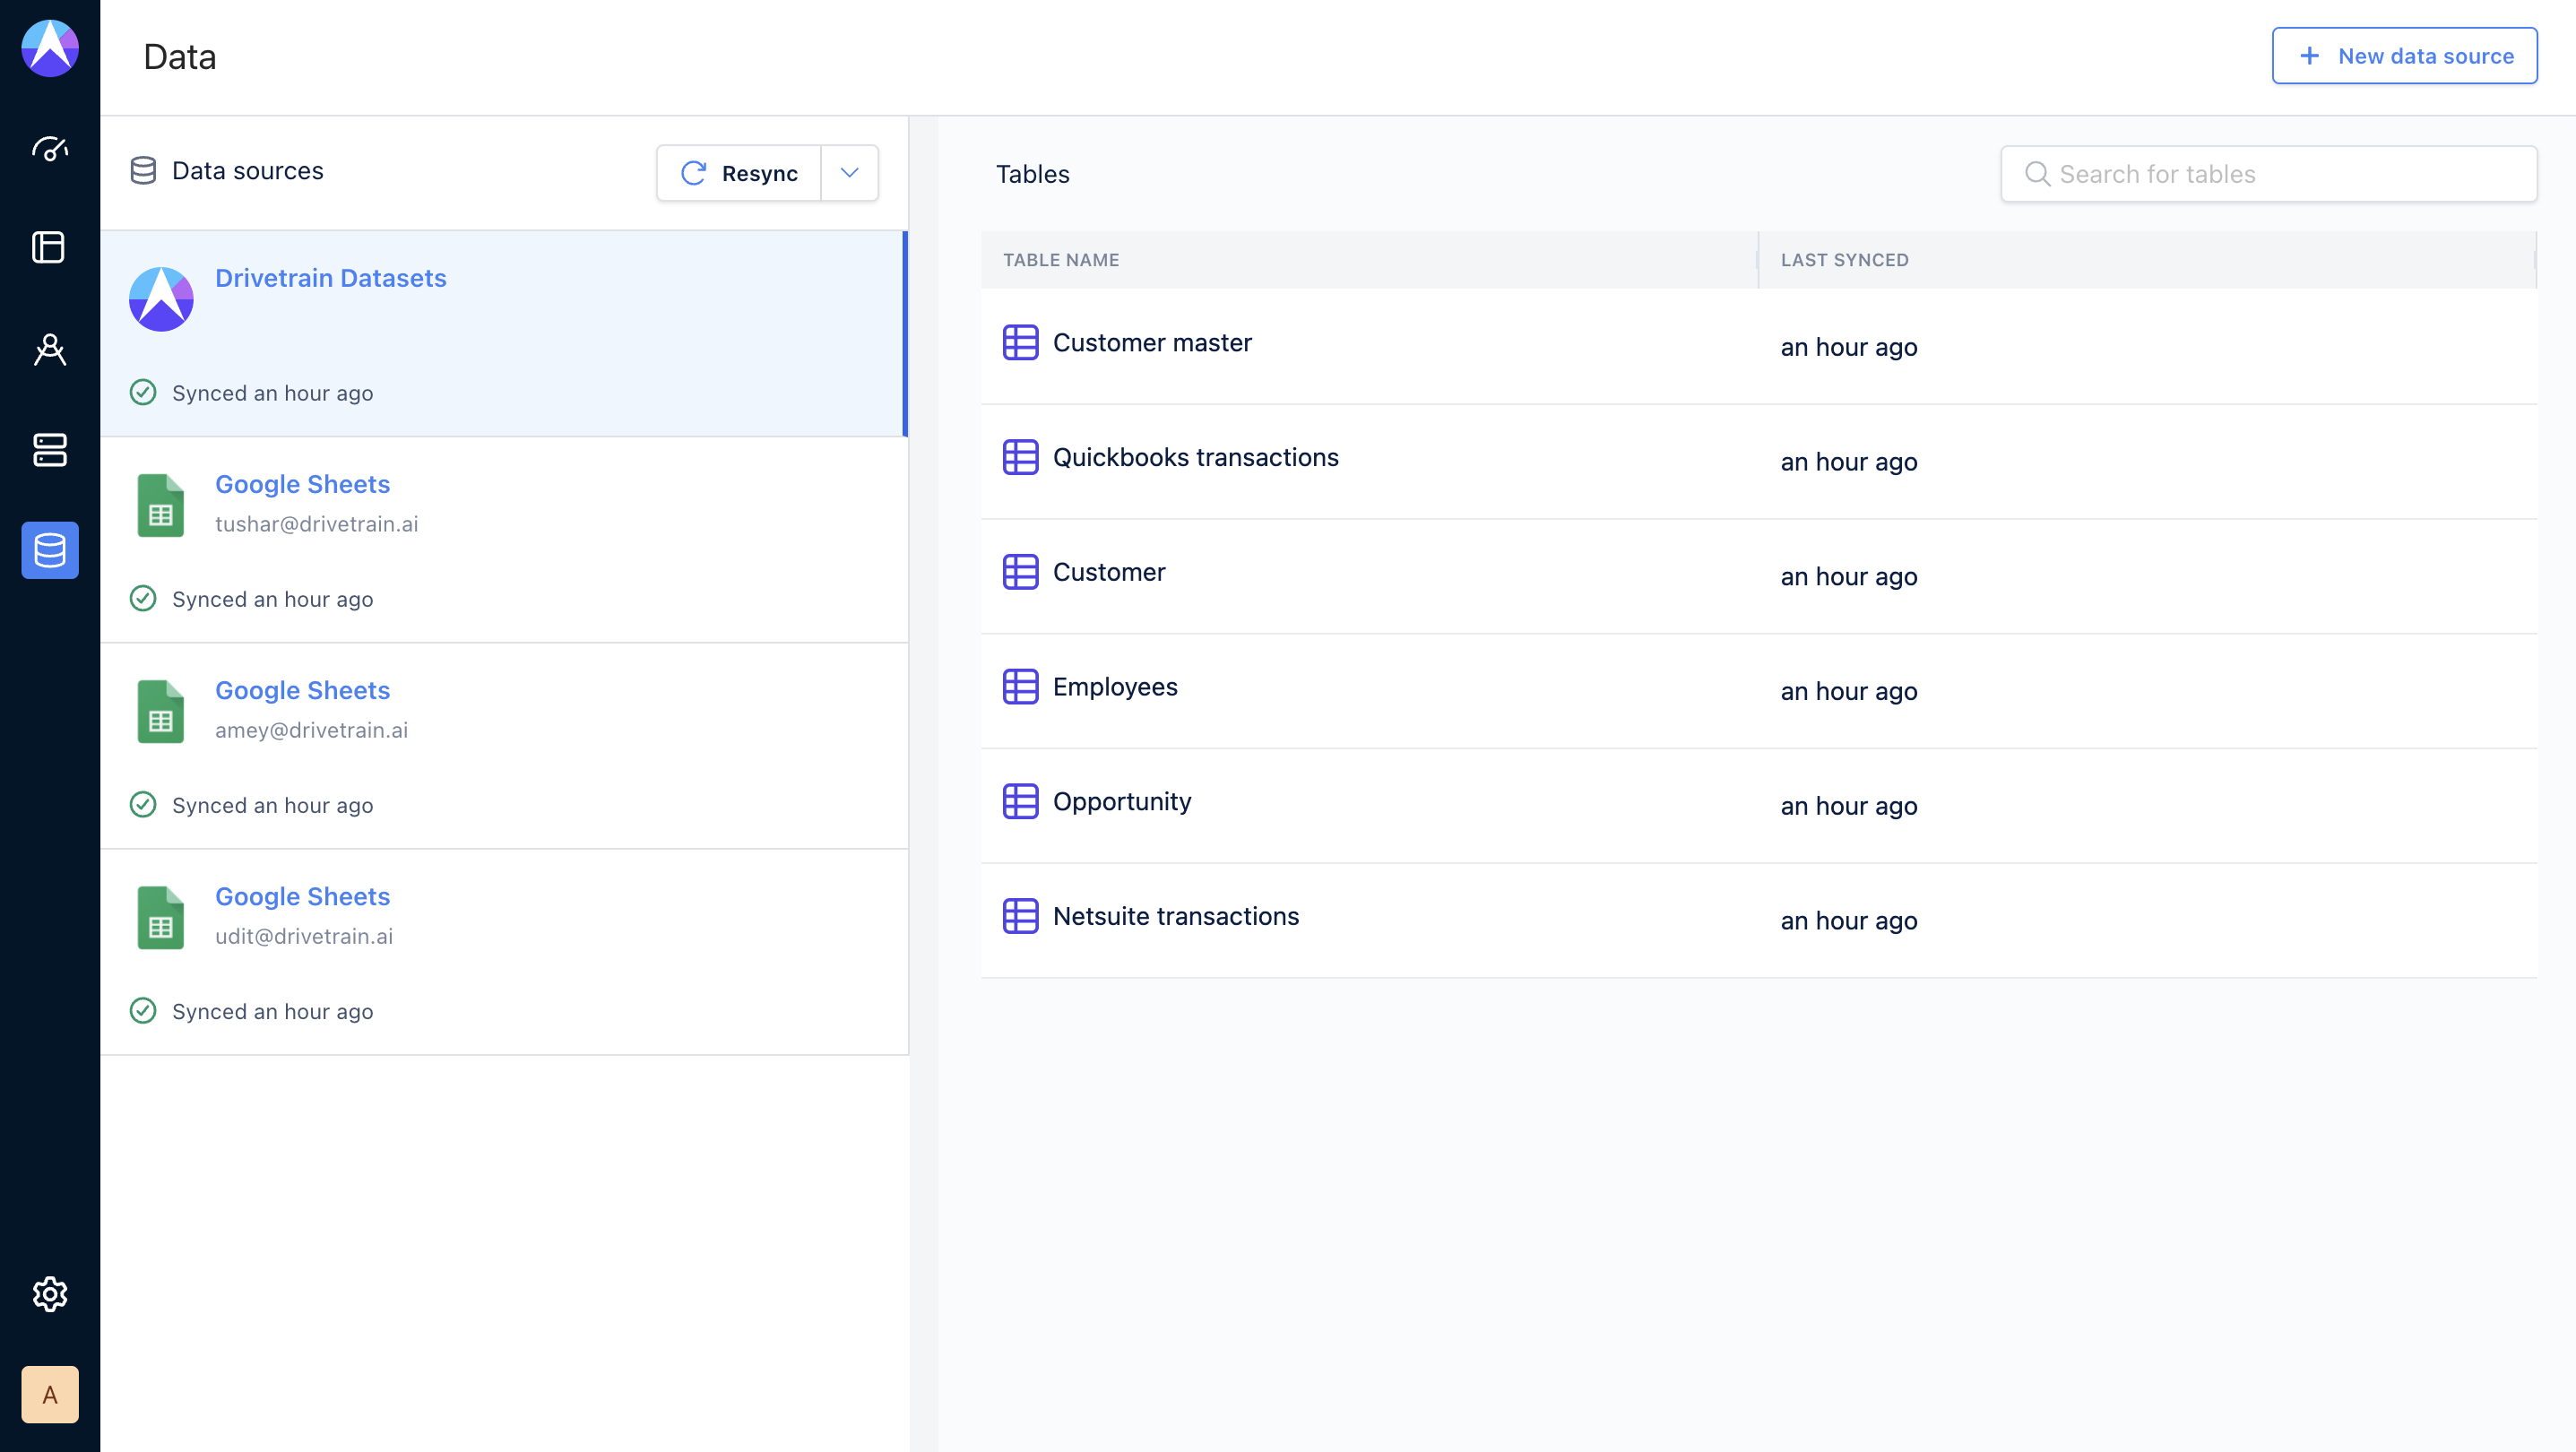
6\. Your **Business Central connection** will start showing up on the **Data page**. Once the sync is complete, you will be able to see your Business Central data on Drivetrain.
# Integrating with Campfire
This guide will walk you through connecting your **Campfire** **accounting** **platform** to **Drivetrain.**
### **Prerequisites**
Before beginning the integration, ensure you have the following:
1. An **active Campfire account** with permissions to create API tokens.
2. **Admin privileges** in Drivetrain.
### **Campfire Setup**
Follow the steps below to set up your Campfire instance so Drivetrain can authenticate and pull data.
#### Step 1: Create an API User
You need an API user and key to allow Drivetrain to connect.
1. Login to your Campfire account
2. In Campfire, navigate to the **API Tokens (`Settings > API Keys`)** section.
3. Click **`New User`**.
4. Fill in the required fields (Name, Email, Role).
* `admin` - full access to APIs
* `clerk` - read access and ability to post drafts
* `view only` - read-only access via `GET APIs`
5. Save the new API user.
{% hint style="info" %}
**View only access** is sufficient to integrate **Campfire** with **Drivetrain.**
{% endhint %}
#### Step 2: Generate Your API Key
Once the API user is created:
1. Click **`Create API Key`** for that user.
2. **Copy the generated API key** - this is shown only once.
3. Store it somewhere securely - you’ll need it for the Drivetrain connection.
#### Step 3: Integrating with Drivetrain
Now that your Campfire API credentials are ready, connect to Drivetrain:
1. Go to the **`Data`** page in Drivetrain.
2. Click the **`+ icon`** in the top-left corner to add a new data source.
3. From the list of available integrations, select **`Campfire`**.
4. In the connection form, paste your API Key into the **`API Key`** field.
5. Click **Submit**.
Drivetrain will validate your credentials and begin syncing your Campfire data. You can monitor sync progress from the Data page.
### **Troubleshooting**
If you’re unable to connect Campfire to Drivetrain after completing the steps above, reach out to your Drivetrain onboarding partner. In most cases, no additional configuration is required.
{% hint style="info" %}
Include a **screenshot** or **brief description** of the error message. We'll help you troubleshoot and guide you through next steps.
{% endhint %}
# Integrating with Certinia
### Certinia
[Certinia](https://certinia.com/) (formerly known as FinancialForce) is an ERP and service automation tool built on Salesforce. Drivetrain connects to the underlying database to integrate your ERP data with the destination of your choice for analytics.
### Setup guide
Certinia is built on the Salesforce technology. Instead of pulling data from Certinia's API, we pull directly from the source database, saving time and effort. To sync data from Certinia, we recommend using our Salesforce connector. We support the Production and Sandbox environments.
\
Follow our [Salesforce setup guide](/integration-guide/readme/crm/integrating-with-salesforce) to connect Certinia to Drivetrain.
### Schema information
Drivetrain fetches objects that have the below prefixes:
* `c2g__`
* `pse__`
# Integrating with NetSuite
### Prerequisites
To connect NetSuite to Drivetrain, you need:
* An active Oracle NetSuite account
* Admin privileges to your NetSuite instance
* Admin privileges in Drivetrain
### NetSuite Setup
#### Step 1: Enable Web Services
Web services will usually be enabled as part of the admin access provided to Drivetrain. In case it isn't you can enable the feature at Setup > Company > Enable Features, in the SuiteTalk (Web Services) section, on the SuiteCloud sub tab.


#### **Step 2: Create a user and assign administrator role to that user**
* From the menu bar, navigate to **Lists** > **Employees** > **Employees** > **New.**

* Select the form as "**Standard Employee Form**" and enter name as "**Drivetrain Integration**".
* If you’ve created a service account under your company’s domain, use that email address.
*Example:* If your company is mycompany, and the service account is , use that email.
* If you’re using a Drivetrain-provided service account, the email typically follows this format: . Please confirm the exact email with your **Data Integration Manager** or **Customer Success Manager.**

* Click the **Access** sub tab.
* Check **Give Access** and **Send Notification Email.**
* Assign a password of your choice.
* Select Role = 'Administrator' and click **Add.**
* Click on **Save**

#### **Step 3: Create an integration**
* From the menu bar, navigate to **Setup** → **Integration** → **Manage** **Integrations** → **New.**

* On the Integration page,
* Fill in the **Name** field. We recommend using "**Drivetrain Integration**"
* Under Authentication section, check **TOKEN-BASED AUTHENTICATION** and uncheck **TBA: AUTHORIZATION FLOW**
* In the **OAuth 2.0** section, uncheck **AUTHORIZATION CODE GRANT**
* Click on **Save**

After you've saved the settings above, scroll down to the bottom of the page. Under the Client Credentials section, you will get:
* **Consumer Secret**
* **Consumer Key**

{% hint style="info" %}
Please make note of both items in a secure document, as they will be required later and will not be accessible once you move to another page.
{% endhint %}
#### Step 4: Generate the token key and token secret
* Log into NetSuite with the admin account for Drivetrain.

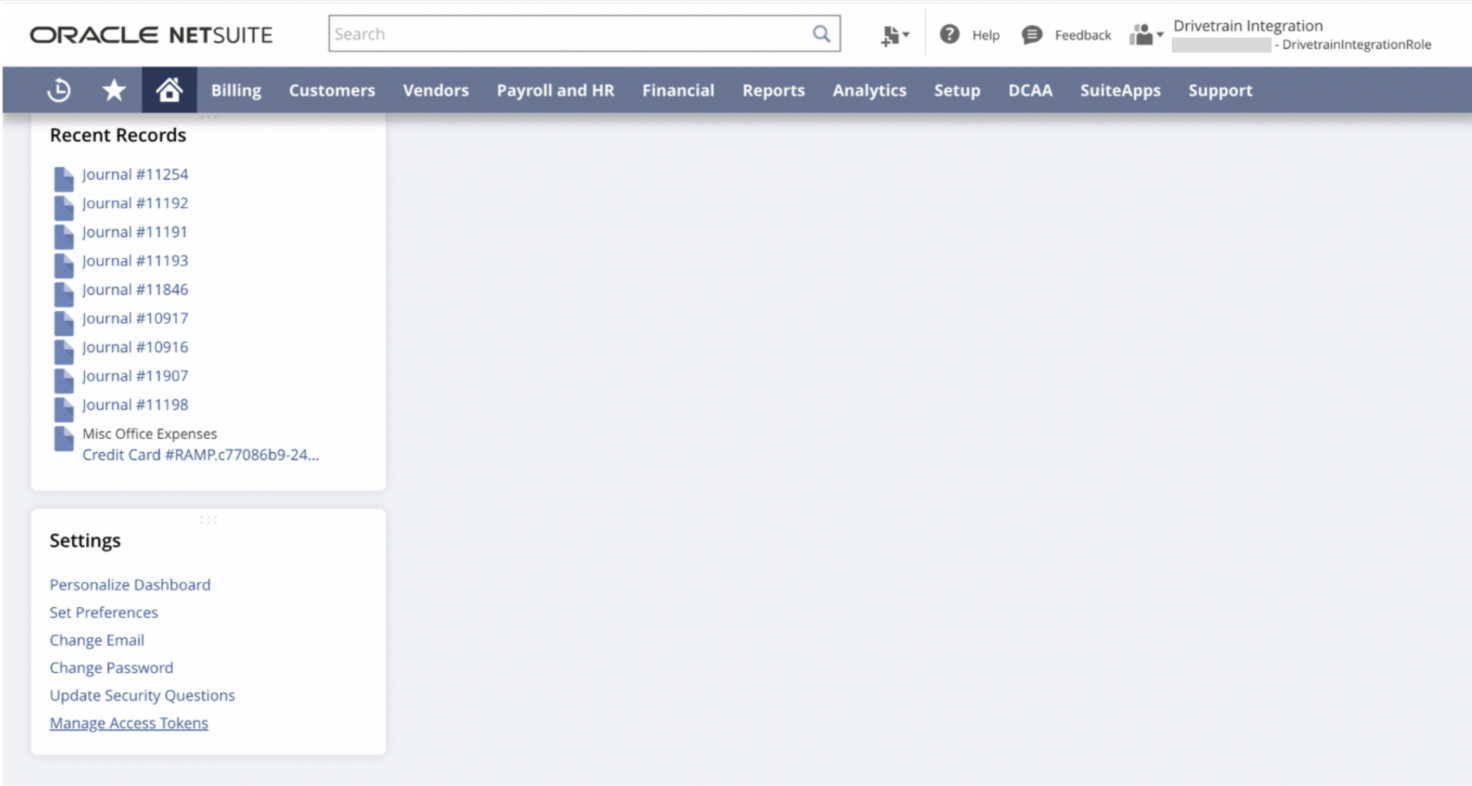
* Click the **Home** icon

* On the left side, under the Home section, scroll to the bottom.
* Click **Manage Access Tokens.**

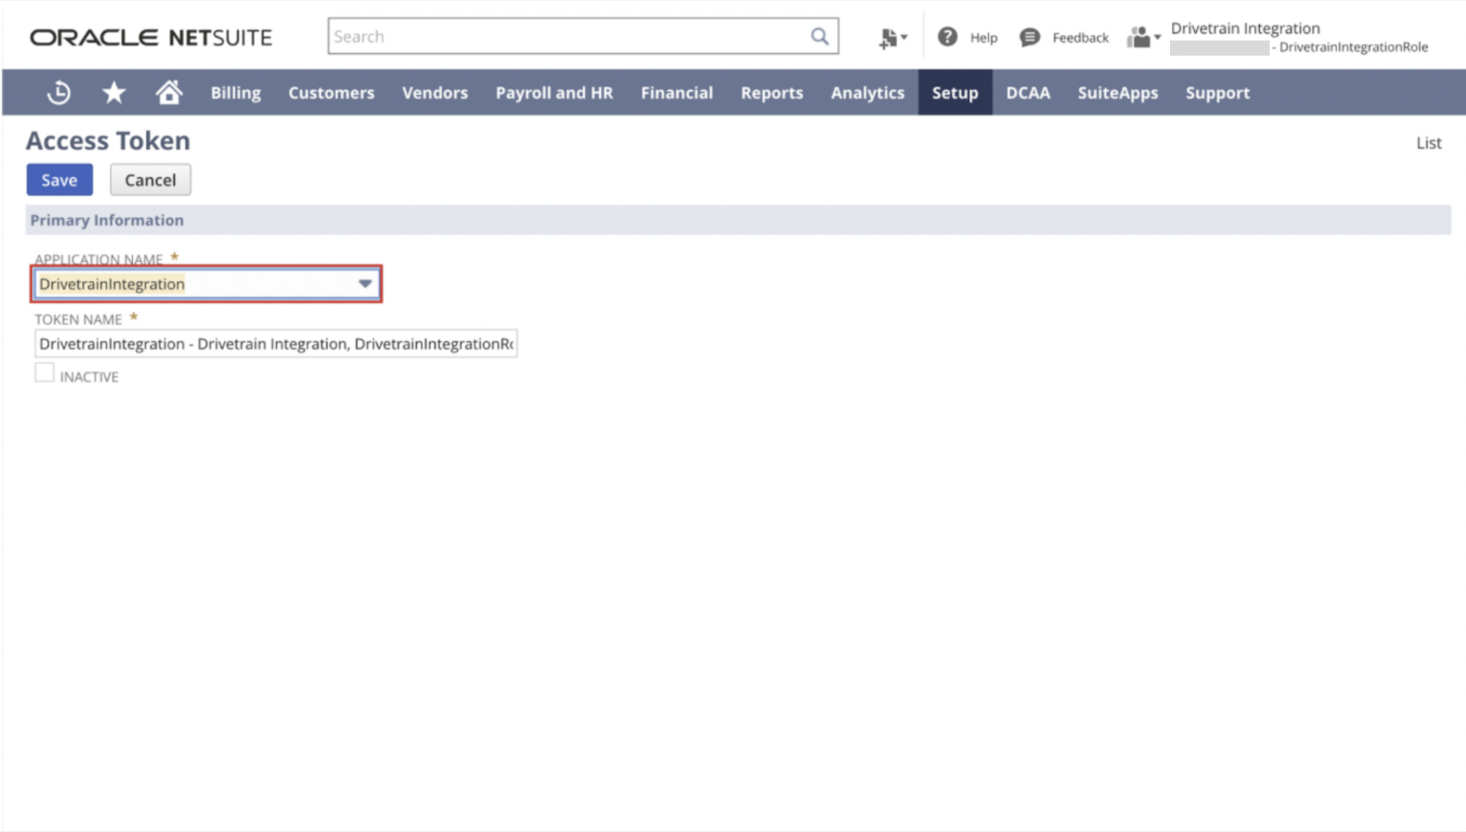
* Click **New My Access Token.**

* In the dropdown list for **APPLICATION NAME**, select the integration you created in **Step 3**

Click **Save** and scroll down to the bottom of the page to get the:
* **Token ID**
* **Token Secret**

{% hint style="info" %}
Please make note of both items in the same secured doc, as they will be required later and will not be accessible once you go to another page.
{% endhint %}
#### Step 5: Get Account ID
* From the menu bar, navigate to **Setup** → **Company** → **Company** **Information.**

You will find the **Account ID** here. Please note it down in the same document where you note the credentials generated in last two steps.
{% hint style="info" %}
This completes your NetSuite setup for standard objects. Below are the steps for setting up saved search, we recommend you to finish this as well if you need to pull data from saved search in future. If you have any questions or run into any issues with this part of the integration process, please contact your customer success manager for assistance.
{% endhint %}
#### Step 6: Set up NetSuite Saved Search
1. Download the Script from and unzip it.
2. To install the script, navigate to **Customization** > **Scripting** > **Scripts** > **New**. You'll see the Upload Script File form.

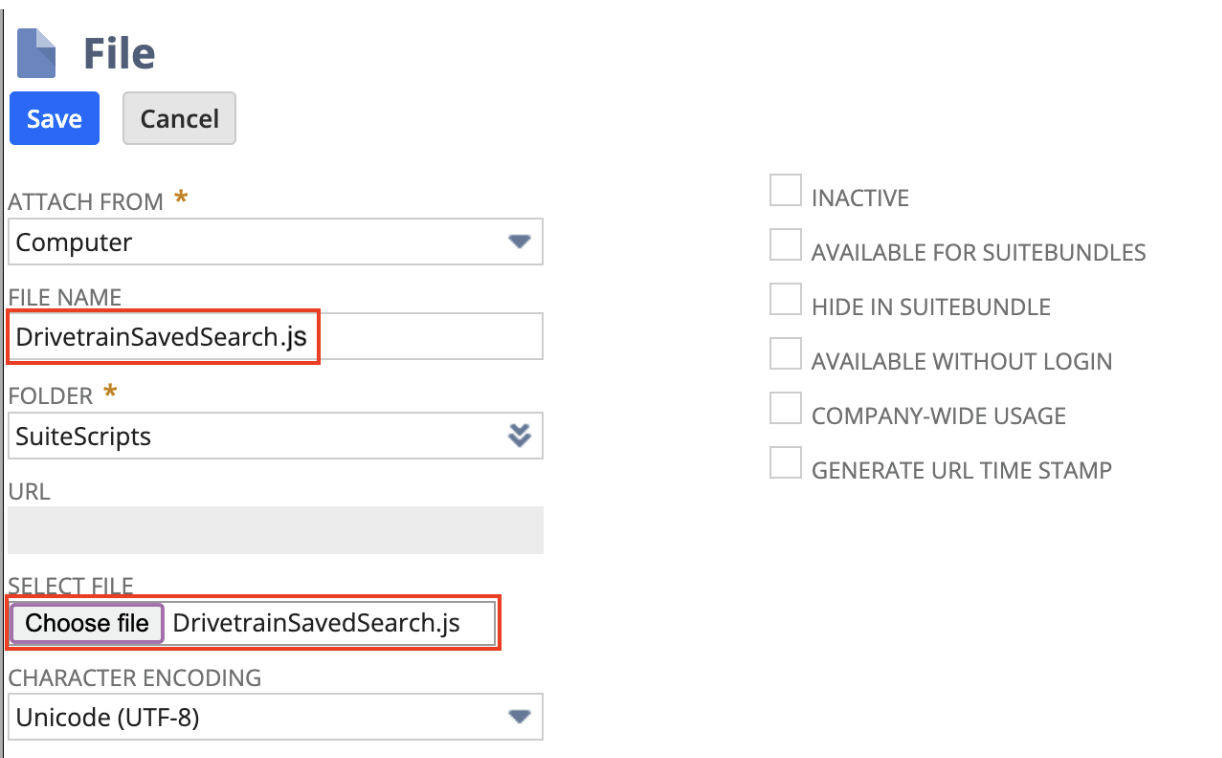
3. Hover over the Script File field, and you'll see a "**+"** button appear to the right of the field. Click the button and the File upload form will appear.

4. By default, the script will be uploaded to SuiteScripts folder in your File Cabinet (or to the last folder that you uploaded a script to). If you'd like to install the script in an alternative folder, select it from the Folder field.
5. Next, click the **Choose File** button in the Select File field. Then navigate to the folder that you unzipped the file to, and select the file.
6. Then click the **Save** button. The file will be uploaded, and then the Upload Script File form will reappear, with the Script File field loaded.

7. Upon saving, the script file will be populated in the Upload Script File form and then click on **Create Script Record** button. The Script form will appear.

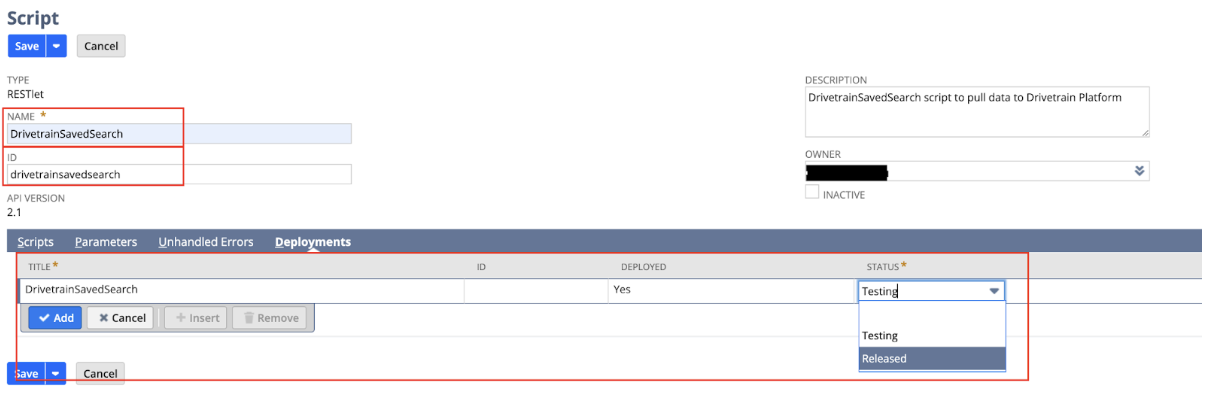
8. In the script form, enter **Name** as "**Drivetrain Saved Search**" and **ID** as "**drivetrainsavedsearch**" Click on the **Deployments** tab, and enter the Title as "DrivetrainSavedSearch\*\*"\*\*.
9. Mark the status as **Released**.

10. Click **Save** to finish the installation process.
11. After saving, click on the Deployment title to view the Script Deployment Form

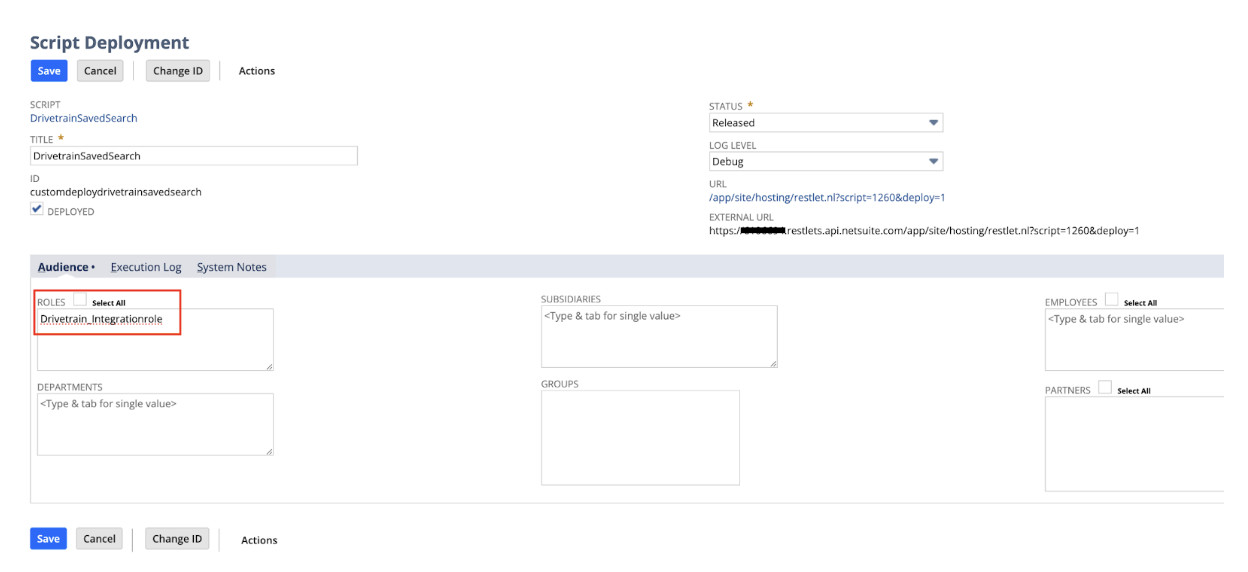
12. Click on the deployed script and on the next page, make a note of **External URL**.

13. Edit the Script Deployment and update the role for the script (which you created for "Drivetrain Integration" user). In this case, we have used role as "Administrator" for the user in Step 2. Click on **Save**

14. Go back to **Home** and on the navigation bar under the Documents section, select **Files** > **File Cabinet** > **New**

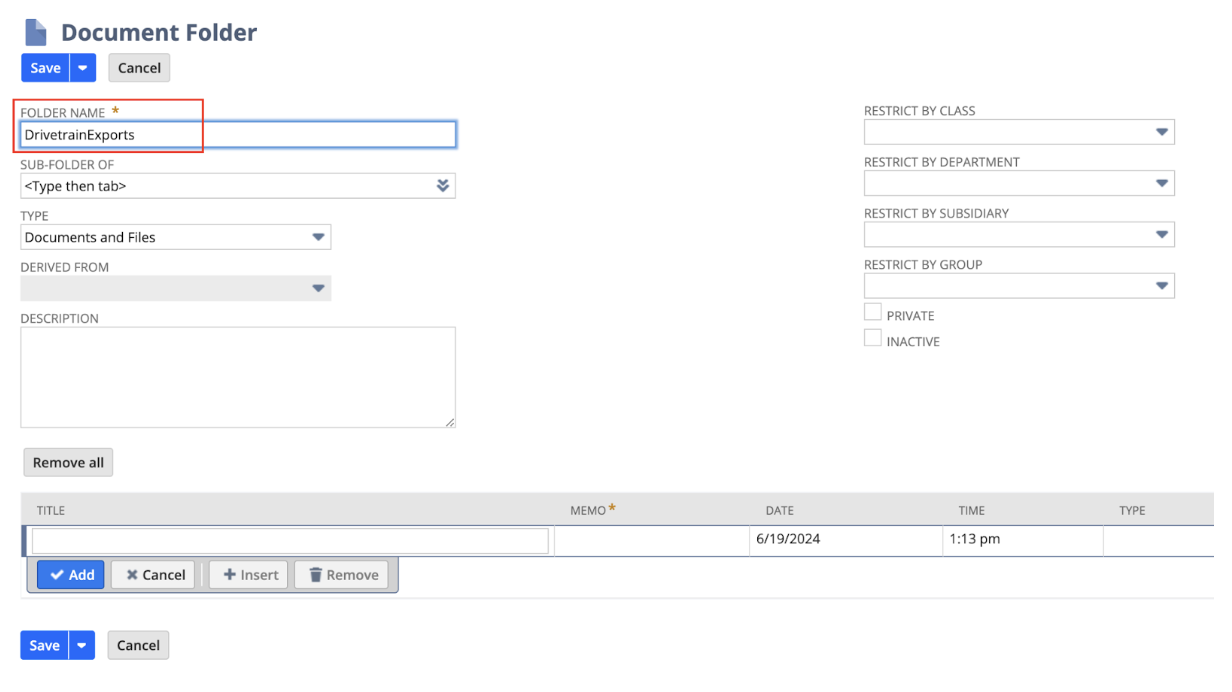
15. Add a folder “DrivetrainExports” in the root of File Cabinet and click **Save**.

### Drivetrain Setup
#### Step 1: Navigating to the NetSuite connector
* Sign in to your Drivetrain instance. Make sure you are logged in as an administrator.
* Click on **+ Add Data Source.**

* Select the NetSuite Data Connector from the list of integrations.

#### Step 2: Entering credentials
* Enter the keys, secrets and account ID you generated when setting up your NetSuite account, and click **Connect**
* **Consumer Secret**
* **Consumer Key**
* **Account ID**
* **Token Key**
* **Token Secret**

* You will be redirected to the **Data** page where you will be able to see your new NetSuite connection.
Once the sync is complete, you will be able to see your NetSuite data on Drivetrain!

#### Step 3: Add Saved Search (optional)
{% hint style="info" %}
After the data sync for standard objects is complete, you may proceed to pull saved searches.
This step is optional—customers who do not wish to retrieve data from saved searches can simply skip it.
**Important: Below are some Prerequisites for Saved Search addition**
Access for saved search should be **Public**
External URL generated in Step 6 of the NetSuite setup must be shared before proceeding, If you skipped that step, please complete it before adding any saved searches.
{% endhint %}
* On top left corner on the data page for NetSuite connector, click **Add Saved Search**

* Enter the Saved Search Id and display name you want to have for the dataset. You can get saved search ID from the saved search URL. For example, if your saved search URL is then your id is 884.

* Click on **Create** and once the sync is complete, you will be able to see the saved search dataset.
#### Access to NetSuite Interface
{% hint style="info" %}
If you have connected NetSuite with your account, instead of creating one for Drivetrain — in those cases, we will need Read access shared to a Drivetrain account. We need this access to run some internal data quality process. If you have any questions or run into any issues with this part, please contact your customer success manager for assistance.
{% endhint %}
# Integrating with Odoo
### Prerequisites
To connect **Odoo to Drivetrain**, you need:
* An **active Odoo account** with admin permissions
#### Step 1: Create a Dedicated User for Drivetrain in Odoo
* Log in to **Odoo** as an **Admin**
* Go to **Settings → Users → Manage Users**
* Click **New**
* Fill in the required user details
* **Email**: Use the email ID shared by your Drivetrain implementation team
* Go to the **Access Rights tab**
* Assign appropriate access based on the data Drivetrain needs
* Click **Save**
* An **invitation email** is sent automatically
* The user must accept the invite and set a password to activate the account
{% hint style="info" %}
Use **Internal User (required for API access)**
{% endhint %}
{% hint style="info" %}
**User Type** can be chosen on the **Manage Users page** by clicking on the search bar, and then setting a filter for either **Internal User** or **Portal User.**
{% endhint %}
#### Step 2: Generate Consumer Key and Consumer Secret (OAuth)
* Ensure your Odoo instance is configured for a **single database** (database filter enabled)
* Log in as an **Admin**
* Go to **Settings → Users → Users**
* Open the **Drivetrain user** created in [Step 1](#step-1-create-a-dedicated-user-for-drivetrain-in-odoo)
* Click **OAuth Applications**
* Click **Register an Application**
* Use the following **Redirect URI:**
* Click **Save**
* Copy the generated:
* **Consumer Key**
* **Consumer Secret**
#### Step 3: Share Details with Drivetrain
Share the following with your Drivetrain team via a **secure document:**
* **Odoo subdomain** (from your login URL)
* **Consumer Key**
* **Consumer Secret**
# Integrating with QuickBooks
Connect QuickBooks to Drivetrain quickly—no provisioning or support required.
You can connect your **QuickBooks** account to Drivetrain in just a few steps. This guide is designed for QuickBooks admins, including those who may not be familiar with Drivetrain. You can complete the setup on your own.
### Prerequisites
Before you begin, make sure you have:
* An active **QuickBooks account** with **Company Admin** privileges
* **Admin Access to Drivetrain** with permission to add data sources
{% hint style="info" %}
You can use either your own QuickBooks account or a shared company account. Make sure you're logged into both **QuickBooks** and **Drivetrain** in the **same browser window** before starting authentication.
{% endhint %}
{% hint style="warning" %}
Only a **Quickbooks Company Admin** can complete this integration. This is a **QuickBooks restriction** for all third-party API connections.
{% endhint %}
### Connecting Quickbooks to Drivetrain
#### Step 1: Start a New Connection in Drivetrain
1. Go to the **Data page** in Drivetrain
2. Click **+** in the top-left corner to connect a data source.
3. Select **QuickBooks** from the list of available integrations
4. Click **Connect to Quickbooks →**
#### Step 2: Log In to QuickBooks
1. You’ll be redirected to the **QuickBooks login page**
2. Sign in using your **QuickBooks admin account credentials**
3. If prompted, complete the **Multi-Factor Authentication** steps
{% hint style="warning" %}
If your **QuickBooks account** has access to **multiple companies**, you’ll be prompted to select one during setup. To connect another company, complete the setup for the first one, then return to **Step 1** and repeat the process.
{% endhint %}
#### Step 3: Complete the Integration
After logging into your QuickBooks account, you’ll be redirected back to Drivetrain.
* The sync will begin automatically, and a **“Sync in progress”** message will appear at the top of the page.
* During the sync, you may briefly see a list of tables being processed.
* Once complete, Drivetrain standard datasets for QuickBooks—**Account**, **General Ledger**, and **Trial Balance**—will appear, and the data will be ready for use.
{% hint style="info" %}
The syncing process continues automatically after authentication.
{% endhint %}
### Troubleshooting
The sync started, but I don’t see any datasets.
Syncing can take between **30 to 120 minutes**, depending on the **volume of your data**. After waiting a while, refresh the page. If datasets still don’t appear, try reconnecting QuickBooks.
Datasets are showing, but some tables are missing.
Ensure that the QuickBooks account has access to all company modules (e.g., Invoices, Bills, Chart of Accounts). If certain modules are restricted or not enabled in QuickBooks, their corresponding datasets won’t appear in Drivetrain.
Nothing’s working. Can someone from Drivetrain help?
You can also reach out to your Drivetrain integration partner for assistance—they’ll guide you through the connection process and request temporary access if needed for validation. [View steps to grant access.](/integration-guide/readme/accounting-and-erp/integrating-with-quickbooks/grant-temporary-access-to-quickbooks)
# Grant temporary access to QuickBooks
Steps to grant Drivetrain temporary access to QuickBooks.
In some cases—such as bug **troubleshooting** or **connection errors**—you may be asked to grant the **Drivetrain team** temporary access to your QuickBooks account. This allows us to log in and investigate issues directly from the QuickBooks UI.
{% hint style="warning" %}
Use this flow only if requested by Drivetrain support. Most customers will not need to follow these steps.
{% endhint %}
This guide explains how to provision a temporary user with admin access that can be revoked once support is complete.
#### Step 1: Add a New Admin User in QuickBooks
1. Log in to your **QuickBooks account** using an existing **admin account**
2. Click on **Settings** in the top right
3. Select **Manage Users**
4. Click **Add User**
#### Step 2: Enter the Drivetrain User Details
1. Set the user’s **first name** to `Drivetrain` and **last name** to `AI`
2. Use the **email address** shared by your Drivetrain Customer Success Manager: This will typically follow the format: `dp-[customername]@drivetrain.ai`
3. Click **Send invite**
4. If prompted, complete the **Multi-Factor Authentication** steps
#### Step 3: Notify the Drivetrain Team
Once the invite has been sent, **notify** your **Drivetrain POC**. A team member will accept the invitation and proceed with the troubleshooting.
#### Step 4: Revoke Access After Resolution (Optional)
You can remove the temporary user after the issue is resolved:
1. Return to **Manage Users**
2. **Locate** the Drivetrain user
3. Click **Delete** or **Remove Access**
{% hint style="warning" %}
This temporary access method gives Drivetrain team members **front-end visibility** into your QuickBooks account. We recommend using it only when required and revoking access once the issue is resolved.
{% endhint %}
# Re-authentication of QuickBooks
If your QuickBooks sync is failing due to expired credentials, a deactivated account, etc. you will need to re-authenticate the connection.
Once re-authentication is complete, your QuickBooks connector will resume syncing automatically.
#### Prerequisites
Before you begin, make sure you have:
* An active **QuickBooks account** with **Organization Admin permissions**
* Your **QuickBooks login credentials**
#### Step 1: Open the QuickBooks Integration in Drivetrain
When a QuickBooks connector has failed, you can re-authenticate the connection in the following way:
1. Click on the **Overflow Menu** (3 dots) beside the connector, and select **Edit credentials**.
2. Click on **Connect to QuickBooks** in the window that appears.
#### Step 2: Log In to QuickBooks as an Admin
1. On the QuickBooks login page, enter your **email ID** and **password** for an Organization Admin account.
{% hint style="info" %}
Re-authentication must be completed using the Organization Admin email ID. A standard user or non-admin role will not have sufficient permissions to re-authorize the connector.
{% endhint %}
#### Step 3: Verify Your Identity
1. When prompted by QuickBooks, verify your identity using either your **passkey** or **password**.
{% hint style="warning" %}
If you have multiple QuickBooks instances connected to Drivetrain, make sure you are logging in with the correct instance that matches the data source you are updating. Logging in with a different instance will not restore the original connection.
{% endhint %}
#### Step 4: Complete Re-authentication
1. Once verification is successful, you will be automatically redirected back to Drivetrain.
2. The QuickBooks connector will refresh, and the sync will start automatically.
#### Troubleshooting
If re-authentication does not complete successfully, check the following:
* Confirm that you used the **Organization Admin email ID** during login.
* If you have multiple QuickBooks instances, confirm that you logged in with the instance that matches the Drivetrain data source you are updating.
#### Still Stuck? We Can Help.
If you are unable to re-authenticate QuickBooks after following all the steps above, reach out to your Drivetrain onboarding partner or Customer Success Manager.
{% hint style="info" %}
Include a short description of the step where the flow stopped, along with a **screenshot** of any error message. The Drivetrain team will help you troubleshoot and guide you through the next steps.
{% endhint %}
# Integrating with Ramp
Drivetrain connects to Ramp using OAuth client credentials (a **Client ID** and **Client Secret**) generated from a developer app in your Ramp account. To set up this integration, you will create a developer app, enable the Client Credentials grant, assign the required read scopes, and share the credentials with Drivetrain. This guide covers the above-mentioned steps in detail below.
### Prerequisites
To connect Ramp to Drivetrain, you need:
* An active **Ramp** account with **Admin** access to the Ramp dashboard.
* Permission to create developer apps in Ramp (**Company → Developer**).
* **Admin** privileges in Drivetrain.
### Ramp Setup
#### Step 1: Create a developer app
1. Log in to your Ramp account as an **Admin**.
2. Go to **Company → Developer**.
3. Click **Create New App**.
4. Name your app (e.g., "**Drivetrain Integration**") and accept the **Terms**.
#### Step 2: Add the grant type and scopes
1. Under **Grant types**, click **Add new grant type** and select **Client Credentials**.
2. Under **Scopes**, click **Configure allowed scopes** and select the read scopes required for Drivetrain.
* At a minimum, enable **transactions:read**.
* Confirm the full list of scopes with your Drivetrain Customer Success Manager or Solutions Consultant, based on the Ramp data you want to sync (for example: transactions, reimbursements, bills, cards, users, and departments).
{% hint style="info" %}
**Note:** Drivetrain only reads data from Ramp. Select read scopes (`...:read`) only — no write scopes are required.
{% endhint %}
#### Step 3: Copy your Client ID and Client Secret
1. Copy the **Client ID** and **Client Secret**.
2. Store them securely in a document — you will share them with Drivetrain, and the **Client Secret is shown only once**.
{% hint style="info" %}
**Note:** If you lose the Client Secret, you can generate a new one from the app's page in **Company → Developer**.
{% endhint %}
#### Step 4: Note your environment
Identify which Ramp environment you are connecting:
* **Production** — API base URL: `https://api.ramp.com`
* **Sandbox (demo)** — API base URL: `https://demo-api.ramp.com`
Most integrations use **Production** unless you are connecting a sandbox for testing.
### Drivetrain Setup
#### Add the Ramp connector
1. Sign in to your Drivetrain instance. Make sure you are logged in as an administrator.
2. On the **Data** page, click **+ Add Data Source**.
3. Select the **Ramp** Data Connector from the list of integrations.
4. Enter the Client ID and Client Secret you generated, then click Submit. (The connector form has two fields — no environment selector.)
5. You will be redirected to the **Data** page where you will be able to see your new Ramp connection.
6. Once the sync is complete, you will be able to see your Ramp data on Drivetrain!
{% hint style="info" %}
If you have any questions or run into any issues during the integration process, please contact your customer success manager for assistance.
{% endhint %}
# Integrating with Rillet
This guide walks you through the steps required to connect your Rillet instance with Drivetrain. The process is simple and requires minimal setup on your end.
### Prerequisites
Before you begin, ensure that:
* You have an active Rillet account.
* You have access to your Rillet Account Manager or Customer Success representative.
### Step 1: Request API Credentials From Rillet
To enable the **Rillet → Drivetrain integration**, Rillet must issue:
* API Key
These credentials can only be generated by Rillet and must be requested through your Rillet Account Manager.
Ensure API access to AT LEAST the following objects:
* Accounts
* BankAccounts
* BookPeriods
* Customers
* Fields
* Invoices
* JournalEntries
* Organizations
* Products
* Subsidiaries
* Vendors
#### How to generate your Rillet API Key
Once Rillet has enabled API access for your organization, you can create and manage the key yourself:
1. Sign in to **Rillet** and open **Organization Settings → API Access** ([app.rillet.io/settings/api-access](http://app.rillet.io/settings/api-access)).
2. Click **Create New API Key**.
3. Give the key a recognizable name, e.g. **"Drivetrain Integration"**.
4. Confirm the key has access to at least the objects listed above.
5. **Copy the API Key** and store it securely — you will paste it into Drivetrain in the next section. The key is sent as a Bearer token and does not expire.
{% hint style="info" %}
**Reference:** Rillet — Getting Started:
{% endhint %}
### Drivetrain Setup
After obtaining your Rillet API Key (above), connect Rillet as a data source in your Drivetrain instance. You must be a **Drivetrain administrator** to add a data source.
#### Step 1: Go to the Data page and add a data source
1. Sign in to your Drivetrain instance as an administrator.
2. In the left navigation, click **Data**.
3. At the top of the data sources panel, click the **+** (Add data source) button.
#### Step 2: Select the Rillet connector
1. In the **Connect a datasource** window, search for **Rillet** (or open the **Accounting & ERP** category).
2. Click the **Rillet** connector card.
#### Step 3: Enter your Access Token
On the **Connect your Rillet account** screen, set up a new Rillet connection:
1. **Access Token** — paste the **Rillet API Key** you generated above.
2. Click **Submit**.
{% hint style="info" %}
Drivetrain connects to Rillet through Rillet's Snowflake. If prompted, ask your Rillet representative to enable data sharing with the Drivetrain team.
{% endhint %}
#### Step 4: Finish setup
1. Once the token is validated, the connection is created and you are returned to the **Data** page.
2. **Rillet** now appears in your list of connected data sources and begins syncing.
3. When the sync completes, your Rillet data is available across Drivetrain.
{% hint style="info" %}
If you have any questions or run into any issues during setup, please contact your customer success manager for assistance.
{% endhint %}
# Integrating with Sage Intacct
### Connecting Sage Intacct
[Prerequisites](#prerequisites-1)
[Sage Intacct Setup](#sage-intacct-setup)\
[Step 1: Enable web services](#step-1-enable-web-services)\
[Step 2: Create a web services user account](#step-2-create-a-web-services-user-account)\
[Step 3: Assign a role to the web services user](#step-3-assign-a-role-to-the-web-services-user)\
[Step 4: Authorize the sender ID](#step-4-authorize-the-sender-id)\
[Step 5: Enable Auditing of Transactions](#step-5-enable-auditing-of-transactions)\
[Step 6: Create Another User for Frontend Access](#step-6-create-another-user-for-frontend-access)\
[Step 7: Share primary reports and account groups](#step-2-create-a-web-services-user-account)
[Drivetrain Setup](#drivetrain-setup)\
[Step 1: Go to the Data page and add a data source](#step-1-go-to-the-data-page-and-add-a-data-source)\
[Step 2: Select the Sage Intacct connector](#step-2-select-the-sage-intacct-connector)\
[Step 3: Enter your Sage Intacct credentials](#step-3-enter-your-sage-intacct-credentials)\
[Step 4: Finish setup](#step-4-finish-setup)
#### Prerequisites
To connect Sage Intacct to Drivetrain, you need:
* An active Sage Intacct admin account.
* An active web services developer license with sender ID and password provisioned by Sage Intacct.
{% hint style="info" %}
Please contact your Sage Intacct account manager to get your developer license, which includes your Sender ID and Sender Password.
{% endhint %}
### Sage Intacct Setup
#### **Step 1: Enable web services**
1. In your Sage Intacct Account, navigate to **Company > Admin.**
2. Next click on **Subscriptions.**
3. In the **Applications** tab, set the **Web Services** toggle to ON.
#### **Step 2: Create a web services user account**
{% hint style="info" %}
As Web Services users are programmatic users and never log in to the UI, both single-sign on and multi-factor authentication are automatically disabled for them, and can access Sage Intacct API using Web Services only. You can read more about these users [here](https://www.intacct.com/ia/docs/en_US/help_action/Administration/Users/web-services-only-users.htm?cshid=Web_services_users).
{% endhint %}
1. Go to **Company > Admin > Users, roles, and groups**, then select the **+** sign beside **Web services users**.
2. Enter a unique **User ID.**
3. Enter the **Username** as “Drivetrain Integration”.
4. Enter the user's **Account email address** as shared by your Drivetrain customer success manager.
5. Select the **User Type** as **Business.**
6. Select the **Admin Privileges** as **Full.**
7. Do not choose any contact in contact name, a new contact name will be automatically generated for the user.
8. **Save** your changes.
9. When the **Verify your identity** pop-up appears, enter your own password as verification of your identity.
#### **Step 3: Assign a role to the web services user**
1. Navigate to **Company > Admin > Roles**.
2. Edit the user you created in the step above and create a new role for them.
3. Add permissions for all the data you want to share with Drivetrain.
#### **Step 4: Authorize the sender ID**
1. Go to **Company > Setup**.
2. In the **Configuration** section, click **Company**.
3. In the company information window, go to the **Security** tab.
4. Next click **Edit**.
5. In the **Web services authorizations** section, click **Add**.
6. In the **Sender ID** field, enter your Sender ID (as shared by your Sage Intacct account manager).
#### **Step 5: Enable Auditing of Transactions**
To capture deleted transactions in Sage, auditing must be enabled as below:
1. Go to **General Ledger** > **Setup** > **Configurations.**
2. Select the **Enable auditing of transactions posted from subledgers** checkbox.
3. Please enable below scopes for capturing complete deleted records:
1. **Platform Services > Custom reports: "List, View"**
2. if you’re using Interactive Custom Reports, **Platform Services > Interactive Custom Reports**
{% hint style="info" %}
Store these Credentials carefully:
* Company ID
* User ID
* Login Password
* Sender ID
* Sender Password
{% endhint %}
#### **Step 6: Create Another User for Frontend Access**
{% hint style="info" %}
Frontend access is needed for the period of onboarding to be able to quality-check numbers.
{% endhint %}
1. From **Settings**, select **User Management**.
2. Select **Invite User**.
3. Enter the email address received in Point 4 of Step 2, then **Save**.
4. Select the level of access you want your user to have.
5. **Save** the changes.
#### **Step 7: Share primary reports and account groups**
1. Share the primary reports (**3 Statements**) from Sage to be used during the implementation phase.
2. Share the account groups (hierarchy of accounts) to be pulled in Drivetrain
***
### Drivetrain Setup
After completing the Sage Intacct setup above, connect Sage Intacct as a data source in your Drivetrain instance. You must be a **Drivetrain administrator** to add a data source.
#### Step 1: Go to the Data page and add a data source
1. Sign in to your Drivetrain instance as an administrator.
2. In the left navigation, click **Data**.
3. At the top of the data sources panel, click the **+** (Add data source) button.
#### Step 2: Select the Sage Intacct connector
1. In the **Connect a datasource** window, search for **Sage** (or open the **Accounting & ERP** category).
2. Click the **Sage Intacct** connector card.
#### Step 3: Enter your Sage Intacct credentials
On the **Connect your Sage Intacct account** screen, set up a new Sage connection by entering the five credentials, then click **Submit**:
1. **Company Id**
2. **User Id**
3. **Login password**
4. **Sender Id**
5. **Sender password**
#### Step 4: Finish setup
1. Once the credentials are validated, the connection is created and you are returned to the **Data** page.
2. **Sage Intacct** now appears in your list of connected data sources and begins syncing.
3. When the sync completes, your Sage Intacct data is available across Drivetrain.
{% hint style="info" %}
If you have any questions or run into any issues during setup, please contact your customer success manager for assistance.
{% endhint %}
# Integrating with Tally
[Connect your virtual machine to Drivetrain](#connect-your-virtual-machine-to-drivetrain)\
[Step 1: Enable NodeJS](#step-1-enable-nodejs)\
[Step 2: Enable Tally as Server](#step-2-enable-tally-as-server)
[Configure NodeJS script](#configuring-nodejs-script)
### Connect your virtual machine to Drivetrain
#### Step 1: Enable NodeJS
1. Install NodeJs using [this](https://nodejs.org/dist/v20.10.0/node-v20.10.0-x64.msi) link.
2. Open **command prompt** in your virtual machine.
3. Download the Tally script provided to you by your Drivetrain customer success manager.
#### Step 2: Enable Tally as Server
1. Open Tally and press **F1 → Settings → Connectivity**.
2. Select **Client/Server configuration**.
3. Choose the configuration as **Both**.
4. **Restart** Tally to apply the changes.
5. Now open your browser and go to **localhost:9000**. The below screen should appear.
### Configuring NodeJs Script
1. Open the config.json file and change the following fields:
1. schema
2. fromdate
3. todate
2. Add the Bigquery credentials to the json file as provided by your Drivetrain customer success manager.
3. **Execute** run.bat file.
{% hint style="info" %}
That’s it! Let your customer success manager know so they can get started!
{% endhint %}
# Integrating with Xero
Connect Xero to Drivetrain quickly—no provisioning or support required.
You can connect your Xero account to Drivetrain in just a few steps. This guide is designed for Xero admins, including those who may not be familiar with Drivetrain. No back-and-forth or user provisioning is required—you can complete the setup on your own.
### Prerequisites
Before you begin, make sure you have:
* An **active Xero account** with **Standard** or **Advisor permissions** (Org Admin recommended)
* Your **Xero login credentials**
* **Admin Access to Drivetrain** with permission to add data sources
* Access to **Multi-Factor Authentication (MFA)**, if enabled on your Xero account.
{% hint style="info" %}
You can use either your own Xero account or a shared company account. Make sure you're logged into both **Xero** and **Drivetrain** in the **same browser window** before starting authentication.
{% endhint %}
### Step 1: Start a New Connection in Drivetrain
1. Go to the **Data page** in Drivetrain.
2. Click **+** in the top-left corner to connect a data source.
3. Select **Xero** from the list of available integrations.
4. Click **Login to connect →**
### Step 2: Log In to Xero
1. You’ll be redirected to the **Xero login page**
2. Sign in using your **Xero account credentials**
3. If prompted, complete the **Multi-Factor Authentication steps**
### Step 3: Choose the Organization to Connect
If your Xero login is linked to multiple organizations, you’ll be asked to select one
* **Choose the organization** you want to sync with Drivetrain
* Each organization must be **connected separately**
{% hint style="info" %}
Xero treats each company as a **separate dataset**. To connect **multiple companies**, you’ll need to create a **separate Xero connection** for each one in Drivetrain.
{% endhint %}
### Step 4: Complete the Integration
After successfully logging in:
1. You’ll be **redirected** back to Drivetrain
2. Your **Xero connection** will appear on the Data page
3. Once the **sync completes**, your Xero data will be available in Drivetrain
{% hint style="info" %}
The syncing process continues automatically after authentication.
{% endhint %}
### Troubleshooting
If you encounter issues connecting your account:
* Confirm that you’re using an Org Admin (or equivalent) login.
* Check that your browser allows pop-ups from Drivetrain.
* Ensure MFA codes are entered, if prompted.
### Still stuck? We can help.
If you’re unable to connect Xero to Drivetrain after completing the steps above, reach out to your Drivetrain onboarding partner. In most cases, no additional configuration is required.
{% hint style="info" %}
Include a **screenshot** or **brief description** of the error message. We'll help you troubleshoot and guide you through next steps.
{% endhint %}
### Need to Grant Temporary Access?
In **rare cases**—such as **data inconsistencies** or **bug investigations**—your Drivetrain team may request temporary access to your Xero account.
**View:** [Grant temporary access to Xero](/integration-guide/readme/accounting-and-erp/integrating-with-xero/grant-temporary-access-to-xero)
This is not required for setup or general connection issues.
### FAQs Where can I check the connection status for Xero?
1. Go to Data page
2. In the **Data sources** section, the connection status for each data source is displayed
3. If the Xero connection is inactive, an error message is displayed\

4. If the Xero connection is active and working fine, a **Connected** message is displayed\

How can I disconnect a Xero instance from Drivetrain?
1. Go to the Data page
2. Click on **Xero** under the **Data sources** section
3. Click on the vertical ellipsis on the top right and select **Remove**
4. Click **Delete** on the **Delete data source** warning popup to confirm both disconnection of Xero and deleting all Xero data from Drivetrain
How often does Xero data get synced with Drivetrain?
Xero data is automatically synced every 24 hours
You can also manually sync Xero data. Click on the **Resync** icon, select the Xero instances you wish to sync and click **Sync**.
What data does the Xero integration bring into Drivetrain?
The Xero connector automatically syncs the following objects into Drivetrain:
* Chart of Accounts
* Bank Transactions
* Bank Transfers
* Contacts
* Credit Notes
* Invoices
* General Ledger Entries
* Payment Journals
* Manual Journal Entries
* Overpayment Records
* Payment Records
* Prepayment Records
# Grant temporary access to Xero
Steps to grant Drivetrain temporary access to Xero.
### Grant Temporary Access to Xero for Support
In some cases—such as bug troubleshooting or connection errors—you may be asked to grant the Drivetrain team temporary access to your Xero account. This allows us to log in and investigate issues directly from the Xero UI.
This guide explains how to provision a temporary user with sufficient access that can be revoked once support is complete. Use this flow only if requested by Drivetrain support. Most customers will not need to follow these steps.
### Step 1: Invite a New User in Xero
1. Log in to Xero with an **Org Admin** account.
2. From the **Organization** dropdown, select **Settings > Users**.
3. Click **Invite a User**.
4. Enter the user details:
* **First name:** Drivetrain
* **Last name:** AI
* **Email:** Use the address provided by your Drivetrain Customer Success Manager (typically `dp-{customername}@drivetrain.ai`).
5. Assign permissions:
* **Projects:** Admin
* **Business and Accounting:** Advisor (Org Admin is preferred for troubleshooting).
6. Click **Send Invite**.
### Step 2: Notify the Drivetrain Team
Once the invite has been sent, notify your Drivetrain point of contact. A team member will accept the invitation and proceed with the troubleshooting.
### Step 3: Revoke Access After Resolution (Optional)
You can remove the temporary user after the issue is resolved:
1. Return to **Users** in Xero.
2. **Locate** the Drivetrain user.
3. Click **Remove User**.
### Security Note
This temporary access method gives Drivetrain team members front-end visibility into your Xero account. We recommend using it only when required and revoking access once the issue is resolved.
# Re-authentication of Xero
If your Xero sync is failing due to expired credentials, de-activated account, etc. you will need to re-authenticate the connection.
Once re-authentication is complete, your Xero connector will resume syncing automatically.
#### Prerequisites
Before you begin, make sure you have:
* An active **Xero account** with **Org Admin permissions**
* Your **Xero login credentials**
#### Step 1: Open the Xero Integration in Drivetrain
When a Xero connector has failed, you can re-authenticate the connection in the following ways:
1. Click **Reconnect** on the pop-up that appears when you open the Xero integration.
2. If the pop-up does not appear, click on the **Overflow Menu** (3 dots) beside the connector, select **Edit credentials**
3. Click on **Login to connect →** in the window that appears.
Either option takes you into the Xero login flow.
#### Step 2: Log In to Xero as an Admin
1. On the Xero login page, sign in using an **Org Admin** account.
2. If prompted, complete the **Multi-Factor Authentication** steps.
{% hint style="info" %}
**Re-authentication** must be completed using an **Org Admin account.** A standard user or non-admin role will not have sufficient permissions to re-authorize the connector.
{% endhint %}
#### Step 3: Disconnect Existing Drivetrain Apps in Xero
Before you continue, you must disconnect any existing Drivetrain apps in your Xero settings. If you skip this step, re-authentication will fail because duplicate Drivetrain apps are already registered in Xero.
1. After logging in to your Xero account, locate the message at the bottom of the screen that reads: *"You can disconnect at any time by going to Connected Apps in your Xero settings."* Click the **Connected Apps** link within this message.
2. On the Connected Apps page, click **Disconnect** next to the Drivetrain app.
3. If you have multiple Drivetrain apps connected, you'll need to disconnect each one individually. Be sure to check all pages, as the list of connected apps may span multiple pages.
{% hint style="danger" %}
Re-authentication will not succeed until every Drivetrain app listed in Xero's **Connected apps** has been disconnected.
{% endhint %}
#### Step 4: Return to the Login Page and Select the organisation
After disconnecting the existing Drivetrain apps:
1. Return to the popup that appeared after logging in to Xero.
2. Sign in again with your Org Admin account, if you are prompted to.
3. Select the organization you want to reconnect with Drivetrain.
{% hint style="warning" %}
You must select the same organisation that was originally connected to Drivetrain for which the sync failed. If you select a different organisation, the connector will not be restored correctly.
{% endhint %}
If your Xero login is linked to multiple organisations (for example, USA, UK, or a parent entity), choose the exact organisation that matches the Drivetrain data source you are updating.
For example, if you are editing credentials for a data source labelled for **USA** in Drivetrain, you must select **USA** during Xero re-authentication.
#### Step 5: Allow Access and Complete Re-authentication
1. After selecting the correct organisation, click **Allow access** on the Xero authorization screen.
2. You will be redirected back to Drivetrain.
3. The Xero connector will refresh, and the sync will start automatically.
#### Troubleshooting
If re-authentication does not complete successfully, check the following:
* Confirm that you used an **Org Admin** account during login.
* Make sure **every** Drivetrain app in Xero's **Connected apps** list has been disconnected. Any leftover app will block the flow.
* Confirm that you selected the **same organisation** that is linked to the Drivetrain data source you are updating.
#### Still Stuck? We Can Help.
If you are unable to re-authenticate Xero after following all the steps above, reach out to your Drivetrain onboarding partner or Customer Success Manager.
{% hint style="info" %}
Include a short description of the step where the flow stopped, along with a **screenshot** of any error message. The Drivetrain team will help you troubleshoot and guide you through the next steps.
{% endhint %}
# Integrating with Zoho Books
[Prerequisites](#prerequisites)
[Zoho Books Setup](#zoho-books-setup)\
[Create a User](#create-a-user)
### Prerequisites
To connect Zoho Books to Drivetrain, you need:
* An active Zoho Books account
* Admin privileges on Zoho Books
* Admin privileges in Drivetrain
### Zoho Books Setup
Drivetrain can connect with Zoho Books using a **dedicated admin user account**. Follow these steps to create a user and assign a role to them.
#### Create a User
1. Log into your ZohoBooks account
2. Go to **Settings** > **Users & Roles**.
3. Click the **Invite User** in the top right corner of the page.
4. Enter the following details:
1. Email address (will be provided by your customer success manager)
2. Name - Drivetrain User
3. Role - Admin
4. Click **Save**
{% hint style="info" %}
That’s it! Inform your customer success manager so that they can get started!
{% endhint %}
# BI
Drivetrain integrates with 10+ BI tools. Right now, you can integrate the following tools directly by following the instructions provided below:
* [Looker](/integration-guide/readme/bi/integrating-with-looker)
* [Power BI](/integration-guide/readme/bi/integrating-with-power-bi)
* [Tableau](/integration-guide/readme/bi/integrating-with-tableau)
For other BI systems, contact your customer success manager to help you get them connected.
# Integrating with Looker
[Prerequisites](#prerequisites)
[Looker Setup](#looker-setup)\
[Step 1: Add a User](#step-1-add-a-user)\
[Step 2: Generate Credentials](#step-1-add-a-user-1)
### Prerequisites
To connect Looker to Drivetrain, you need:
* An active Looker account
* Admin privileges on Looker
* Admin privileges in Drivetrain
### Looker Setup
Drivetrain supports integration with Looker via API from a **dedicated user account**. To get started you would need to create a dedicated user on Looker for Drivetrain.
#### Step 1: Add a User
1. Login to your Looker account.
2. Navigate to the **Users** page which is in the **Users** section of the **Admin** menu. This lists all the user accounts on your Looker instance.
3. To add a user, click the **Add Users** button.
4. In the **Adding a new user** page, type or paste the email address shared by your customer success manager.
5. Provide the user with the default **Developer** role.
#### Step 2: Generate Credentials
Only admins can generate API3 Keys (required for integration). The steps to do so are as follows:
1. Navigate to the **Users** page which is in the **Users** section of the **Admin** menu. This lists all the user accounts on your Looker instance.
2. Navigate to our user and click the **Edit Keys** button. Click the **New API3 key** button to generate a new key.
3. Note the **Client ID**, **Client Secret** and **Subdomain** and share them with your customer success manager.
Documentation on this topic for your reference here.
{% hint style="info" %}
That’s it! Inform your customer success manager so that they can get started!
{% endhint %}
# Integrating with Power BI
Connect Power BI to Drivetrain using a Microsoft Entra ID service principal
Drivetrain connects to Power BI through a Microsoft Entra ID app registration that acts as a service principal. You register an app in Azure, grant it Power BI API permissions, enable a few Power BI tenant settings, give it access to the workspace you want to sync, and share three credentials, the Client ID, Tenant ID, and Client Secret, with Drivetrain.
**Note:** This is a read-only integration. The service principal only pulls data from Power BI into Drivetrain, nothing is written back.
## Prerequisites
To connect Power BI to Drivetrain, you need:
* Admin access to Microsoft Entra ID (Azure AD), to register an app and grant admin consent.
* Power BI (Fabric) admin access, to change tenant settings in the Power BI admin portal.
* A Power BI Premium Per User (PPU) license, or Premium or Fabric capacity, on the workspace. This is required for the Execute Queries API the integration uses.
* Admin access to the Power BI workspace you want Drivetrain to read.
## Registering an app in Microsoft Entra ID
This app registration is the service principal Drivetrain authenticates with.
### Step 1: Create the app registration
To create the app registration:
1. Sign in to the Azure portal at [portal.azure.com](https://portal.azure.com).
2. Go to **Microsoft Entra ID → App registrations → New registration**.
3. Enter a name, for example "Drivetrain BI Integration".
4. Under **Supported account types**, select **Accounts in any organizational directory (Multitenant)**.
5. Click **Register**. The app's **Overview** page opens.
### Step 2: Copy the Client ID and Tenant ID
On the app's **Overview** page, copy and save these two values in a secure document. You'll share them with Drivetrain:
* Application (client) ID
* Directory (tenant) ID
### Step 3: Add Power BI API permissions
1. In the app, go to **API permissions**.
2. Click **Add a permission → Power BI Service** and add the required Delegated permissions.
3. Click **Add a permission → Power BI Service** again and add the required Application permissions.
4. Click **Grant admin consent for {your organization}**, then click **Yes** to confirm. Every permission shows a green **Granted** status.
### Step 4: Create a client secret
1. Go to **Certificates & secrets → New client secret**.
2. Enter a description and choose an expiry.
3. Click **Add**.
4. Copy the secret's **Value**, not the Secret ID, and store it securely.
**Important:** The secret **Value** is shown only once. If you navigate away or refresh the page, it disappears and you have to create a new one.
You now have the three service principal credentials: Client ID, Tenant ID, and Client Secret.
## Enabling Power BI tenant settings
You must be a Power BI or Fabric administrator for this section. In Power BI, go to **Settings (⚙) → Admin portal → Tenant settings**, then enable the following (search each by name):
* **Integration settings → Dataset Execute Queries REST API**: enable, applied to the entire organization or to a security group that contains the app.
* **Developer settings → Allow service principals to use Power BI APIs**: enable.
* **Admin API settings → Service principals can access read-only admin APIs**: enable. This lets Drivetrain read workspace metadata.
* Optional: **Enhance admin APIs responses with detailed metadata**.
* Optional: **Enhance admin APIs responses with DAX and mashup expressions**.
**Tip:** You can scope each setting to a specific security group instead of the whole organization. If you do, add the service principal to that group.
**Important:** The workspace must be on Premium Per User (PPU), or Premium or Fabric capacity. Without it, the Execute Queries API doesn't work.
## Granting the service principal access to your workspace
1. Open the Power BI workspace you want Drivetrain to read.
2. Click **Manage access → Add people or groups**.
3. Search for your app registration by name (for example, "Drivetrain BI Integration") and select it.
4. Set the role to **Contributor**. This is required so the service principal can run queries. Click **Add**.
## Sharing credentials with Drivetrain
Share the following with your Drivetrain customer success manager, through a secure channel such as a password manager or an encrypted document:
* Client ID
* Tenant ID
* Client Secret
* The Power BI workspace name(s) you want Drivetrain to sync
## What happens next
* Drivetrain validates the credentials and workspace access.
* Drivetrain configures the sync based on the enabled permissions.
* You're notified once the integration is live, and your Power BI data becomes available across Drivetrain.
**Note:** If you have questions or run into issues during setup, contact your customer success manager.
# Integrating with Tableau
[Prerequisites](#prerequisites)
[Tableau Setup](#looker-setup)\
[Step 1: Create personal access token](#step-1-add-a-user)\
[Step 2: Find Subdomain and Site Name](#step-1-add-a-user-1)
### Prerequisites
To connect Tableau to Drivetrain, you need:
* An active Tableau account
* Admin privileges on Tableau
* Admin privileges in Drivetrain
### Tableau Setup
Drivetrain supports integration with Tableau via **Personal Access Token (PAT).** To get started you would need to create a token on Tableau for Drivetrain.
#### Step 1: Create personal access token
1. Login to your [Tableau Cloud account](https://sso.online.tableau.com/public/idp/SSO).
2. Go to the **Settings** page.
3. In the Personal Access Tokens (PAT) section, select the **Enable personal access tokens** option.
4. Select the users who can create new PATs on the site, below are the options:
1. To enable all users to create PATs, select the **All users on this site** option.
2. To limit the access of creating new PATs only to the users that are members of a group, select the **Only users in a specified group** option and then select a group from the drop-down menu. \[Recommended]
5. Set the expiration period of the token, below are the options:
1. Select the default option - 180 days.
2. In the **Custom days** field, specify a custom value \[Recommended, choose at least 365 days]
6. Click Save
7. Make a note of PAT Name and PAT Secret in a secured document, these will be needed to configure the integration on Drivetrain.
#### Step 2: Find Subdomain and Site Name
Find your Tableau subdomain and site name in your Tableau Cloud account URI and make a note of them.
For example, if your Tableau Cloud account URL is `https://test.online.tableau.com/#/yoursite/home`, your subdomain is `test` and your site name is `yoursite`.
{% hint style="info" %}
That’s it! Share the PAT Name, PAT Secret, Subdomain and Site with your Data Integrations Manager or Customer Success Manager to get started!
{% endhint %}
# Billing & Invoicing
Drivetrain integrates with 10+ Billing & Invoicing tools. Right now, you can integrate the following tools directly by following the instructions provided below:
* [Chargebee](/integration-guide/readme/billing-and-invoicing/integrating-with-chargebee)
* [Invoiced](/integration-guide/readme/billing-and-invoicing/integrating-with-invoiced)
* [Maxio Chargify](/integration-guide/readme/billing-and-invoicing/integrating-with-maxio-chargify)
* [Maxio SaaSOptics](/integration-guide/readme/billing-and-invoicing/integrating-with-maxio-saasoptics)
* [Recurly](/integration-guide/readme/billing-and-invoicing/integrating-with-recurly)
* [Stripe](/integration-guide/readme/billing-and-invoicing/integrating-with-stripe)
* [Subscript](/integration-guide/readme/billing-and-invoicing/integrating-with-subscript)
* [Tabs](/integration-guide/readme/billing-and-invoicing/integrating-with-tabs)
For other Billing & Invoicing systems, contact your customer success manager to help you get them connected.
# Integrating with Chargebee
[Prerequisites](#prerequisites)
[Chargebee Setup](#chargebee-setup)\
[Create an API key](#create-an-api-key)\
[Find Subdomain](#find-subdomain)
### Prerequisites
To connect Chargebee to Drivetrain, you need:
* An active Chargebee account
* Admin privileges on Chargebee
### Chargebee Setup
#### Create an API key
1. Login to your [Chargebee account](https://app.chargebee.com/login)
2. Navigate to **Settings > Configure Chargebee**
3. Scroll down to the **API Keys and Webhooks** section and Click **API Keys** tab
4. Click **Add API Key** to create a new API key
5. Select **Read-only Key**.
6. Select **All** and enter name as "**Drivetrain Integration**" for the API key, then click **Create Key**.
7. Find the API key you just created on the next page and make a note of it in a secure document
#### Find Subdomain
Find your account's subdomain in your Chargebee URL and make a note of it. For example, if your Chargebee URL is `https://drivetrain-test.chargebee.com`, then your subdomain is `drivetrain-test`.
{% hint style="info" %}
That’s it! Share the API key and Subdomain with your customer success manager or data integrations manager so that they can get started!
{% endhint %}
# Integrating with Invoiced
[Prerequisites](#prerequisites)
[Invoiced Setup](#invoiced-setup)\
[Add Webhook URL](#step-1-add-webhook-url)\
[Create an API Key](#step-2-create-an-api-key)
### Prerequisites
To connect Invoiced to Drivetrain, you need:
* An active Invoiced production account
* Admin privileges on Invoiced
### Invoiced Setup
Drivetrain uses Fivetran to integrate with Invoiced, you have to add a webhook URL and create an API key to complete this Integration. In this guide, you will find detailed steps on how to add both items.
### Step 1: Add Webhook URL
1. Log in to your [Invoiced account](https://app.invoiced.com/login) account and on the navigation menu click on **Settings**
2. On the Integrations tile, click on **Developers**
3. Click **Integrations** > **New Webhook**.
4. Reach out to Drivetrain's Data Integration Manager or Customer Success Manager for webhook URL.
5. Set the **Enabled** toggle to **ON**
6. In the Enabled Events section, select **Select events**.
7. Select the following events:
* **credit\_note.deleted**
* **customer.deleted**
* **estimate.deleted**
* **invoice.deleted**
* **note.deleted**
* **payment.deleted**
* **subscription.deleted**
* **task.deleted**
8. Click **Save**.
#### Step 2: Create an API key
1. Go back to Invoiced home page, and on the navigation menu, click **Settings**.
2. On the Integrations tile, click on **Developers**
3. Click **API Keys** > **New API Key**.
4. Make a note of the API Key.
{% hint style="info" %}
That’s it! Share the API key with your data integrations manager or customer success manager so they can get started!
{% endhint %}
# Integrating with Maxio Chargify
[Prerequisites](#prerequisites)
[Maxio Chargify Setup](#maxio-chargify-setup)
### Prerequisites
To connect Maxio Chargify to Drivetrain, you need:
* An active Maxio Chargify account
* Admin privileges on Maxio Chargify
### Maxio Chargify Setup
1. Login to your Maxio Chargify account and navigate to **Config > Integrations** by clicking on the sidebar menu.
2. Next we need to create a new API key. Click on **New API Key**.
3. Make a note of the API Key.
4. You will also need to provide your subdomain name. For instance, if your Maxio Chargify site URL is [https://drivetrain.chargify.com](https://observe.chargify.com/), "drivetrain" is the subdomain name.
{% hint style="info" %}
That’s it! Share the API key and subdomain name with your customer success manager so they can get started!
{% endhint %}
# Integrating with Maxio SaaSOptics
[Prerequisites](#prerequisites)
[Maxio SaaSOptics Setup](#maxio-saasoptics-setup)
### Prerequisites
To connect Maxio SaaSOptics to Drivetrain, you need:
* An active Maxio SaaSOptics account
* Admin privileges on Maxio SaaSOptics
### Maxio SaaSOptics Setup
1. Login to your Maxio SaaSOptics account and navigate to **Admin** by clicking on the sidebar menu.
2. In the Settings section, click **API Tokens**.
3. Enter the name for your API token as **"Drivetrain Integration"** and click **Create API Token**.
4. Make a note of your API Token securely, as it will be displayed only once.
5. You will also need to provide your subdomain and account name. For instance, if your Maxio SaaSOptics login URL is [https://drivetrain.saasoptics.com/drivetrain\_account/profile](https://fivetran.saasoptics.com/fivatran_account/profile), then "**drivetrain**" is the subdomain name and "**drivetrain\_account**" is the account name.
{% hint style="info" %}
That’s it! Share the API key and subdomain and account name with your customer success manager so they can get started!
{% endhint %}
# Integrating with Recurly
Drivetrain can connect with Recurly using an API key and subdomain.
[Prerequisites](#prerequisites)
[Integrations Steps](#integrations-steps)\
[Step 1: Obtain an API Key](#step-1-obtain-an-api-key)\
[Step 2: Get your Recurly subdomain](#step-2-get-your-recurly-subdomain)
## Prerequisites
To connect Recurly to Drivetrain via API, you need:
* An account/user with “Integrations” permissions in Recurly. These permissions are required to create an API key.
### Integrations Steps
#### Step 1: Obtain an API Key
**Option A: Obtain Existing API Key**
1. Log in to your [Recurly account](https://app.recurly.com/login).
2. In the navigation bar on the left, select **Integrations > API Credentials**.
3. Find your private API key and make a note of it.
**Option B: Generate a Recurly API Key**
1. Navigate to **Integrations > API Credentials**.
2. Scroll to the bottom and select **Add Private API Key**.
3. Assign a name to your API key, jot down its purpose, and specify the third-party application it's intended for.
4. Confirm by clicking **Save Changes**.
#### Step 2: Get your Recurly subdomain
1. While logged into your Recurly account, look at the address bar at the top of your web browser and find your subdomain. Your subdomain is the part of the URL between https\:// and recurly.com. It is usually the same as your company name.
{% hint style="info" %}
That’s it! Inform your customer success manager and share the API Key and subdomain with them so that they can get started!
{% endhint %}
# Integrating with Stripe
[Prerequisites](#prerequisites)
[Stripe Setup](#stripe-setup)\
[Create API Key](#add-a-new-admin)
## Prerequisites
To connect Stripe to Drivetrain, you need:
* An active Stripe account
* Admin privileges on Stripe
* Admin privileges in Drivetrain
### Stripe Setup
Drivetrain can connect to Stripe using API. To create an API key inside Stripe, please follow the steps:
### Create API Key
1. Log into the [Stripe dashboard](https://dashboard.stripe.com/apikeys)
2. On the **Developers** page, select **API Keys**
3. Under the Standard Keys section, click on **+ Create secret key**
4. Enter the name of the Key as "**Drivetrain Integration Key**" and click **Create**
5. Make a note of the Standard API key and store it in a secure document.
{% hint style="info" %}
That’s it! share the API key with your customer success manager so that they can get started!
{% endhint %}
# Integrating with Subscript
[Prerequisites](#prerequisites)
[Subscript setup](#subscript-setup)\
[Get API key](#get-api-key)
## Prerequisites
To connect Subscript with Drivetrain, you need:
1. An active Subscript account
2. Admin privileges on Subscript
3. Admin privileges in Drivetrain
## Subscript setup
Drivetrain can connect to Subscript using an **API key**. To get an API key, please follow the steps:
## Get API key
Step 1: Log in to your [Subscript account](https://app.subscript.com/).
Step 2: Navigate to **Configuration** and Hover on **External Sources.**
Step 3: Scroll down and select **Managing Subscript API key**.
Step 4: Share the API key to your Customer Success Manager.
Step 5 (Optional): Share a new key by clicking **Rotate API key** if there is no existing key used by any external source.
{% hint style="info" %}
That’s it! Inform your Customer Success Manager so that they can get started.
{% endhint %}
# Integrating with Tabs
[Tabs](https://www.tabs.com/) is an AI-native revenue automation platform that streamlines contract ingestion, billing, cash application, revenue recognition, and reporting. Connecting Tabs to Drivetrain lets you automatically sync your customers, contracts, invoices, payments, and revenue data, so your models and reports always reflect the latest billing activity.
This guide walks you through generating a Tabs API key and then adding Tabs as a data source in Drivetrain.
{% hint style="info" %}
The Tabs connector is **read-only** — Drivetrain only pulls data from Tabs and never writes anything back.
{% endhint %}
### Prerequisites
To connect Tabs to Drivetrain, you need:
* A Tabs account with **admin access** (only admins can create API keys).
* Access to your Drivetrain workspace with permission to add data sources.
### What Drivetrain syncs from Tabs
Once connected, Drivetrain can pull the core entities of the Tabs data model:
* **Customers** — the businesses you bill, with contacts and custom fields.
* **Contracts** — agreements defining dates, payment terms, and obligations.
* **Invoices** — itemized requests for payment, with line items and dates.
* **Payments** — recorded receipts that settle outstanding invoices.
* **Revenue & reports** — recognized revenue, ARR, and cash-forecasting data.
### Tabs Setup — Generate an API key
Tabs authenticates API requests with an Authorization-header API key. You will generate one in the Tabs app and paste it into Drivetrain.
#### Step 1: Open Developers in Tabs
Log in to Tabs and, from the left side navigation menu, click **Developers**. You must be an admin in Tabs to create a key — if you are not, ask your Tabs admin to create one for you.
#### Step 2: Create the API key
On the **API Keys** tab, click **+ Create API key**. Give the key a recognizable name (for example, **Drivetrain Integration**) so you can identify it later, then click **Create key**.
#### Step 3: Copy and store the key
Tabs displays your new key only once. Click **Copy** and store it somewhere secure — you will paste this value into Drivetrain in the next section.
{% hint style="warning" %}
Treat the API key like a password. Never expose it publicly or commit it to source control. If a key is ever compromised, contact Tabs Support to revoke and reissue it.
{% endhint %}
### Drivetrain Setup — Add Tabs as a data source
#### Step 1: Open Data and add a source
In Drivetrain, go to **Data** in the left navigation, then click the **+** button to add a new data source.
#### Step 2: Select the Tabs connector
In the **Connect a datasource** window, search for **Tabs** and select it under **Billing & Invoicing**.
#### Step 3: Enter your API key
On the **Connect your Tabs account** screen, paste the API key you copied from Tabs into the **API Key** field, then click **Submit**. The connector form has a single field — just the API key.
#### Step 4: Confirm the connection
Tabs now appears as a connected data source and begins syncing. Your Tabs data — customers, contracts, invoices, payments, and revenue — will populate in Drivetrain once the initial sync completes.
{% hint style="info" %}
If you run into any issues connecting Tabs or do not see your data after syncing, reach out to your Drivetrain CSM and we will be happy to help.
{% endhint %}
# CRM
Drivetrain integrates with 20+ CRM tools. Right now, you can integrate the following tools directly by following the instructions provided below:
* [Active Campaign](/integration-guide/readme/crm/integrating-with-active-campaign)
* [HubSpot](/integration-guide/readme/crm/integrating-with-hubspot)
* [LeadSquared](/integration-guide/readme/crm/integrating-with-leadsquared)
* [Outreach](/integration-guide/readme/crm/integrating-with-outreach)
* [Pipedrive](/integration-guide/readme/crm/integrating-with-pipedrive)
* [Salesforce](/integration-guide/readme/crm/integrating-with-salesforce)
For other CRM tools, contact your customer success manager to help you get them connected.
# Integrating with Active Campaign
[Prerequisites](#prerequisites)
[Active Campaign Setup](#leadsquared-setup)\
[Find URL and API key](#step-1-creating-a-new-user)
## Prerequisites
To connect Active Campaign to Drivetrain, you need:
* An active Active Campaign account
* Admin privileges on Active Campaign
* Admin privileges in Drivetrain
## Active Campaign Setup
Drivetrain supports integration with Active Campaign via API. To get started you would need to find API key and URL with administrator privileges on Active Campaign for Drivetrain.
### Find URL and API Key
1. Log in to your [ActiveCampaign account](https://www.activecampaign.com/login) as an Administrator.
2. On the left-hand navigation menu, click **Settings** > **Developer**.
3. Go to the API Access section, copy the URL and API Key and paste them in a secured location.
{% hint style="info" %}
That’s it! share the API URL and API key with your Data Integration Manager or Customer Success Manager to get started!
{% endhint %}
# Integrating with HubSpot
Connect HubSpot to Drivetrain quickly—no provisioning or support required.
You can connect your HubSpot account to Drivetrain in a few quick steps. This guide walks you through how to do it.
### Prerequisites
To complete this integration, make sure you have:
* An active **HubSpot** **account** with **API permissions**
* **Admin access** in Drivetrain
{% hint style="info" %}
**Recommended**: Connect using your **HubSpot Super Admin account** to avoid permission issues with specific objects.
{% endhint %}
### Step 1: Add a Data Source in Drivetrain
1. Log in to Drivetrain and go to the **Data page**
2. Click the **+ icon** to **add a new data source**
3. Select **HubSpot** from the list of available integrations
4. Click **Login to connect**
### Step 2: Log in to HubSpot
You’ll be redirected to the **HubSpot authorization** **screen**.
1. Enter your **HubSpot login credentials**
2. When prompted, select the correct **company account**
3. Click **Choose Account**
4. Review the **list of permissions** Drivetrain is requesting
5. Click **Connect app** to authorize the integration
{% hint style="info" %}
Drivetrain only **reads** your CRM data—no changes will be made.
{% endhint %}
### Step 3: Sync starts automatically
After authorization:
* You’ll be **redirected** back to Drivetrain
* The **HubSpot data source** will appear in the **Data** **page** **sidebar** with a **Syncing** indicator
* Within a few minutes, datasets like **Deal**, **Company**, **Contact**, **Pipeline**, and others will begin to populate
### Next Steps
Once the sync is complete, you can:
* Use **HubSpot data** in your planning models and reports
* Access objects such as:
* Contacts
* Companies
* Deals
* Pipelines and stages
* Users and associations
No manual data setup is required. You can begin using these datasets immediately across Drivetrain’s planning, reporting, and metrics workflows.
### Troubleshooting
If you run into an error while connecting:
* Retry the integration using an account with higher permissions, such as a **Super Admin**.
* Log out of HubSpot and reconnect from Drivetrain.
* Try the integration in an **incognito window** to rule out cookie or session issues.
If the issue persists, contact your **Drivetrain onboarding partner** for help.
{% hint style="info" %}
Include a **screenshot** or **brief description** of the error message. We'll help you troubleshoot and guide you through next steps.
{% endhint %}
### Need to Grant Temporary Access?
In **rare cases**—such as **data inconsistencies** or **bug investigations**—your Drivetrain team may request temporary access to your HubSpot account.
**View:** [Grant temporary access to HubSpot](/integration-guide/readme/crm/integrating-with-hubspot/grant-temporary-access-to-hubspot)
This is not required for setup or general connection issues.
# Grant temporary access to HubSpot
Grant temporary HubSpot access to Drivetrain for troubleshooting.
If you’ve already connected HubSpot to Drivetrain but run into issues with sync errors, or missing data, you can temporarily grant access to the Drivetrain team for troubleshooting.
{% hint style="warning" %}
You must be a **Super Admin** in HubSpot to apply these changes.
{% endhint %}
Follow the steps below to create a temporary user.
### Step 1: Invite a new user
1. **Log in** to your HubSpot account
2. Click the **settings icon** ⚙️ in the top navigation bar
3. In the left sidebar, go to **Users & Teams**
4. Click **Create user** in the top-right corner
5. Select **Custom Invite**
### Step 2: Setting access permissions
In the user creation flow:
1. **Enter the email address** provided by your Drivetrain CSM (e.g., `dp-[customername]@drivetrain.ai`) and click Next
2. Assign relevant **user access levels**
1. Start by assigning a **Core Seat** from the **Seat assignment dropdown**
2. Under **Choose how to set access**, select **Start from scratch**
3. Expand the **Choose permissions** section and enable the following permissions:
1. Account > Settings access > Turn on **App Marketplace Access**
2. Account > User & account access > Turn on **Account Access**
3. Reporting > Turn on **Reports Access**
4. Turn on other relevant permissions
### Step 3: Send the invite
1. Click **Next** to review permissions
2. Expand the **Send an invite link** section
3. **Copy** the invite link
4. **Paste the invite link** into your Slack chat or email thread with your CSM to notify them
### Step 4: Revoke access after troubleshooting
Once the issue is resolved, you can safely:
* Deactivate the temporary user, or
* Remove the Super Admin role if continued limited access is needed
{% hint style="warning" %}
Drivetrain uses this temporary account solely to diagnose and resolve integration issues. No changes are made to your HubSpot data or configuration. You retain full control and can revoke access or delete the user at any time.
{% endhint %}
# Integrating with LeadSquared
[Prerequisites](#prerequisites)
[LeadSquared Setup](#leadsquared-setup)\
[Step 1: Creating a New User](#step-1-creating-a-new-user)
## Prerequisites
To connect LeadSquared to Drivetrain, you need:
* An active LeadSquared account
* Admin privileges on LeadSquared
* Admin privileges in Drivetrain
## LeadSquared Setup
Drivetrain supports integration with LeadSquared via API from a **dedicated user account**. To get started you would need to create a dedicated profile and a dedicated user with administrator privileges on LeadSquared for Drivetrain.
### Step 1: Creating a New User
1. Access the LeadSquared Platform.
2. Navigate to the profile icon and click **Manage Users**.
3. At the top right, click on **Create.**
4. Create a new user with the name ***Drivetrain Integration.*** The email address will be provided to you by your Drivetrain Customer Success Manager.
5. Under **Role,** select ***Administrator*** and under **User Type** select ***Regular.***
6. \[Optional] You can select a reporting manager and Team appropriately.
7. Click on **Create New.**
{% hint style="info" %}
That’s it! Inform your customer success manager so that they can get started!
{% endhint %}
# Integrating with Outreach
[Prerequisites](#prerequisites)
[Outreach Setup](#outreach-setup)\
[Step 1: Creating a New Profile](#step-1-creating-a-new-profile)\
[Step 2: Creating a New User](#step-2-creating-a-new-user)
## Prerequisites
To connect Outreach to Drivetrain, you need:
* An active Outreach account
* Admin privileges on Outreach
* Admin privileges in Drivetrain
## Outreach Setup
Drivetrain supports integration with Outreach via API from a **dedicated user account**. To get started you would need to create a dedicated profile and a dedicated user on Outreach for Drivetrain.
### Step 1: Creating a New Profile
1. Access the Outreach Platform.
2. Click the User's initials (avatar) in the bottom left corner of the navigation sidebar.
3. Click **Profiles** under the **USER ADMIN** section on the **Settings** panel.
4. Create a new profile with the name ***Drivetrain Integration***
## List of Permissions
Please add the following permissions to this profile (which may vary based on your specific use case):
| Permission | Options | Setting for Drivetrain Profile |
| --------------------- | ---------------- | ------------------------------ |
| Users and Profiles | Permitted/Denied | Denied |
| Plugins | Permitted/Denied | Denied |
| Triggers | Permitted/Denied | Permitted |
| Teams and Collections | Permitted/Denied | Permitted |
| Rulesets | Permitted/Denied | Permitted |
| Phones | Permitted/Denied | Denied |
| Branded URLs | Permitted/Denied | Denied |
| Export from Outreach | Permitted/Denied | Permitted |
| Record Visibility | | |
| ---------------------------------------- | ---------------------------------------------------- | ------------- |
| Prospects | All Records/Owned and Reports' records/Owned Records | All records |
| Accounts | All Records/Owned and Reports' records/Owned Records | All records |
| Grant visibility to prospects in account | Permitted/Denied | Denied |
| Opportunities | All Records/Owned and Reports' records/Owned Records | All records |
| Tasks | All Records/Owned Records | All records |
| Calls | All Records/Owned and Reports' records/Owned Records | All records |
| Meetings | All Records/Owned and Reports' records/Owned Records | All records |
| Bulk Actions | All Records/Owned and Reports' records/Owned Records | All records |
| Imports | All Records/Owned and Reports' records/Owned Records | Owned Records |
| Outbox | All Records/Owned and Reports' records/Owned Records | Owned Records |
| Smart Views | All Records/Owned and Reports' records/Owned Records | Owned Records |
| Prospects | | |
| ------------------------ | ---------------- | --------- |
| CSV Import | Permitted/Denied | Permitted |
| Salesforce Report Import | Permitted/Denied | Denied |
| Large Bulk Actions | Permitted/Denied | Denied |
| Delete Email Data | Permitted/Denied | Denied |
| Revert Opt Out | Permitted/Denied | Denied |
| Sequences | | |
| ---------------------------------- | ---------------------------------------------------------------------------------------- | ----------------------- |
| View Private Sequences | Any Sequences/Sequences owned by user or its subordinates/Sequences owned by user | Any sequences |
| Create | Permitted/Denied | Denied |
| Edit | Any Sequences/Sequences owned by user or its subordinates/Sequences owned by user | Sequences Owned by User |
| Enable Sequences | Any Sequences/Sequences owned by user or its subordinates/Sequences owned by user/Denied | Disabled |
| Sharing Sequences | Permitted/Denied | Denied |
| Use Custom Rulesets | Permitted/Denied | Denied |
| Exceed 5 Active templates per step | Permitted/Denied | Permitted |
| Tasks | | |
| --------------------- | ----------------------------------------------------------------------------- | ---------------------- |
| Edit | Any task/tasks owned by user or its subordinates/tasks owned by user | Tasks Owned by User |
| Snippets | | |
| View private snippets | Any snippet/Snippets owned by user or its subordinates/snippets owned by user | Snippets owned by user |
| Create | Permitted/Denied | Denied |
| Edit | Any snippet/Snippets owned by user or its subordinates/snippets owned by user | Snippets owned by user |
| Share | Permitted/Denied | Denied |
| Templates | | |
| ---------------------- | -------------------------------------------------------------------------------- | ----------------------- |
| View Private Templates | Any template/templates owned by user or its subordinates/templates owned by user | Templates owned by user |
| Create | Permitted/Denied | Denied |
| Edit | Any template/templates owned by user or its subordinates/templates owned by user | Templates owned by user |
| Share | Permitted/Denied | Denied |
| Meeting Types | | |
| -------------------------- | ---------------------------------------------------------------------- | ----------------- |
| View Private Meeting Types | All Meeting Types/Owned and Reports' Meeting Types/Owned Meeting Types | All Meeting Types |
| Create | Permitted/Denied | Denied |
| Share | Permitted/Denied | Denied |
| Layouts | | |
| -------------------- | ------------------------------------------ | ----------- |
| View Private Layouts | Any Layouts / Layouts owned by User / None | Any Layouts |
| Create | Permitted/Denied | Permitted |
| Share | Permitted/Denied | Permitted |
| Meetings | | |
| ---------------- | ---------------- | --------- |
| Can Use Meetings | Permitted/Denied | Permitted |
| Opportunities | | |
| -------------------------------------------- | ---------------------------------------------------------------------------------------------------------- | --------- |
| Can Use Opportunities | Permitted/Denied | Denied |
| Create | Permitted/Denied | Denied |
| Edit | Any Opportunity / Opportunities owned by user or its subordinates / Opportunities owned by user / Disabled | Disabled |
| Activities get associated with Opportunities | Permitted/Denied | Permitted |
| Association Dropdown | Permitted/Denied | Denied |
| Voice | | |
| ----------------------------- | ---------------- | --------- |
| Can use voice | Permitted/Denied | Permitted |
| Local Presence | Permitted/Denied | Denied |
| Live Listen | Permitted/Denied | Denied |
| Recordings | Permitted/Denied | Denied |
| Show Two Party Consent Dialog | True/False | TRUE |
| Texting | Permitted/Denied | Denied |
| Unrelated emails using Outreach | | |
| ------------------------------- | ---------------- | ------ |
| View Subject | Permitted/Denied | Denied |
| View Body | Permitted/Denied | Denied |
| Unrelated emails not using Outreach | | |
| ----------------------------------- | ---------------- | ------ |
| View Subject | Permitted/Denied | Denied |
| View Body | Permitted/Denied | Denied |
| Mail Tracking | | |
| ------------------------- | ---------------- | --------- |
| Use open tracking | Permitted/Denied | Permitted |
| Use clicked link tracking | Permitted/Denied | Permitted |
| Mailboxes | | |
| --------- | ---------------------------------------------------- | ------------- |
| Send from | All records/Owned and reports' records/Owned Records | Owned Records |
| Prospect Engagement | | |
| --------------------------------- | ------------------------------------------------------- | ----------- |
| Email based on prospect ownership | All records/Owned and reports' records/Owned Records | All Records |
| Email based on account ownership | Owned and Reports' Records / Owned Records / No Records | No records |
### Step 2: Creating a New User
Here is a [link](https://www.google.com/url?q=https://support.outreach.io/hc/en-us/articles/115002866748-Outreach-Seat-Management-Process\&sa=D\&source=editors\&ust=1677758935547540\&usg=AOvVaw1PmJ3AdkONkMGXgI4KvR50) with instructions on how to setup an account.
Or you can follow these step by step instructions given here:
1. Access the Outreach Platform > Click the **User icon** (single silhouette) in the navigation sidebar. > Click **+User**
2. Input the **New User** information in the corresponding fields as below:
First Name: ***Drivetrain***
Last Name: ***Integration***
Email: (*Your customer success manager will share this with you)*
3. Select **User's permissions** from the options under **Role (In Governance)** and **Drivetrain Profile** from the options under **Governance Profile**.
4. Click **Save.**
{% hint style="info" %}
That’s it! Inform your customer success manager so that they can get started!
{% endhint %}
# Integrating with Pipedrive
[Pipedrive Setup](#pipedrive-setup)\
[Step 1: Add a new user](#step-1-add-a-new-user)\
[Step 2: Update user permissions](#step-2-update-user-permissions)\
[Step 3: Find the subdomain](#step-3-find-the-subdomain)
## Pipedrive Setup
### Step 1: Add a new user
1. Log in to your [Pipedrive](https://app.pipedrive.com/auth/login) account.
2. Go to **Settings > Manage Users >** [**Users**](https://app.pipedrive.com/settings/users)**.** Add a new user to your account by clicking the **“+”** button.
3. Enter the email address dedicated to your Drivetrain account (this will be provided by your Drivetrain onboarding partner) and create the account.
### Step 2: Update user permissions
1. In the top right corner, click your profile picture. Select **Company settings** > **Manage users**.
2. Grant the newly created user with the **Deals admin** permission set.
3. Make sure that the Deals Admin has access to **Use API** as well.
4. Save the changes.
### Step 3: Find the subdomain
1. Find your subdomain in your Pipedrive URL. For example, if your Pipedrive URL is drivetrain.pipedrive.com then your subdomain is ’drivetrain’.
{% hint style="info" %}
That’s it! Share your subdomain and account credentials with your drivetrain onboarding partner to get started!
{% endhint %}
# Integrating with Salesforce
Connect Salesforce to Drivetrain quickly—no provisioning or support required.
You can connect your Salesforce account to Drivetrain in just a few steps. This guide is designed for Salesforce admins, including those new to Drivetrain. In most cases, no provisioning or setup support is required—you can complete the setup on your own.
### Prerequisites
To connect Salesforce to Drivetrain, you need:
* An **active Salesforce Enterprise level** **plan** or higher
* **Admin-level access** in both **Salesforce** and **Drivetrain**, or equivalent permission sets that allow **API usage** and **data visibility**
Drivetrain requires read access to the following **Salesforce objects at minimum**:
* **Opportunity**
* **Opportunity History**
* **Opportunity Field History**
* **Users**
* **Account**
* **Lead**
Additional objects may be required depending on your reporting needs.
{% hint style="warning" %}
Salesforce API limits are shared across all integrations connected to your org (commonly 15,000–145,000 calls/day depending on edition). If other tools are heavy API consumers, Drivetrain's sync can stall or fail with a message like *"Salesforce daily API request limit has been exhausted."* Review which integrations are consuming the bulk of your daily quota, and increase your org's daily API call limit from the Salesforce side if needed.
{% endhint %}
#### Check and Enable API Permissions in Salesforce
To ensure your Salesforce integration with Drivetrain works correctly, confirm that **API access is enabled** and that the **relevant standard objects** are **readable** by the integration user.
{% hint style="info" %}
**Access to REST API services** is automatically included when **API Enabled** is checked. There is no separate checkbox for it.
{% endhint %}
#### Verify API Access
Check whether the profile assigned to your integration user has API access enabled:
1. In Salesforce, click the **Settings** icon in the top right and select **Setup**
2. In the **Quick Find** box, search for and select **Profiles**
3. Click the **read-only profile** assigned to your integration user
4. Scroll to the **Administrative Permissions** section
5. Look for **API Enabled** and ensure that it's **selected**
6. If it's not selected, click **Edit** at the top of the page, check **API Enabled**, and click **Save**
{% hint style="warning" %}
If **API Enabled** is unchecked, the user will not be able to make **API calls**—including those required by Drivetrain.
{% endhint %}
#### Grant Read Access to Required Standard Objects
Drivetrain requires read access to several standard objects in Salesforce. To configure this:
1. In the same **profile** (or **permission set**, if applicable), scroll to **Standard** **Object Settings**
2. For each of the following objects, click the name, then click **Edit**, and ensure **Read** access is enabled:
* **Opportunities**
* **Accounts**
* **Leads**
3. To grant access to the **User** object:
* Scroll to the **Administrative Permissions** section in the same profile
* Enable **View All Users**
{% hint style="info" %}
You may not see **Opportunity History** or **Opportunity Field History** listed as separate objects. These are tracked via **Field History Tracking**, which must be enabled under: **Setup > Object Manager > Opportunity > Fields & Relationships > Set History Tracking**
{% endhint %}
{% hint style="warning" %}
Ensure the **Salesforce user** you plan to use for integration has this **profile or permission set assigned**.
{% endhint %}
#### Grant Field-Level Read Access (Field-Level Security)
Object-level **Read** access alone is not always enough—if fields are hidden by field-level security, those columns sync **blank** even though the object connects. For each object above:
1. Open the **profile** (or **permission set**) and go to **Field-Level Security** for the object (**Object Settings > \[Object] > Field Permissions**)
2. Ensure **Read Access** is enabled for the fields you need synced
#### Grant Record Visibility (so records aren't empty)
A newly created, dedicated integration user **owns no records**, so with default private sharing settings its objects can sync as **empty tables**. Give the integration user visibility into the records:
* In the profile's **Administrative Permissions**, enable **View All Data** (recommended for a read-only integration user), **or**
* Adjust **org-wide sharing defaults / role hierarchy** so the integration user can see the records you want synced
{% hint style="warning" %}
If tables sync but come in **blank** (for example, only the **User** table has data), this record-visibility setting is almost always the cause.
{% endhint %}
#### Grant the "Run Reports" Permission (for Reports-based sync)
If you plan to sync **Salesforce Reports** (see Step 3), the integration user needs to be able to run and see those reports:
1. In the profile's **System Permissions**, enable **Run Reports**
2. Ensure the **specific reports** you want to sync are **shared with the integration user** (via the report folder's sharing settings)
{% hint style="warning" %}
Without **Run Reports** and report-folder access, report syncs fail with a permission error even when object access is configured correctly.
{% endhint %}
### Step 1: Start a New Connection in Drivetrain
1. Go to the **Data page** in Drivetrain
2. Click **+** in the top-left corner to **connect a data source**
3. Select **Salesforce** from the list of integrations
4. Click **Login to connect →**
### Step 2: Log In to Salesforce
A new pop-up window will open.
1. Log in using your **Salesforce admin credentials**
2. If prompted, complete **Multi-Factor Authentication (MFA)**
#### Allow Installation of the Drivetrain Application
1. The system admin has to connect the Drivetrain app and install the app.
2. Once the system admin or any other user attempts to connect via the linking flow from Drivetrain, the system can admin can do this by:
1. Going to **Setup > Apps > Connected Apps > Connected Apps OAuth Usage**
2. Select **Install** against the Drivetrain app
3. Then any user from the organisation can connect via this app and create the salesforce connector on Drivetrain.
Alternatively,
1. The system admin has to give access to user profile to connect to uninstalled app.
2. Go to **Setup > Administration > Users > Profile** and check the **Approve Uninstalled Connected Apps** box
{% hint style="info" %}
This is only available for **standard user license**.
{% endhint %}
### Step 3: Choose What to Sync
Once connected, you’ll be **redirected back to Drivetrain.** You can bring in data using either **Salesforce Reports** or **Salesforce Objects**, depending on your needs.
### Salesforce Reports
**Salesforce Reports** are user-defined views of your data based on filters, groupings, and custom logic. This is the best option when you’ve already created reports in Salesforce and want to reuse those filtered datasets directly in Drivetrain.
#### **To sync a report**
1. In Salesforce, **open the report** you want to sync
2. Copy the **report URL**
3. In Drivetrain, **paste the URL** in the **Reports section**
4. Click **Add**
{% hint style="warning" %}
Salesforce limits report syncs to **2,000 rows**. If your report exceeds this limit, only the first 2,000 records will be synced.
{% endhint %}
{% hint style="info" %}
**Salesforce doesn't expose formula fields to the Reports API.** If a synced report comes back empty for formula columns, pull the underlying value from the source **Object** instead (e.g. the Opportunity or Account object), or recreate the report without the formula columns.
{% endhint %}
#### **Overcoming the 2,000 Row Limit**
To bring in **larger datasets:**
* Use **Salesforce Objects** instead of Reports
* Or, break your report into **multiple smaller reports** using filters (e.g., by region or time period)
**If a report stays capped at 2,000 rows even with a unique ID column selected**, compare it against a report that syncs fully:
1. **Filter count**—Salesforce caps a report at \~20 filters, and Drivetrain adds one more for syncing. Too many filters can block pagination.
2. **Row Limit or cross filters**—a standard date filter, Row Limit, or cross filter can also block API pagination.
3. **Report format**—confirm it's **Tabular**, not **Summary** or **Matrix**.
4. **Unique ID column**—confirm a real Contact/Lead/Opportunity ID column is present and filled on every row.
### Salesforce Objects
**Salesforce Objects** provide raw, unfiltered access to your data tables—such as Opportunities, Accounts, Leads, and custom objects.
{% hint style="info" %}
Use this method when you need to sync full datasets or handle more than 2,000 rows.
{% endhint %}
#### **To sync objects**
1. In the **import window in Drivetrain**, search and **select the tables** you want to **import**
2. Click **Add**
3. The **selected objects** will appear in your **Salesforce table** list once syncing is complete
### Troubleshooting
If you’re **unable to connect**:
* Confirm you're using a **Salesforce user** with **API access**
* **Complete MFA**, if it's enabled for your account
* Confirm you’re on the **Salesforce Enterprise (or higher) plan**
* Try an **incognito window** to rule out browser extensions or cookies
Why does Salesforce limit report exports to 2,000 records?
Salesforce limits report exports to 2,000 records to ensure system performance and stability, as reports are designed for quick insights rather than large-scale data extraction. To work around this limitation, we recommend pulling data directly from Salesforce objects, which allow access to complete datasets without restrictions. For detailed information on these limitations, please refer to Salesforce’s official [documentation](https://help.salesforce.com/s/articleView?id=analytics.rd_reports_dashboards_limits.htm\&type=5).
**If tables sync but come in blank (e.g., only the User table has data):**
* The integration user's profile is missing **Read** access on those objects, or **field-level Read** on their fields—see *Grant Read Access* and *Grant Field-Level Read Access* above
* Or the integration user lacks **record visibility**—enable **View All Data** or adjust sharing settings (see *Grant Record Visibility*)
**If a report fails with a permission error:**
* Enable the **Run Reports** system permission and share the report folder with the integration user (see *Grant the "Run Reports" Permission*)
**If you see `403 API_DISABLED_FOR_ORG`:**
* API access is not enabled for the org or the profile. Enable **API Enabled** on the profile (and confirm your Salesforce edition includes API access), then re-authenticate.
{% hint style="info" %}
Enterprise, Unlimited, and Developer editions have the API enabled by default. Professional edition customers can purchase this feature.
{% endhint %}
**If sync fails to start with a message about the daily API request limit being exhausted:**
* Your org's shared API quota (e.g. 15,000/day, higher on some editions) has been used up, often by another connected integration. Ask your Salesforce admin to review which integrations are consuming the bulk of the quota and, if needed, raise the org's daily API call limit from the Salesforce side. Drivetrain's sync will resume automatically once quota is available.
**If you see `Drivetrain could not authenticate with your Salesforce account. The password may have been changed or the authorization has been revoked.`:**
* Credentials were changed or authorization was revoked on the Salesforce side. Re-authenticate:
1. Go to the **Data page** in Drivetrain
2. Click the **three dots** next to the Salesforce connector
3. Select **Edit credentials**
4. Log in again using a valid **Admin-level access** Salesforce account
**Still stuck?** Check the profile again: **Setup > Administration Setup > Manage Users > Profiles**, select the profile, and under **Administrative Permissions** verify **API Enabled** and **View Setup and Configuration** are checked. If you’re still unable to connect after completing the steps above, reach out to your Drivetrain onboarding partner. Include a screenshot or brief description of the error message.
### Need to Grant Temporary Access?
In rare cases—such as data inconsistencies or bug investigations—your Drivetrain team may request temporary access to your Salesforce account.
View: [Grant temporary access to Salesforce](/integration-guide/readme/crm/integrating-with-salesforce/grant-temporary-access-to-salesforce)
This is not required for setup or general connection issues.
# Grant temporary access to Salesforce
Grant temporary Salesforce access to Drivetrain for troubleshooting.
In rare cases—such as data inconsistencies, unexpected sync behavior, or bugs—your Drivetrain onboarding or support team may ask you to grant temporary access to your Salesforce account. This lets us investigate issues directly in your environment, using a read-only user that you control.
{% hint style="warning" %}
Use this guide only if requested by Drivetrain support. Most users do not need to complete this setup.
{% endhint %}
### Overview
This guide walks you through how to:
1. Create a read-only profile in Salesforce
2. Set the right API and object-level permissions
3. Create a dedicated user account with that profile
4. Revoke access after troubleshooting is complete
All access granted via this method is read-only and temporary. You can remove the user at any time.
### Step 1: Create a Read-Only Profile
1. Log in to Salesforce with an **admin account**
2. Go to **Setup**
3. In the left menu, navigate to **Users → Profiles**
4. Click **New Profile**
5. Use **Read Only** as the base profile
6. Name the profile `Drivetrain Integration`
7. Click **Save**
### Step 2: Set API and Object Permissions
1. Open the new profile and click **Edit**
2. Under **Administrative Permissions**, enable:
1. API Enabled
2. API Only User
3. Scroll down to **Standard Object Permissions** and grant **Read access** to:
1. Opportunities
2. Opportunity History
3. Opportunity Field History
4. Accounts
5. Leads
6. Users
4. Add read access to any relevant custom objects (Optional)
5. Click **Save**
### Step 3: Create a Temporary User
1. In Setup, go to **Users → Users**
2. Click **New User**
3. Set the following:
1. **Email address:** Use the one shared by your Drivetrain CSM (typically `dp-[yourcompany]@drivetrain.ai`)
2. **Profile:** Select the read-only profile you created
4. Click **Save**
The user will receive login credentials via email, which will be used by the Drivetrain team to investigate the issue.
### Step 4: Notify Drivetrain
After the user is created, notify your Drivetrain CSM. A team member will log in and proceed with troubleshooting.
### Step 5: Revoke Access (Optional)
After the issue is resolved:
1. Return to **Manage Users** in Salesforce
2. Find the **user account** you created
3. Click **Delete** or **Remove Access**
{% hint style="info" %}
This access method grants Drivetrain **temporary, read-only visibility** into your Salesforce data. You retain full control and can revoke access at any time. No write or administrative permissions are granted at any stage.
{% endhint %}
# Customer Success
Drivetrain integrates with 10+ CSM tools. Right now, you can integrate the following tools directly by following the instructions provided below:
* [ChurnZero](/integration-guide/readme/customer-success/integrating-with-churnzero)
* [Freshdesk](/integration-guide/readme/customer-success/integrating-with-freshdesk)
* [Planhat](/integration-guide/readme/customer-success/integrating-with-planhat)
* [Zendesk](/integration-guide/readme/customer-success/integrating-with-zendesk)
For other CSM systems, contact your customer success manager to help you get them connected.
# Integrating with ChurnZero
### Coming Soon...
# Integrating with Freshdesk
[Prerequisites](#prerequisites)
[Freshdesk Setup](#freshdesk-setup)\
[Find Subdomain](#find-subdomain)\
[Find API key](#find-api-key)
## Prerequisites
To connect Freshdesk to Drivetrain, you need:
* An active Freshdesk account
* Admin privileges on Freshdesk
## Freshdesk Setup
### Find Subdomain
1. Log in to your Freshdesk account using your Freshdesk URL.
2. Make a note of your subdomain. For example, if your Freshdesk URL is `https://mysubdomain.freshdesk.com`, then the subdomain is `mysubdomain`.
### Find API key
1. In the top right corner, click your avatar image and select **Profile settings** from the dropdown.
2. On the **My Profile Settings** page, find and click **View API Key**.
3. Make note of your API key in a secured document.
{% hint style="info" %}
That’s it! share the Subdomain and API Key with your Data Integration Manager or Customer Success Manager to get started
{% endhint %}
# Integrating with Planhat
[Prerequisites](#prerequisites)
[Planhat Setup](#planhat-setup)\
[Step 1: Create a service account](#step-1-create-a-service-account)\
[Step 2: Generate API access token](#step-2-generate-api-access-token)
## Prerequisites
To connect Planhat to Drivetrain, you need:
1. An active Planhat account with admin privileges.
2. Service Account for token generation.
## Planhat Setup
Drivetrain connects to Planhat using an API access token generated in Planhat for this integration. To setup this integration, you need to login into your Planhat account and create a service account, assign relevant permissions to access Planhat objects, and share the API token with us. This guide covers the above-mentioned steps in detail below.
### Step 1: Create a Service Account
1. Login into your Planhat account, hover your mouse on your avatar (intials or photo) in the bottom right of your Planhat tenant and click “**Service Accounts**”.
2. Click on **Add New** to create a new service account, and enter the service account name as “Drivetrain Integration”.
{% hint style="info" %}
A service account is a special account used by the applications to access data within relevant permissions, we strongly suggest creating a new service account for Drivetrain. However, you can continue to use an already-created one as well.
{% endhint %}
3. Select a role or service account to copy permissions from. If none is selected, the service account will have full permissions, which you can modify later.
4. Click on **Save.**
### Step 2: Generate API Access Token
1. If you did not select a role or service account in Step 1, point 3, click on ‘**Permissions**’ under the service account.
2. Assign the relevant permissions here needed for the integration.
3. Click on **Generate New Token.**
{% hint style="info" %}
That’s it share the token with your customer success manager
{% endhint %}
# Integrating with Zendesk
[Prerequisites](#prerequisites)
[Zendesk Setup](#zendesk-setup)\
[Create a New User](#create-a-new-user)
## Prerequisites
To connect Zendesk to Drivetrain, you need:
* An active Zendesk account
* Admin privileges on Zendesk
* Admin privileges in Drivetrain
### Zendesk Setup
Drivetrain supports integration with Zendesk via API from a **dedicated user account**. To get started you would need to create a dedicated profile and dedicated user on Zendesk for Drivetrain.
### Create a New User
{{ More content yet to be added by onboarding team }}
We need access to the following objects in that account:
1. Tickets
2. Comments
3. Contacts
4. Attachments
5. Accounts
6. Users
7. Teams
8. Tags
{% hint style="info" %}
That’s it! Inform your customer success manager so that they can get started!
{% endhint %}
# Databases and Warehouses
Drivetrain integrates with multiple databases and warehouses. Right now, you can integrate the following tools directly by following the instructions provided below:
* [Azure SQL Server](/integration-guide/readme/databases-and-warehouses/integrating-with-azure-sql-server)
* [BigQuery](/integration-guide/readme/databases-and-warehouses/integrating-with-bigquery)
* [Databricks](/integration-guide/readme/databases-and-warehouses/integrating-with-databricks)
* [Postgres](/integration-guide/readme/databases-and-warehouses/integrating-with-postgres)
* [Redshift](/integration-guide/readme/databases-and-warehouses/integrating-with-redshift)
* [S3](/integration-guide/readme/databases-and-warehouses/integrating-with-s3)
* [Snowflake](/integration-guide/readme/databases-and-warehouses/integrating-with-snowflake)
* [Google Cloud Storage](/integration-guide/readme/databases-and-warehouses/integrating-with-google-cloud-storage)
For other database and warehouse systems, contact your Drivetrain customer success manager to help you get them connected.
# Integrating with AWS Cost Explorer
### Overview
This guide provides step-by-step instructions for connecting AWS Cost Explorer to Drivetrain so your cloud cost and usage data can be synced for analysis and reporting.
### Prerequisites
To connect AWS Cost Explorer to Drivetrain, you need:
* An AWS account with Cost Explorer enabled
* IAM permissions to create policies and roles (or an IAM user) in that account
* The data scope you want to sync (see "Data Scope to Confirm" at the end of this guide)
### Integration Methods
Two approaches are available:
Method 1: IAM Role (Recommended, more secure)
* You grant Drivetrain's AWS account permission to assume a read-only role in your account. No long-lived keys are shared.
* You share back: Role ARN
Method 2: Access Key and Secret
* You create an IAM user with read-only Cost Explorer access and share its credentials.
* You share back: Access key, Access secret
AWS Cost Explorer is a global service, so no AWS Region is required.
### Method 1: Using IAM Role (Recommended)
#### Step 1: Create an IAM Policy
Create the policy in the AWS IAM console with this JSON configuration:
{\
"Version": "2012-10-17",\
"Statement": \[\
{\
"Effect": "Allow",\
"Action": \[\
"ce:GetCostAndUsage",\
"ce:GetCostAndUsageWithResources",\
"ce:GetDimensionValues",\
"ce:GetTags",\
"ce:GetCostForecast",\
"ce:GetCostCategories",\
"ce:ListCostCategoryDefinitions"\
],\
"Resource": "\*"\
}\
]\
}
Name the policy "Drivetrain-CostExplorer-Access".
#### Step 2: Create an IAM Role
1. Go to Roles and select Create role
2. Choose AWS account and enter Drivetrain's Account ID: 865992467666
3. Select the "Drivetrain-CostExplorer-Access" policy
4. Name the role "Drivetrain-Integration" and create it
The role's trust relationship should allow Drivetrain's account to assume it. After creation, the trust policy should look like this:
{\
"Version": "2012-10-17",\
"Statement": \[\
{\
"Effect": "Allow",\
"Principal": {\
"AWS": "arn:aws:iam::865992467666:role/Drivetrain-Integration"\
},\
"Action": "sts:AssumeRole"\
}\
]\
}
#### Step 3: Integration Details
Share these with Drivetrain:
1. Role ARN (e.g. arn:aws:iam::\:role/Drivetrain-Integration)
2. The data scope (see "Data Scope to Confirm" below)
### Method 2: Using Access Key and Secret
#### Step 1: Create an IAM Policy
Follow the same steps as Method 1, Step 1, to create the "Drivetrain-CostExplorer-Access" policy.
#### Step 2: Create User
1. Go to Users and select Add users
2. Enter a username (e.g. "Drivetrain-Integration")
3. Select "Attach policies directly" and choose your "Drivetrain-CostExplorer-Access" policy
4. Complete user creation
#### Step 3: Generate Access Key and Secret
1. Open the created user in the Users tab
2. Navigate to Security credentials > Access keys
3. Create an access key for third-party service use
4. Copy both the Access key and Secret access key values
#### Step 4: Integration Details
Share these with Drivetrain:
1. Access key
2. Access secret
3. The data scope (see "Data Scope to Confirm" below)
### Data Scope to Confirm
Along with access, confirm what you would like Drivetrain to pull:
* Cost metric(s): unblended, blended, amortized, net amortized, or net unblended cost (and usage quantity, if needed)
* Granularity: daily or monthly
* Group-by dimensions: e.g. service, linked account, region, usage type, instance type
* History: how far back to backfill (e.g. last 12 or 24 months)
### Information to Share with Drivetrain
Provide your Data Integration Manager or Customer Success Manager with:
* Role ARN (Method 1) or Access key and Access secret (Method 2)
* Cost metric(s)
* Granularity
* Group-by dimensions
* History / backfill period
# Integrating with Azure SQL Server
Drivetrain uses Fivetran to integrate with Azure SQL Server. We connect to your Azure account directly using TLS. This guide covers the detailed steps for the integration process.
[Prerequisites](#prerequisites)
[Azure SQL Server Guide](#azure-sql-server-guide)\
[Choose Authentication Method](#step-1-choose-authentication-method)\
[Enable Access](#step-2-enable-access)\
[Create User](#step-3-create-user)\
[Grant User Permissions](#step-4-grant-user-permissions)\
[Enable Incremental Updates](#step-5-enable-incremental-updates)
## Prerequisites
To connect Azure SQL Server to Drivetrain, you need:
* SQL Server version 2012 or above
* An Azure account with a DB Owner, SQL Server Contributor, or SQL Security Manager role
* ALTER ANY USER permissions in your database server
* Your database host's IP (e.g., `1.2.3.4`) or domain (e.g., `your.server.com`)
* Your database's port (usually `1433`)
{% hint style="info" %}
**IMPORTANT**: We do not support single-user mode.
{% endhint %}
## Azure SQL Server Guide
### Step 1: Choose Authentication Method
Select the preferred authentication method, below are the details for both of the authentication methods.
**Authenticate with Microsoft Entra ID (formerly Azure Active Directory)**
{% hint style="info" %}
IMPORTANT: You must have a properly configured Entra ID enabled within your Azure account to authenticate with Microsoft Entra ID (formerly Azure Active Directory). Follow Azure's [Active Directory for Azure SQL setup instructions](https://docs.microsoft.com/en-us/azure/azure-sql/database/authentication-aad-configure) to properly enable Entra ID Authentication on your Azure SQL Database. You must have an AD admin user role to authorize Drivetrain's access
{% endhint %}
Microsoft Entra ID allows you to authenticate Drivetrain using OAuth-style authentication. You can easily limit permissions and revoke Drivetrain's access at any time, while also not sharing any user or password credential information with Drivetrain.
1. Go to the Azure portal, and search **Microsoft Entra ID** on the search bar.
2. On the Microsoft Entra ID page, click the **Properties** button.
3. Find and copy your tenant ID and store it in a secure document.
4. In your Azure SQL database, create a user using the following command. Even though you don't share user or password information with Drivetrain, the database eventually requires a user to issue queries. The `PRINCIPAL-NAME` must either match your Active Directory user's User Principal Name or be a Group Principal Name assigned to that user.
```
CREATE USER [] FROM EXTERNAL PROVIDER;
```
{% hint style="info" %}
Note: Please share the **Tenant ID** along with other details which you will setup in this guide to your customer success manager
{% endhint %}
**Authenticate with Username and Password**
With this method, you provide Drivetrain with a username and associated password for a properly-configured user on the database. You'll create this user later in this setup guide.
### Step 2: Enable Access
1. Log in to the [Azure console](https://azure.microsoft.com/en-us/features/azure-portal/).
2. On the Azure main page, select **SQL databases.**
3. Click on the SQL database that you want to connect to Drivetrain.
4. On the database overview page, find the server name and make a note of it in the same secure document.
5. Click **Set server firewall.**
6. On the Firewall settings page, add a new firewall rule with a name as “**Drivetrain Integration**”. Use [this](https://fivetran.com/docs/using-fivetran/ips) link to enter the IP for your database region. Click on **Save**
{% hint style="info" %}
Note: Drivetrain connects to Azure Directly, for which you must have enabled TLS on your database. Follow Azure's [TLS setup instructions](https://docs.microsoft.com/en-us/azure/azure-sql/database/connectivity-settings#minimal-tls-version) to enable TLS on your database.
Please note, above link mentioned in 6th point contains information about Fivetran IPs.
{% endhint %}
### Step 3: Create User
If you're authenticating Drivetrain with a username and password, create a database user for Drivetrain's exclusive use.
{% hint style="info" %}
IMPORTANT: If you are authenticating with Microsoft Entra ID (formerly Azure Active Directory), skip ahead to Grant user permissions step.
{% endhint %}
1. Open a connection to your Azure SQL database.
2. Add a [container database user](https://docs.microsoft.com/en-us/sql/relational-databases/security/contained-database-users-making-your-database-portable) for Drivetrain by running the following command. Replace <`database`> with the name of your database, <`username`> with the username of your choice, and <`password`> with a password of your choice:
```
USE [];
CREATE USER WITH PASSWORD = '';
```
{% hint style="info" %}
Please nore username and password in the same secure document.
{% endhint %}
### Step 4: Grant User Permissions
1. Once you have created user for Drivetrain, grant it SELECT permissions for the database, schemas, tables or specific columns you want to sync. Below are sample snippets for every type of access:
```
/*For granting access to everything in database*/
GRANT SELECT on DATABASE::[] to [];
/*For granting access to all tables in particular schema*/
GRANT SELECT on SCHEMA::[] to [];
/*For granting access to a specific table*/
GRANT SELECT ON [].[
] TO [];
/*For granting access to specific columns on a table*/
GRANT SELECT ON [].[
] ([], [], ...) TO [];
/*For granting access to all columns but a set of specific columnns*/
GRANT SELECT ON [].[
] TO ;
DENY SELECT ON [].[
] ([], [], ...) TO [];
/*For granting a managed database-level role*/
ALTER ROLE add member [];
```
2. (Optional) For SQL Server for Linux, if you are using [Change Tracking](https://fivetran.com/docs/connectors/databases/sql-server#changetracking) with [history mode](https://fivetran.com/docs/using-fivetran/features#historymode) enabled, to improve performance and reduce delays, you may want to grant the necessary permissions to the Drivetrain user by running the following command:
```
USE [master]; GRANT VIEW SERVER STATE TO ;
```
This grants the Drivetrain user access to server state information, minimizing the dependency on checkpoint timing and reducing update delays. See the [Sync Delays with SQL Server for Linux Using Change Tracking with History Mode Enabled](https://fivetran.com/docs/connectors/databases/sql-server/troubleshooting/grant-view-server-state-linux) troubleshooting page for details.
### Step 5: Enable Incremental Updates
For incremental updates, we use change tracking mechanism. With this mechanism, Drivetrain copy only the rows that have changed since the last data sync so we don't have to copy the whole table every time. Learn more in this [updating data documentation](https://fivetran.com/docs/connectors/databases/sql-server#updatingdata). Below are the instructions for this:
1. Enable change tracking at database level
```
ALTER DATABASE []
SET CHANGE_TRACKING = ON
(CHANGE_RETENTION = 7 DAYS, AUTO_CLEANUP = ON);
```
{% hint style="info" %}
While we recommend seven days of change retention, you can set your retention period as low as one day. However, a shorter retention period increases the risk that your logs will expire in between syncs, triggering an [automatic full source re-sync](https://fivetran.com/docs/connectors/databases#automaticfullsourceresyncforsqldatabases)
{% endhint %}
2. Enable CT for each table you want to integrate
```
ALTER TABLE [].[
] ENABLE CHANGE_TRACKING;
```
3. Grant the Drivetrain user **VIEW CHANGE TRACKING** permission for each of the tables that have change tracking enabled:
```
GRANT VIEW CHANGE TRACKING ON [].[
] TO ;
```
{% hint style="info" %}
(Optional) Schema changes for change tracking (CT) - By default, when you create a new table in your database, you must manually enable CT. If you want to automate this process, we have to deploy a script on the database. Please reach out to your customer succces manager for that.
{% endhint %}
{% hint style="info" %}
That’s it share the below details with your customer success manager to complete the integration.
1. Database Host’s IP (for example, `1.2.3.4`) or Domain ([your.server.com](http://your.server.com/))
2. Database Instance’s Port Number
3. Database Name
4. Authentication Method Name
5. Tenant ID (For Entra ID based Auth); Username & Password (For the second type of Auth)
{% endhint %}
# Integrating with BigQuery
[Prerequisites](#prerequisites)
[BigQuery Setup](#bigquery-setup)\
[Add an external user in BigQuery](#add-an-external-user-in-bigquery)
## Prerequisites
To connect BigQuery to Drivetrain, you need:
* An active BigQuery account
* Sharing privileges on BigQuery
* Admin privileges in Drivetrain
## BigQuery Setup
Drivetrain supports integration with BigQuery from a read-only external user account. To get started you would need to share the read-only access with service account.
### Add an external user in BigQuery
To grant an access to external user, (someone who is not listed as an employee in the company), follow these steps:
1. Select the **Dataset/ Resource** which is to be shared with the user.
2. From the **Sharing** option on the right top of the page, route to **Permissions**.
3. Add as principal.
4. Assign role - Set as **BigQuery Data Viewer**.
5. Select the above role & click **Save**
{% hint style="info" %}
That’s it! Share the below details with your Customer Success Manager or Data Integrations Manager so that they can get started:
1. If you have given access to complete dataset, please share Project ID/Name and Dataset Name.
2. If you have given access to specific tables in the dataset, please Project ID/Name, Dataset Name and Table Names.
{% endhint %}
# Integrating with ClickHouse
Connect a ClickHouse database and sync its tables and views into Drivetrain
## Overview
Drivetrain connects to ClickHouse over its HTTPS interface. One ClickHouse connector covers one database, once you connect it, you choose which tables and views inside that database to sync. You don't create a separate connector for each table.
## Connection details
Provide these values when you add the connector:
| Field | Description |
| -------- | ------------------------------------------------------------------ |
| Hostname | Your ClickHouse host, e.g. `abc123.us-east-1.aws.clickhouse.cloud` |
| Port | The HTTPS interface port, `8443` on ClickHouse Cloud |
| Username | A read-only user (see Permissions below) |
| Password | Password for that user |
| Database | The database whose tables you want to sync, e.g. `analytics` |
Drivetrain validates the credentials by running `SELECT 1` against the database before saving the connection.
## Selecting tables and views
Once the connection validates, Drivetrain lists every table and view in the database that your user can read. Select as many as you need, each one syncs into its own table in Drivetrain, and you can add or remove objects later without recreating the connector.
Because the database is already set on the connection, names appear unqualified (`orders`, not `analytics.orders`). There's nowhere in setup to type a table name or a SQL query, you select from the list.
### Syncing more than one database
Table listing is scoped to the database in the connection. To sync tables from a second database, add a second ClickHouse connector with that database name. The host, port, and credentials can stay the same.
## Permissions
The user needs:
* `SELECT` on each table or view you sync.
* Read access to the underlying tables of any view you sync.
**Tip:** Use a dedicated read-only user scoped to just the objects you want to share.
## Using views to shape what you share
Selecting a raw table works, Drivetrain reads its full contents. Views are optional, and they give you tighter control over what leaves your warehouse and over sync volume. A view lets you:
* Expose only the columns Drivetrain needs, instead of a whole wide table.
* Pre-aggregate or pre-filter, for example, restrict to the last 24 months.
* Encapsulate joins so Drivetrain reads one object instead of several.
Create the view in the database you connected and grant your Drivetrain user `SELECT` on it. It appears in the list alongside regular tables, and you select it the same way, no different connector, credentials, or setup steps.
# Integrating with Databricks
[Prerequisites](#prerequisites)
[Databricks Guide](#databricks-guide)\
[Create Personal Access Token](#step-1-create-personal-access-token)\
[Create and Connect a new SQL Warehouse](#step-2-create-and-connect-a-new-sql-warehouse)\
[Connect an existing SQL warehouse or all-purpose compute](#step-3-connect-an-existing-sql-warehouse-or-all-purpose-compute)
## Prerequisites
To connect Databricks to Drivetrain, you need:
1. An active Databricks admin account
2. At least one [SQL warehouse](https://docs.databricks.com/en/compute/sql-warehouse/index.html) or a compute cluster to sync data from your catalog.
## Databricks Guide
### Step 1: Create Personal Access Token
1. Drivetrain uses a secure token to connect to Databricks. You can read more about the Databricks token management guide [here](https://docs.databricks.com/en/dev-tools/auth/pat.html)
2. In your Databricks workspace, click your Databricks username in the top bar, and then select **Settings** from the drop down.
3. Click **Developer**.
4. Next to **Access tokens**, click **Manage**.
5. Click **Generate new token**.
6. (Optional) Enter a comment that helps you to identify this token in the future, and change the token’s default lifetime of 90 days. To create a token with no lifetime (not recommended), leave the **Lifetime (days)** box empty (blank).
7. Click **Generate**.
8. Copy the displayed token to a secure location, and then click **Done**.
{% hint style="info" %}
Please note during the data sync, if we find a table which doesn’t have ChangeDataFeed enabled, we try to activate it. Make sure the personal access token has MODIFY permissions on the table. The command to enable ChangeDataFeed for a table is
`ALTER TABLE catalog_name.schema_name.table_name SET TBLPROPERTIES (delta.enableChangeDataFeed=true)`
{% endhint %}
### Step 2: Create and Connect a new SQL Warehouse
{% hint style="warning" %}
If there is already an unity catalog enabled SQL warehouse or an all-purpose compute present in your Databricks setup, please jump to step 3
{% endhint %}
1. In the Databricks console, go to **SQL** > **SQL warehouses** > **Create SQL warehouse**
2. In the New SQL warehouse window, enter a **Name** for your warehouse
3. Choose your **Cluster Size** and configure the other warehouse options
4. Click **Create**
5. After creating the warehouse, Go to the **Connection details** tab
6. Make a note of the following values and keep them in the secured location along with personal access token.
1. Server Hostname
2. Port
3. HTTP Path
### Step 3: Connect an existing SQL warehouse or all-purpose compute
1. Go to your compute cluster or warehouse.
2. Click **Configuration** > **Advanced Options** > **JDBC/ODBC**
3. Make a note of the following values and keep them in the secured location along with personal access token.
1. Server Hostname
2. Port
3. HTTP Path
{% hint style="info" %}
That’s it, share server hostname, port, HTTP path & personal access token to your customer success manager.
{% endhint %}
# Integrating with Postgres
## Postgres Setup
Drivetrain connects to Postgres using a secure TCP/IP connection over the standard PostgreSQL port. To begin with the integration, you need to share below details with us to get started
### Required Details
1. **Hostname & Port**: We need this detail to locate your Postgres server and port to use for the connection. Eg: `your-db.company.com:5432`
2. **Username**: This is used to authenticate and identify the database user for the connection, please ensure user has **read** access to the schema and tables you intend to share
3. **Password:** Used along with the username to securely authenticate the connection to your database.
4. **Schema Name:** PostgreSQL organises data into schemas. This tells us which specific part of your database to look into.
5. **Table Names:** This helps us identify the specific tables within the schema from which data should be extracted.
### Best Practices
1. We recommend creating a **dedicated read-only user** for this integration to ensure access is limited and controlled.
2. if needed, we can provide our **static IP address** to allowlist in your firewall for secure connectivity.
# Integrating with Redshift
Drivetrain supports connecting to **Amazon Redshift** as a data source for financial planning and analysis (FP\&A). This guide explains how to configure and establish the connection.
### Prerequisites
1. An active **Amazon Redshift cluster** with access to the **database** you want to connect.
2. A **user account** with the appropriate read permissions on the required database and schema.
### Required Information
When setting up the Redshift connector in Drivetrain, you’ll need to provide the following details:
**Host**\
The endpoint of your Redshift cluster.\
Example: `redshift-cluster-1.abc123xyz.us-east-1.redshift.amazonaws.com`
**Port**\
The port number on which your Redshift cluster is running.\
Default: `5439`
**Database Name (dbname)**\
The name of the database within your Redshift cluster to connect to.\
Example: `fpna_db`
**User**\
The Redshift user with read-only or required privileges.\
Example: `drivetrain`
**Password**\
The password for the above user.
**Schema (Optional)**\
The schema within the specified database to query by default.\
If not provided, Redshift will use the user’s default schema (often public).\
Example: `finance_schema`
{% hint style="info" %}
Please share the above information with your Drivetrain Customer Success Manager to get started.
{% endhint %}
### Connecting via VPC Peering
If your Redshift cluster is hosted in a private subnet, you can connect it to Drivetrain using **AWS VPC Peering** instead of a **public endpoint.**
To set up VPC Peering, please share the following details with your Drivetrain Customer Success Manager:
* **Account ID**
* **Region**
* **VPC ID (Accepter)**
Drivetrain will initiate the peering request from its VPC. Once you accept the request in your AWS console and configure routing, the connection will be established.
For detailed instructions on creating and accepting VPC peering connections, refer to the [AWS VPC Peering documentation](https://docs.aws.amazon.com/vpc/latest/peering/create-vpc-peering-connection.html?utm_source=chatgpt.com).
# Integrating with S3
[Prerequisites](#prerequisites)
[Amazon S3 Setup](#amazon-s3-setup)\
[Integration Methods](#integration-methods)\
[Method 1: Using Access Key and Secret](#method-1-using-access-key-and-secret)\
[Step 1: Create an IAM policy](#step-1-create-an-iam-policy)\
[Step 2: Create User](#step-2-create-user)\
[Step 3: Generate the Access key and secret](#step-3-generate-the-access-key-and-secret)\
[Step 4: Integration details](#step-4-integration-details)\
[Method 2: Using the IAM role](#method-2-using-iam-role)\
[Step 1: Create an IAM policy](#step-1-create-an-iam-policy-1)\
[Step 2: Create an IAM role](#step-2-create-an-iam-role)\
[Step 3: Adding permissions to the S3 bucket](#step-3-adding-permissions-to-the-s3-bucket)\
[Step 4: Integration details](#step-4-integration-details-1)
## Prerequisites
To connect your Amazon S3 bucket to Drivetrain, you need:
* An S3 bucket containing files with CSV file types and encodings
* For private or encrypted buckets, an AWS account with the ability to grant Drivetrain permission and to read from the bucket
## Amazon S3 Setup
We recommend disabling Access Control Lists (ACLs) on each S3 bucket so that the bucket contents are controlled by the bucket's access control settings and not the original file owner's settings. For more information about disabling ACLs for your bucket, see [Amazon S3 documentation](https://docs.aws.amazon.com/AmazonS3/latest/userguide/about-object-ownership.html).
## Integration Methods
Method 1: Using the Access key and Secret
* Bucket name
* Folder path
* Access key
* Access secret
* AWS Region
Method 2: Using Roles (More secure)
* Bucket name
* Folder path
* AWS Region
## Method 1: Using Access Key and Secret
### Step 1: Create an IAM Policy
{% hint style="info" %}
You must create an IAM policy for both the IAM Role and Access Key and Secret approaches.
{% endhint %}
{% hint style="info" %}
For encrypted buckets, follow [Amazon S3 bucket instructions](https://aws.amazon.com/premiumsupport/knowledge-center/s3-bucket-access-default-encryption/) to modify the AWS KMS key's policy to grant Drivetrain permissions to download files from your encrypted bucket
{% endhint %}
1. Open your [Amazon IAM console](https://console.aws.amazon.com/iam/home#home).
2. Go to **Policies**, then click **Create Policy**
3. Go to the **JSON** tab
4. Copy the following policy and paste it into the visual editor. Replace `{your-bucket-name}` with the name of your S3 bucket. After that, click **Next: Tags**.
```
{
"Version": "2012-10-17",
"Statement": [
{
"Effect": "Allow",
"Action": [
"s3:GetBucketLocation",
"s3:GetObject",
"s3:ListBucket"
],
"Resource": [
"arn:aws:s3:::{your-bucket-name}/*",
"arn:aws:s3:::{your-bucket-name}"
]
}
]
}
```
\
5\. ***(Optional)*** If you use a customer-managed KMS key, add the following policy to the Action section of the IAM policy to provide read access to the encrypted files.
```
Action": [
"kms:Decrypt",
"kms:GenerateDataKey"
]
```
6. In the Add tags step, you can optionally add custom tags that will be associated with your bucket. Click **Next: Review**.
7. In the Review policy step, specify the name of your policy, for example "Drivetrain-S3-Access", then click **Create policy.**
### Step 2: Create User
1. Open your [Amazon IAM console](https://console.aws.amazon.com/iam/home#home).
2. Go to **Users**, then click **Add users**.
3. Enter the user name, then click **Next**.
4. Select the **Attach policies directly** option, then choose the "Drivetrain-S3-Access" policy you created in Step 1.
5. Click **Next**, then click **Create User.**
### Step 3: Generate the access key and secret
1. In the **Users** tab, open the User you created.
2. Go to the **Security credentials** tab and navigate to the **Access keys** section.
3. Click the **Create access key**.
4. From the **Use Case** options, select the **Third-party service** option and then click **Next**.
5. Enter a **Description tag** value and then click the **Create access key**.
6. Copy the **Access key** and **Secret access key** values. You will need them to configure the integration.
### Step 4: Integration details
Share the following details with the Drivetrain team:
1. Bucket name
2. Folder path
3. Access key
4. Access secret
5. AWS Region
## Method 2: Using IAM Role
### Step 1: Create an IAM Policy
Follow the same steps as in [Step 1](#step-1-create-an-iam-policy) of Method 1.
### Step 2: Create an IAM Role
1. Go to Roles, then click **Create role.**
2. Select AWS account, then enter Drivetrain’s AWS Account ID, `865992467666`, in the **Account ID** field.
3. In the **Add permissions** step, select the "Drivetrain-S3-Access" policy you created, then click **Next.**
4. Enter the name Drivetrain-Integration check Trust policy settings and attached policy and click Create Role.
### Step 3: Adding permissions to the S3 bucket
To assign permissions to your S3 bucket, follow the below steps:
1. Select the bucket to which you want to assign permissions.
2. Navigate to the **Permissions** tab.
3. Go to **Bucket Policy.**
4. Click **Edit**. Copy the below policy and paste it into the visual editor. Replace `{your-bucket-name}` with the name of your S3 bucket.
```
{
"Version": "2012-10-17",
"Statement": [
{
"Effect": "Allow",
"Principal": {
"AWS": "arn:aws:iam::865992467666:role/Drivetrain-Integration"
},
"Action": [
"s3:GetBucketLocation",
"s3:GetObject",
"s3:ListBucket"
],
"Resource": [
"arn:aws:s3:::{your-bucket-name}/*",
"arn:aws:s3:::{your-bucket-name}"
]
}
]
}
```
4. Click 'Save' to apply the changes.
### Step 4: Integration details
Share the following details with the Drivetrain team:
1. Bucket name.
2. Folder path.
3. AWS Region
# Integrating with Snowflake
[Prerequisites](#prerequisites)
[Snowflake Setup](#snowflake-setup)\
[How to create a Share with Drivetrain's Account](#how-to-create-a-share-with-drivetrains-account)\
[List of Supported Snowflake Accounts for Direct Sharing](#list-of-supported-snowflake-accounts-for-direct-sharing)
## Prerequisites
To connect Snowflake to Drivetrain, you will need:
* Admin privileges in Snowflake
## Snowflake Setup
**Drivetrain uses Snowflake's Direct Share approach to connect with customer accounts.**\
Direct Shares only work when both accounts are on the **same cloud provider and region**. To support this, we maintain Snowflake accounts across multiple regions and cloud platforms (see list below).
If your account’s provider or region isn’t listed, please reach out—we’ll be happy to set it up for you.
You can read more about Data Sharing via Direct Shares [here](https://docs.snowflake.com/en/user-guide/data-sharing-intro)
### How to create a Share with Drivetrain's Account
1. Login to your [Snowflake](https://app.snowflake.com/) account
2. In the left navigation menu, under "**Data Products**" option, select "**Private Sharing**"
3. Click on "**Share**" on top right corner and select **Create a Direct Share**
4. In the Share Data dialog, select + Select Data and then:
1. Select the source database which you want to integrate.
2. Select the target object or objects from the source database.
3. Optionally, update the Secure Share Identifier created for your share.
4. Optionally, enter a Description.
5. In the remaining text box, enter an account locator. You can find the respective account for your cloud provider and region below. You can only add accounts within the same region to the share. If you don't find any account for your region, please reach out to us.
6. Select Create Share.
5. Share the name of the Shares you created and Organization Details containing Organization Name, Account Name and Locator with your Customer Success Manager.
### List of Supported Snowflake Accounts for Direct Sharing
{% hint style="info" %}
***AWS Snowflake Accounts***
#### **AWS US WEST**
Organization ID: **ICKQIFB**
Account ID: **DRIVETRAIN\_USWEST**
Locator ID: **VJB64118**
Cloud Provider: **AWS**
Region: **US West (Oregon)**
#### **AWS US EAST (Virginia)**
Organization ID: **ICKQIFB**
Account ID: **DRIVETRAIN\_USEAST**
Locator ID: **YIB12816**
Cloud Provider: **AWS**
Region: **US EAST (Virginia)**
#### **AWS US EAST (Ohio)**
Organization ID: **ICKQIFB**
Account ID: **DRIVETRAIN\_USEAST\_OHIO**
Locator ID**: QX73326**
Cloud Provider: **AWS**
Region**: US EAST (Ohio)**
#### AWS CA CENTRAL (Canada)
Organization ID: **ICKQIFB**
Account ID: **DRIVETRAIN\_AWS\_CACENTRAL**
Locator ID**: RN48023**
Cloud Provider: **AWS**
Region**: CA CENTRAL (Canada)**
#### WS EU CENTRAL (Frankfurt)
Organization ID: **ICKQIFB**\
Account ID: **DRIVETRAIN\_AWS\_EU\_CENTRAL\_1**\
Locator ID: **FM31440**\
Cloud Provider: **AWS**\
Region: **EU** **CENTRAL 1 (Frankfurt)**
{% endhint %}
{% hint style="info" %}
***GCP Snowflake Accounts***
#### **GCP US CENTRAL (Iowa**)
Organization ID: **ICKQIFB**
Account ID: **DRIVETRAIN\_USCENTRAL**
Locator ID: **AB40701**
Cloud Provider: **GCP**
Region: **US Central (Iowa)**
#### **GCP US EAST (North Virginia**)
Organization ID: **ICKQIFB**
Account id: **DRIVETRAIN\_GCP\_USEAST4**
Locator id: **OH55314**
Cloud provider: **GCP**
Region: **US EAST 4 (North Virginia)**
{% endhint %}
{% hint style="info" %}
**AZURE *****Snowflake Accounts***
#### **AZURE US WEST (**Washington)
Organization ID: **ICKQIFB**
Account ID: **DRIVETRAIN\_AZ\_USWEST**
Locator ID: **RA27187**
Cloud Provider: **AZURE**
Region: **US West (Washington)**
#### **AZURE CA CENTRAL (Toronto)**
Organization id: **ICKQIFB**
Account id: **DRIVETRAIN\_AZURE\_CACENTRAL**
Locator id: **QN47444**
Cloud provider: **AZURE**
Region: **Canada Central (Toronto)**
#### AZURE NORTH EUROPE
Organization id: **ICKQIFB**
Account id: **DRIVETRAIN\_AZURE\_NORTH\_EUROPE**
Locator id: **LM67628**
Cloud provider: **AZURE**
Region: **North Europe (Ireland)**
#### AZURE UK South London
Organization id: **ICKQIFB**\
Account id: **DRIVETRAIN\_AZURE\_UKSOUTH**\
Locator id: **OC15986**\
Cloud provider: **AZURE**\
Region: **UK South (London)**
{% endhint %}
### Important Notes
{% hint style="info" %}
**Important:**
1. Please configure Row Level Security to provide access to relevant tables for Drivetrain. If you’re using a different region on AWS or are on other cloud platform, please share the details with the Drivetrain team.
2. If you encounter any issues while creating a share in Snowflake using the Account ID, please try using the Locator ID instead. If the issue persists, contact your Customer Success Manager or Data Integration Manager for assistance.
{% endhint %}
# Integrating with Google Cloud Storage
[Prerequisites](#prerequisites)
[Google Cloud Storage Setup](#google-cloud-storage-setup)\
[Step 1: Create a new bucket (optional)](#step-1-create-a-new-bucket-optional)\
[Step 2: Grant permissions to access the bucket](#step-2-grant-permissions-to-access-the-bucket)
## Prerequisites
To connect Google Cloud Storage to Drivetrain, you need:
* An active Google Cloud Storage account
* A Google Cloud Storage bucket and path of folder containing CSV files.
## Google Cloud Storage Setup
Drivetrain supports integration with Google Cloud Storage from a read-only external user account. To get started you would need to share the read-only access with service account.
### Step 1 : Create a new bucket (optional)
{% hint style="info" %}
If you are granting read access to an existing bucket, proceed directly to Step 2.
{% endhint %}
1. Create a new bucket with name as "Drivetrain Bucket" with US multi region.
2. Create a new folder "Drivetrain Files" under this bucket and move all the CSV files you want to ingest into this folder.
### Step 2: Grant permissions to access the bucket
To grant an access to external user, (someone who is not listed as an employee in the company), follow these steps:
1. Log in to your Google Cloud account. Open Google Cloud Storage in the Cloud Console, then select the bucket containing the files you want to share.
2. Choose **Permissions** tab and click on **Grant Access**
3. Add service account to the New principals and assign below mentioned roles and click **Save**
1. **Storage Legacy Bucket Reader**
2. **Storage Legacy Object Reader**
{% hint style="info" %}
That’s it! Share the below details with your Customer Success Manager or Data Integrations Manager so that they can get started:
1. Bucket Name
2. Folder Path (where CSV files are stored)
{% endhint %}
# HRIS & ATS
Drivetrain integrates with **60+** HRIS & ATS tools.
You can integrate the following tools directly by following the instructions provided below:
* [ADP Workforce Now](/integration-guide/readme/hris-and-ats/integrating-with-adp-workforce-now)
* [Ashby](/integration-guide/readme/hris-and-ats/integrating-with-ashby)
* [BambooHR](/integration-guide/readme/hris-and-ats/integrating-with-bamboohr)
* [Darwinbox](/integration-guide/readme/hris-and-ats/integrating-with-darwinbox)
* [Deel](/integration-guide/readme/hris-and-ats/integrating-with-deel)
* [Greenhouse](/integration-guide/readme/hris-and-ats/integrating-with-greenhouse)
* [Gusto](/integration-guide/readme/hris-and-ats/integrating-with-gusto)
* [HiBob](/integration-guide/readme/hris-and-ats/integrating-with-hibob)
* [HiBob (SFTP)](/integration-guide/readme/hris-and-ats/integrating-with-hibob-sftp)
* [Justworks](/integration-guide/readme/hris-and-ats/integrating-with-justworks)
* [Lattice](/integration-guide/readme/hris-and-ats/integrating-with-lattice)
* [Lever](/integration-guide/readme/hris-and-ats/integrating-with-lever)
* [Namely](/integration-guide/readme/hris-and-ats/integrating-with-namely)
* [Paylocity](/integration-guide/readme/hris-and-ats/integrating-with-paylocity)
* [Paychex](/integration-guide/readme/hris-and-ats/integrating-with-paychex)
* [Paycom](/integration-guide/readme/hris-and-ats/integrating-with-paycom)
* [Paycor](/integration-guide/readme/hris-and-ats/integrating-with-paycor)
* [Personio](/integration-guide/readme/hris-and-ats/integrating-with-personio)
* [Rippling (API)](/integration-guide/readme/hris-and-ats/integrating-with-rippling-via-api-key)
* [Rippling (SFTP)](/integration-guide/readme/hris-and-ats/integrating-with-rippling-sftp)
* [Sapling](/integration-guide/readme/hris-and-ats/integrating-with-sapling)
* [UKG Pro](/integration-guide/readme/hris-and-ats/integrating-with-ukg-pro)
* [UKG Ready](/integration-guide/readme/hris-and-ats/integrating-with-ukg-ready)
* [Workday (SFTP)](/integration-guide/readme/hris-and-ats/integrating-with-workday-sftp)
* [Zenefits](/integration-guide/readme/hris-and-ats/integrating-with-zenefits)
For other HRIS & ATS systems, contact your customer success manager to help you get them connected.
# Integrating with ADP Workforce Now
## Prerequisites
* An active ADP Workforce Now admin account
* Admin privileges in Drivetrain
## ADP Workforce Now Setup
Drivetrain uses SFTP to integrate ADP Workforce Now to do data ingestion of files. SFTP is a secure and private method to send files over the internet.
In this guide, you will be given detailed instructions on how to create a custom report in ADP with fields that you want to include for your use case.
### Step 1: Create your employee report
1. Log into ADP and click the **Reports & Analytics** tab
2. Then click **Set Up New** under the Custom Reports
3. In **Set Up New Report** page, set the Report Title to **employee-census**
4. Then click Select Fields to continue
### Step 2: Add fields to your custom report
1. Add fields to your custom report
2. Search for the field name under **ADD FIELDS,** then \*\*\*\*click the **+** button to add it to the report on the right
3. Below are fields most commonly used in a custom employee report
| | |
| ------------------------ | ---------------- |
| **Associate ID** | Race/Ethnicity |
| Payroll First Name | Marital Status |
| Payroll Last Name | Position ID |
| Preferred or Chosen Name | File Number |
| Gender | Company Code |
| Birth Date | Job Title |
| Tax ID | Business Unit |
| Primary Address | Hire Date |
| Personal E-mail | Termination Date |
| Home Phone | Annual Salary |
| Work Phone | |
\*And other employee fields.
| | |
| ---------------------------------------------- | ------------------------------------------ |
| **Associate ID** | Home Phone Number |
| Personal Number | Work Phone |
| Preferred or Chosen Name | Work Email |
| Date of Birth | Address Line 1 (Primary Address) |
| Personal Email | Address Line 1 (Work Address) |
| Status | Address Line 2 (Primary Address) |
| Address Line 2 (Work Address) | City (Work Address) |
| City (Primary Address) | State/ Province / Territory (Work Address) |
| State / Province / Territory (Primary Address) | Country (Primary Address) |
| Zip Code / Postal Code (Primary Address) | Country (Work Address) |
| Zip Code / Postal Code (Work Address) | |
4. Once you are done with selection, click **Save + Run**, this will take you to View Report screen
5. Click run to finalise this report
{% hint style="info" %}
Sometimes ADP appends a reports total to your custom report. If you see this, please delete the row. 
{% endhint %}
### Step 3: Recurring report transfers using Automatic Export Service
1. To automatically send your report on a recurring basis you will need to contact your ADP representative. They will charge a recurring fee to set up report automation that can be used across one or multiple reports. For more information on pricing, please refer to your ADP representative. *Charges may vary but anecdotally we have heard prices range from $500-$750 for one-time setup and $30-$50/month recurring fee.*
2. To set up the automation, you'll need to complete a Statement of Work with ADP to initiate the recurring file transfers (see the example below). Once finalised, ADP will apply the automation to the custom report you previously created. The process typically takes 3-4 weeks to complete.
3. See details below for filling the Client Supplied Information:
1. **WFN Client ID:** Characters to the right of the @ symbol in your ADP login name
2. **WFN Security Master:** Person you chose as the Security Master in your ADP instance, this is likely your ADP Admin
3. **Authentication Level:** Select SSH Key (ADP Provided)
4. **Date Stamp Required:** Select No
5. **Required PGP Encryption:** Both are acceptable depending on your preferences, you can read more about PGP Encryption [here](https://www.adpucm.com/pgp).
1. If PGP encryption is required, you have to create key-pair, after which you can then share the key with ADP.
4. Please find details for remaining fields:
1. FTP Username: Reach out to Drivetrain team for Username.
2. Directory: Reach out to Drivetrain team for Username.
3. Host Name / IP Address: `sftp1.drivetrain.ai`
4. Port: `22`
5. Once the SOW is completed, ADP will typically respond in 3-4 weeks with confirmation on when the report is to be scheduled and the required SSH Key to authenticate the connection
### Step 4: Scheduling the report
ADP may schedule the reports themselves based on your preferences, but if you would prefer to schedule the report:
1. Go to **Reports & Analytics,** and click on All Custom Reports
2. Find the custom report and click on the three dots on right, then select **Schedule to Run**
3. Fill in the details of the schedule when you want to push data from ADP to drivetrain, after filling all details click on **Apply**
{% hint style="info" %}
That’s it, please note ADP will them provide you an SSH Key which you will need to connect the account.
{% endhint %}
## Troubleshooting
If you are having difficulties sending or receiving the data please first check the following common requirements.
1. Your report must be in .csv format
# Integrating with Ashby
[Prerequisites](#prerequisites)
[Ashby Setup](#zenefits-setup)
[Create a new API Key](#add-a-new-user)
## Prerequisites
To connect Ashby to Drivetrain, you need:
* An active Ashby account
* Admin privileges on Ashby
* Admin privileges in Drivetrain
## Ashby Setup
Drivetrain supports integration with Ashby via **API** from a read-only external **admin** user account.
To get started you would need to create an API Key on Ashby for Drivetrain with read-only administrative access.
### Create a new API key
1. Sign in to Ashby and click **Admin** in the top navigation bar and click on Navigate to **Integrations** in left side bar.
2. Click on **API keys**
3. Click "**+ New**" in the upper right corner
4. Add a name for the new API key as "**Drivetrain Integration**", then click "**Create API Key"**
5. Grant the following permissions to your API key
| Permission | Required at minimum | Explanation |
| ------------------------------ | ------------------- | ---------------------------------------- |
| Jobs: Read | Y | |
| Candidates: Read | Y | |
| Candidates: Write | N | Not needed, we don't write back to Ashby |
| Interviews: Read | Y | |
| Hiring Process Metadata: Read | Y | |
| Hiring Process Metadata: Write | N | Not needed, we don't write back to Ashby |
| Organization: Read | Y | |
| Offers: Read | Y | |
6. Click on Save and Continue. Copy the API key and store it in a secured document.
***
### Drivetrain Setup
After generating your Ashby API key (above), add Ashby as a data source in your Drivetrain instance. You must be a **Drivetrain administrator** to add a data source.
#### Step 1: Go to the Data page and add a data source
1. Sign in to your Drivetrain instance as an administrator.
2. In the left navigation, click **Data**.
3. At the top of the data sources panel, click the **+** (Add data source) button.
#### Step 2: Select the Ashby connector
1. In the **Connect a datasource** window, type **Ashby** in the search bar (or open the **HRIS & ATS** category).
2. Click the **Ashby** connector card.
#### Step 3: Confirm administrator access
1. The Ashby connection window opens with the message **"Administrator role required."**
2. Click **I am an admin** to continue.
#### Step 4: Enter your Ashby API key
1. When prompted, paste the **Ashby API Key** you generated in the **Ashby Setup** section above.
2. Click **Next** to validate the key and create the connection.
#### Step 5: Finish setup
1. Once the key is validated, the connection is created and you are returned to the **Data** page.
2. **Ashby** now appears in your list of connected data sources and begins syncing.
3. When the sync completes, your Ashby data is available across Drivetrain.
> If you have any questions or run into any issues during setup, please contact your customer success manager for assistance.
# Integrating with BambooHR
Connect BambooHR to Drivetrain for workforce and HR planning.
**Drivetrain integrates with BambooHR** to bring in **employee and organizational data** for workforce planning, headcount tracking, and HR-linked financial models.
To connect your BambooHR account to Drivetrain, follow the steps below.
### Prerequisites
Before you begin, make sure you have:
* Your BambooHR **subdomain** (e.g., in `yourcompany.bamboohr.com`, the subdomain is `yourcompany`)
* A BambooHR **admin account login credentials**
* **Admin permissions** within Drivetrain
### Step 1: Log in to BambooHR
1. In the BambooHR login page, enter your **BambooHR subdomain** (e.g., in `yourcompany.bamboohr.com`, the subdomain is `yourcompany`)
2. Click **Continue**
3. Enter your **BambooHR admin account credentials**
4. Click **Log In**
### Step 2: Generate an API key in BambooHR
1. Click your **profile picture** in the bottom-left corner > **API Keys**
2. Click **+ Add New Key**
3. Name the key `Drivetrain Integration`
4. Click **Generate Key**
5. **Copy** the **API key** shown
{% hint style="warning" %}
You’ll only see this key once—make sure to **save it securely.**
{% endhint %}
### Step 3: Integrate in Drivetrain
1. Go to the **Data page** in Drivetrain
2. Click the **+** **icon** in the top-left corner to **add a new data source**
3. Select **BambooHR** from the list of available integrations
4. Enter your **BambooHR subdomain** into the **Subdomain field**
5. Paste the **API key** into the **API Key field**
6. Click **Submit**
Drivetrain will validate your credentials and begin syncing your BambooHR data. You’ll be able to monitor sync progress from the Data page.
### Next Steps
Once connected, you’ll be able to:
* **Pull employee attributes** like name, ID, department, location, and more
* **Use employee data** in planning models, filters, and access controls
### Troubleshooting
If you’re unable to connect BambooHR to Drivetrain after completing the steps above, reach out to your Drivetrain onboarding partner. In most cases, no additional configuration is required.
{% hint style="info" %}
Include a **screenshot** or **brief description** of the error message. We'll help you troubleshoot and guide you through next steps.
{% endhint %}
### Need to Grant Temporary Access?
In **rare cases**—such as **data inconsistencies** or **bug investigations**—your Drivetrain team may request temporary access to your BambooHR account.
**View:** [Grant temporary access to BambooHR](/integration-guide/readme/hris-and-ats/integrating-with-bamboohr/grant-temporary-access-to-bamboohr)
This is not required for setup or general connection issues.
# Grant temporary access to BambooHR
Grant temporary BambooHR access to Drivetrain for troubleshooting.
In **rare cases**—such as **data inconsistencies** or **bug investigations**—your Drivetrain support or onboarding team may ask you to grant temporary access to your BambooHR account. This allows us to **troubleshoot directly** using a controlled, read-only user that you create.
{% hint style="warning" %}
Use this guide only if requested by Drivetrain. This is not required for initial setup or general connection issues.
{% endhint %}
### Overview
This guide walks you through how to:
1. Add a **temporary user account** for the Drivetrain team
2. Assign the **correct permissions**
3. **Revoke access** once troubleshooting is complete
Access is temporary and limited to what’s required for diagnosis. You retain full control and visibility at all times.
### Step 1: Add a Temporary Admin User
1. In BambooHR, go to **Settings**
2. Select **Access Levels**
3. Click on **Full Admin**
4. Click **Add a New Non-Employee User**
### Step 2: Fill in Temporary Admin User details
1. Use the following details:
1. **First name:** Drivetrain
2. **Last name:** AI
3. **Email:** `dp-[yourcompany]@drivetrain.ai` *(provided by your CSM)*
4. **Access Level:** Full Admin
2. Click **Save**
{% hint style="info" %}
**Full admin access** is required only for the duration of troubleshooting. No passwords need to be shared manually.
{% endhint %}
### Step 3: Notify the Drivetrain Team
Once the user has been created:
* **Notify** your Drivetrain CSM via email or Slack
* The **Drivetrain team** will log in and proceed with debugging
### Step 4: Remove Access After Troubleshooting
After the issue is resolved:
1. Go to **Settings > Access Levels > Full Admin**
2. **Hover** on the temporary Drivetrain user
3. Click **Manage Access**
4. Select **No Access**
5. Click **Update Access**
{% hint style="warning" %}
Temporary access is granted only for issue resolution. Access is handled via user provisioning—no credentials are shared manually. You can remove or deactivate the user at any time.
{% endhint %}
# Integrating with Darwinbox
[Prerequisites](#prerequisites)\
[Case One: When you have access to Darwinbox Studio Module](#case-one-when-you-have-access-to-darwinbox-studio-module)\
[Step 1: Creating a Studio User](#step-1-create-a-studio-user)\
[Step 2: Creating an API key](#step-2-create-an-api-key)\
[Case Two: When you don't have access to Darwinbox Studio Module](#case-two-when-you-dont-have-access-to-darwinbox-studio-module)\
[Step 1: Contact your Darwinbox Representative](#step-1-contact-your-darwinbox-account-manager)
Darwinbox has two methods to integrate with their APIs:
1. If you have **Darwinbox Studio** module as part of your Darwinbox subscription, then you can directly create an API key yourself.
2. If you don't have a Darwinbox Studio module you will need to reach out to your Darwinbox account manager.
## Prerequisites
1. An active Darwinbox admin account.
## Case One: When you have access to Darwinbox Studio Module
### Step 1: Create a Studio user
1. Log into your Darwinbox account with super admin role, and go to the modules page.
2. Click on **Darwinbox Studio.**
3. Under Studio Users tab, click on **Add Studio User**.
4. Add the below user details in the next screen:
1. Enter Username as “Drivetrain Integration”.
2. Select Type as External.
3. Enter the email address as shared by your Drivetrain customer success manager.
4. Enter a unique User ID.
5. Enter a strong password.
{% hint style="info" %}
Username and Password are needed for authentication.
{% endhint %}
### Step 2: Create an API key
1. Under Darwinbox API Keys Tab, click on **Configure Darwinbox API.**
2. Drivetrain fetches data from two essential APIs, if more APIs need to be pulled raise this to your Drivetrain’s CSM.
1. [Employee Data](https://api-docs.darwinbox.com/#e3afba06-d4cf-479e-8605-26388b14eda3)
2. [Employee CTC Data](https://api-docs.darwinbox.com/#981af6ff-0fac-42f2-bec4-78b8466260aa)
3. Add the below API details in the next screen:
1. Enter key type as static key.
2. Enter the API configuration name as **Drivetrain Integration Employee Data.**
3. Select the user created in the previous step.
4. Select the module you want to pull into drivetrain. For employee data API select the module as **Core**, and **Compensation** for Employee CTC data.
5. Select endpoint as `/masterapi/employee` for employee data and `/payrollapi/ctcbreakup` for employee CTC data.
6. Click on Create.
{% hint style="info" %}
For both APIs you’ll need to create separate API keys.
{% endhint %}
{% hint style="info" %}
That’s it! Share the API keys , Dataset Keys for both modules, and Username & Password with your Drivetrain customer success manager.
{% endhint %}
## Case Two: When you don't have access to Darwinbox Studio Module
### Step 1: Contact your Darwinbox account manager
1. Initiate a request with your Darwinbox account manager regarding an integration with Drivetrain.
2. Ask Darwinbox team to create a user with name “Drivetrain Integration”.
3. Ask Darwinbox team to create API keys for below APIs:
1. [Employee Data](https://api-docs.darwinbox.com/#e3afba06-d4cf-479e-8605-26388b14eda3)
2. [Employee CTC Data](https://api-docs.darwinbox.com/#981af6ff-0fac-42f2-bec4-78b8466260aa)
{% hint style="info" %}
That’s it! Share the API keys , Dataset Keys for both modules, and Username & Password with your Drivetrain customer success manager.
{% endhint %}
# Integrating with Deel
Drivetain uses organization token to integrate Deel, it enables user to limit the scopes they want to share.
[Prerequisites](#prerequisites)\
[Deel Setup](#deel-setup)\
[Create Organization Token](#step-1-create-organization-token)
## Prerequisites
1. An active Deel admin account.
2. Admin priviliges in Drivetrain.
## Deel Setup
### Step 1: Create Organization Token
1. Log In into your Deel account and Click on **Hub,** on the next page Click on **Developer Center**
2. On the Developer Center > API access & Sandbox and Click on **Generate New Token** under Organization Token
3. Label the token as **Drivetrain Integration** and click on next
4. Select the necessary scopes for for which you want to pull data into drivetrain, and choose the **read method** for every scope and click on **Generate**
{% hint style="info" %}
Scopes represent the objects user has created in their account, you can choose to not share certain scopes which doesn’t fit in the usecase. Please refer to [this](https://developer.deel.com/docs/scopes-1) to understand more about scopes
{% endhint %}
5. Copy the token in a secure place and click on close.
{% hint style="info" %}
That’s it share the organization token to your customer success manager.
{% endhint %}
# Integrating with Greenhouse
[Prerequisites](#prerequisites)
[Greenhouse Setup](#greenhouse-setup)\
[Step 1: Create an API key](#step-1-create-an-api-key)\
[Step 2: Assigning Relevant Permissions](#step-2-assigning-relevant-permissions)
Drivetrain uses API keys to integrate with Greenhouse, utilising the Harvest API type, which is designed to allow Greenhouse customers to push their data from Greenhouse. For more information about the Harvest API, refer to the Harvest API [documentation](https://developers.greenhouse.io/harvest.html?shell#introduction). This guide shows how to create an API key in Greenhouse and select the relevant permissions for the data you want to ingest into Drivetrain.
## Prerequisites
To connect Greenhouse to Drivetrain, you need:
1. An active Greenhouse Admin Account.
2. Admin Privileges in Drivetrain.
## Greenhouse Setup
### Step 1: Create an API key
1. Log in to your Greenhouse account, and click on the **Configure (Settings)** icon in the upper right-hand corner of any page.
2. Click on **Dev Center** in the left panel.
3. Under Dev Center, Select **API Credential Management**
4. Click **Create New API Key.**
5. Select the API type as **Harvest**, enter the description of the API key as “Drivetrain Integration API Key” and click **Manage Permissions**.
6. Click the **Copy** button, store the API key in a safe document, and then click **“I have stored the API key.”**.
{% hint style="info" %}
You won’t be able to copy the API key again, so make sure to store it in a safe document.
{% endhint %}
### Step 2: Assigning Relevant Permissions
1. Select the relevant permissions required for your solution
2. Drivetrain accesses the following objects using the permissions defined in point 3:
* Candidates
* Applications
* Jobs
* Users
* Interviews
* Scorecards
* Attachments
* Interview Stages
* Offers
* Offices
* Departments
* Activities
* Reject Reasons
* Tags
3. Please find below the permissions required to access the specified objects:
| Object Name | Permissions Required |
| -------------------- | -------------------------------------------------------------------------------------------------------------------------------------------------------------------- |
| Candidates |
GET: List Candidates GET: Retrieve Candidates
|
| Applications |
GET: List Applications GET: Retrieve Applications
|
| Tags |
GET: List Candidate Tags GET: List tags applied to candidate
|
| Users |
GET: List Users GET: Retrieve Users
|
| User Roles | GET: List User Roles |
| EEOC |
GET: List EEOC GET: Retrieve EEOC Data for Application
|
| Scorecards |
GET: List Scorecards GET: List Scorecards for Application GET: Retrieve Scorecard
|
| Offers |
GET: List Offers GET: List Offers for Applications GET: Retrieve Current Offer for Application GET: Retrieve Offer
|
| Scheduled Interviews |
GET: List Scheduled Interviews GET: List Scheduled Interviews for Application GET: Retrieve Scheduled Interview
GET: List Email Templates GET: Retrieve Email Template
|
| Custom Fields |
GET: List Custom Fields GET: Retrieve Custom Fields GET: List Custom Field Options
|
| Jobs |
GET: List Jobs GET: Retrieve Job GET: Hiring Team
|
| Job Posts |
GET: List Job Posts GET: Retrieve Job Post GET: List Job Posts for Job GET: Retrieve Job Post for Job GET: Retrieve Custom Locations for Job Post
|
| Job Stages |
GET: List Job Stages GET: List Job Stages for Job GET: Retrieve Job Stage
|
| Job Openings |
GET: List Job Openings GET: Single Opening for Job
|
| Offices |
GET: List Offices GET: Retrieve Office
|
| Rejection Reasons | GET: List Rejection Reasons |
| Sources | GET: List Sources |
| Close Reasons | GET: List Close Reasons |
| Education |
GET: List Degrees GET: List Disciplines GET: Schools
|
| Prospect Pool |
GET: List Prospect Pools GET: Retrieve Prospect Pool
|
| Tracking Links | GET: Tracking Link Data for Token |
| Approvals |
GET: List Approvals for Job GET: Retrieve Approval Flow GET: Pending Approvals for User
|
4. The minimum permissions needed for this integration are under the **Users** section:
1. GET: List Users
2. GET: Retrieve Users
{% hint style="info" %}
That’s it. Share the API key with your Customer Success Manager.
{% endhint %}
# Integrating with Gusto
[Prerequisites](#prerequisites)
[Gusto Setup](#gusto-setup)\
[Create a New User](#create-a-new-user)
[Drivetrain Setup](#drivetrain-setup)
## Prerequisites
To connect Gusto to Drivetrain, you need:
* An active Gusto account
* Admin privileges on Gusto
* Admin privileges in Drivetrain
## Gusto Setup
Drivetrain supports integration with Gusto via API from an admin user account. To get started you would need to create a new user on Gusto.
### Create a New User
Please follow this short video guide with instructions on how to set up Gusto:
{% embed url="" %}
Or you can follow the step-by-step instructions given below:
1. Log in to Gusto with an Admin account
2. Navigate to Settings by clicking on **My Profile** from the overflow menu on the top-right of the screen
3. Click on the **Permissions** tab
4. Click on **Gusto admins** to add a new Admin user
5. Click on **Add new admin**
6. Specify the details as per the image below (*Your Drivetrain customer success manager would share the email address with you)*
7. Select Full Access under **Which roles will Drivetrain Integration need to help run your business?**
8. Under Summary, click **Add admin**
## Drivetrain Setup
1. Log in to your Drivetrain account
2. Click on **+ New Data Source**
3. Click **+Connect** on the Gusto Data Connector from the list of integrations
4. On the widget, click **Continue**
5. Enter your Gusto **User ID** and **Password,** and click on **Submit**
6. Enter the 2FA code you would have received on your email/authenticator/phone for Gusto
7. Please wait while your Gusto integration is set up. Once done, click on **Finish Setup**
# Integrating with HiBob
### Prerequisites
Please ensure you fulfill the requirement to set up the integration:
* You have Administrator permissions in your company's HiBob instance
### HiBob Setup
To authenticate HiBob using a Service Account, you will need to provide the following information:
* Service Account User ID
* Service Account Token
#### Step One: Create the service user in your HiBob account
1. Navigate to your HiBob **System Settings**
2. In settings, go to integrations and click **Manage Service Users.**
3. Next click on **Create Service User** to create a new service user and enter the display name as '**Drivetrain Integration'** and click **Create**.
4. On the next screen, HiBob display the credentials for your new service user. Make a note of the **Service User ID** and **Token**. You can name the new service user then click on Go to permission groups and proceed with the next step.
#### Step Two: Create a permission group
1. Click Add permission group, then Service user
2. Name the group as 'Drivetrain Integration' and select your new service user ("Drivetrain Integration") under **Select service users** and click **Create** and asked to confirm the changes, click **Confirm**
3. Switch to the People's data tab of the new Permission Group, pick "Select people by condition" under Whose data can members access?, then click on Edit to select the people the integration can access
4. In the Select people by condition pop-up, select all relevant Lifecycle Statuses. In most scenarios this will include **Hired**, **Employed**, and **Terminated**. Click Apply twice once done:
5. Under **People's Data** add the following permissions:
Please note the permissions below are the required permissions for the full HRIS API. You only need to configure the permissions based on your use case
* People > Basic Info
* View selected employees' Basic info sections (This is required to surface employees)
* People > Employment
* View selected employees' Employment sections
* View selected employees' Employment section histories
* People > History
* View selected employees' profile changes history
* People > Identification
* View selected employees' Identification sections
* Edit selected employees' Identification sections (only applicable if you want full unobscured SSN numbers.)
* People > Lifecycle
* View selected employees' Lifecycle sections (This is needed to surface Employment Status)
* Edit selected employees' Lifecycle sections
* View selected employees' Lifecycle section histories
* People > Personal
* View selected employees' Personal sections
* Edit selected employees' Personal sections (Note: This is needed to surface Date of Birth. We will NOT edit any employee sections)
* People > Personal contact details
* View selected employees' Personal contact details sections
* Edit selected employees' Personal contact details sections
* People > Work
* View selected employees' Work sections
* View selected employees' Work section histories
* People > Work contact details
* View selected employees' Work contact details sections
If you do not require Payroll, Address, EEO, Home, or Time Off, to reflect in Drivetrain, you do not need to include those, you can ignore the below permissions
* People > Address
* View selected employees' Address sections
* View selected employees' Address section histories
* People > EEO
* View selected employees' EEO sections
* People > Home
* View selected employees' Home sections
* People > Payroll
* View selected employees' Payroll sections
* View selected employees' Payroll section histories
* Timeoff > Balance
* See selected people's time off and sick leave balances
* Timeoff > Requests
* Create, edit, and cancel people's requests that haven't been approved yet
* Edit and cancel people's future requests that have been approved
* Edit and cancel people's past requests that have been approved
* View, approve or decline requests that are pending approval of others
* Timeoff > See who's out today
* See who's out today
Once done adding the above permissions, finish creating the Permission Group by selecting **Save**.
***
### Drivetrain Setup
After creating your HiBob service user and permission group (above), connect HiBob as a data source in your Drivetrain instance. You must be a **Drivetrain administrator** to add a data source.
#### Step 1: Go to the Data page and add a data source
1. Sign in to your Drivetrain instance as an administrator.
2. In the left navigation, click **Data**.
3. At the top of the data sources panel, click the **+** (Add data source) button.
#### Step 2: Select the HiBob connector
1. In the **Connect a datasource** window, search for **bob** (or open the **HRIS & ATS** category).
2. Click the **HiBob** connector card.
#### Step 3: Enter your Hibob credentials
On the **Connect your Hibob account** screen, set up a new Hibob connection:
1. **Service Account Id** — your HiBob **Service User ID**
2. **Service Account Password** — your HiBob **Token**
3. Click **Submit**.
#### Step 4: Finish setup
1. Once the credentials are validated, the connection is created and you are returned to the **Data** page.
2. **HiBob** now appears in your list of connected data sources and begins syncing.
3. When the sync completes, your HiBob data is available across Drivetrain.
{% hint style="info" %}
If you have any questions or run into any issues during setup, please contact your customer success manager for assistance.
{% endhint %}
# Integrating with HiBob (SFTP)
## Drivetrain HiBob SFTP Guide
### **Step 1: Configure connection via SFTP**
* **Prerequisites:** You need to be an Account Admin for your HiBob Account
* From the left menu, select **Settings** **>** **Integrations**.
* From the integrations menu, search for **SFTP**, then click on **Connect** or **Manage** from the SFTP tile.
Click **Add SFTP destination** and enter a **Name** for the SFTP destination. Then under identification, select Credentials.
{% hint style="info" %}
If this is your first time setting up SFTP, Bob will display Connect. If an SFTP destination has already been set up at least once, Bob will display **Manage.**
{% endhint %}
Get these details from your **Drivetrain customer success representative** to enter in **HiBob**:
* Username
* Password
* HostPort
* Path
* Then click save.
### **Step 2: Setup secure file transfer schedule**
* Navigate back to your report that you created in Step 1 - from the left menu, select **Analytics** > **Reports.**
* Find the report that you would like to send via SFTP
* Click More dropdown on the top right of your screen
* Click Schedule
**Enter the following information:**
* Scheduling name: this can be any value
* SFTP: Select the destination that you just configured
* Frequency Period and Timezone: choose any
* File Format: csv
Now save and run. The reports that you created will now be sent to Drivetrain at the schedule that you specified.
# Integrating with Justworks
### Prerequisites
Before you begin, ensure:
1. You have an active **Justworks admin** account.
2. You have **Admin access in Drivetrain** with permission to add data sources.
### Connect Justworks
Follow these steps to start the connection from within Drivetrain:
#### Step 1: Open the Justworks connector in Drivetrain
* Log in to **Drivetrain**.
* Go to the **Data** page.
* Click the **+ Add data source** icon.
* Search for **Justworks** and select it.
* Confirm **I am an admin** and click **Next**.
* **Review the list of items** Drivetrain will have read access to and click **Next**.
* Click **Open window** to launch the Justworks login prompt.
#### Step 2: Log in to Justworks
* You’ll be redirected to the **Justworks login** screen.
* Sign in using your **Justworks admin credentials**.
#### Step 3: Authorize the Connection
* Click **Next** on the first screen.
* If prompted, check the box to allow access to **Sex** or **Date of Birth** information.
* This checkbox only appears if your company requires that level of access.
* Click **Authorize** to complete authentication.
Once authorization succeeds, Merge will redirect you back to Drivetrain and your Justworks sync will begin.
# Integrating with Lattice
[Prerequisites](#prerequisites)
[Lattice Setup](#zenefits-setup)\
[Generate API Key](#add-a-new-user)
## Prerequisites
To connect Lattice to Drivetrain, you need:
* An active Lattice account
* Super Admin privileges on Lattice
* Admin privileges in Drivetrain
## Lattice Setup
Drivetrain supports integration with Lattice via **API** using an API key.
### Generate API key
{% hint style="info" %}
Ensure that the person creating the API key is a super admin in your Lattice account.
{% endhint %}
1. Log in to your Lattice account.
2. On the left-hand navigation pane, select **Admin** > **Settings** > **API Keys**.
3. Click **Generate API key**.
4. Make a note of the API key in a secured document.
{% hint style="info" %}
That’s it! Share the API key with your customer success manager so that they can get started!
{% endhint %}
# Integrating with Lever
[Prerequisites](#prerequisites)
[Lever Setup](#lever-setup)
## Prerequisites
To connect Lever to Drivetrain, you need:
* An active Lever account
* Super admin privileges on Lever
### Lever Setup
1. Log into your Lever account, navigate to **Settings > Integrations** by clicking on the top left drop-down menu.
2. Navigate to the API credentials tab. Under Lever API credentials, click **Generate New Key**.
3. Make a note of the API key.
4. Under **Permissions**, choose the **Select all read** preset.
{% hint style="info" %}
That’s it! Share the API Key with your customer success manager so they can get started!
{% endhint %}
# Integrating with Namely
## Coming Soon...
# Integrating with Paylocity
[Prerequisites](#prerequisites)
[Paylocity Setup](#paylocity-setup)\
[Step One: Getting your Company ID](#step-1-getting-your-company-id)\
[Step Two: Getting your client ID and Secret](#step-2-getting-your-client-id-and-secret)
## Prerequisites
To connect Paylocity to Drivetrain, you need:
* An active Paylocity account along with the below details:
* Company ID
* Client ID
* Client Secret
* Admin privileges in Drivetrain
## Paylocity Setup
You can integrate Drivetrain with Paylocity using access tokens that Paylocity shares with you.
### Step 1: Getting your Company ID
Your Company ID is available on the upper left hand corner of your Paylocity portal.
### Step 2: Getting your Client ID and Secret
1. Fill out the Paylocity Web Services Access Request Form: Use this link to access the Request Form - [Integration/Paylocity Web Services\_Access Request.pdf](broken://spaces/xk5QIoB2UA1qxCweAfEf)
In the 'Client Contact Information' section of the form, provide information of someone from your company (for example, the details of a HR personnel).
In the 'Vendor / Third Party Contact Information' section, provide Drivetrain's information.
Under 'Briefly describe use case', describe that you wish to use Drivetrain for business reporting purposes.
You can ignore the "Webhook Push Notifications" section.
If you need information on Pay Statements, Deductions, & Earnings fill out the following:
{% hint style="info" %}
'Get Employee' is a required permission to authenticate the linking flow, but only endpoints needed for your integration should be selected. For example, if you don’t need Pay Statements, Deductions, or Earnings, remove those from the permissions.
{% endhint %}
2. Send your completed form to
The email should contain the following:
Subject: Requesting Client ID and Client Secret
Hi Paylocity team,
Can we get access to a Client ID and Client Secret for API access? ()
We have attached the form specifying relevant permissions.
{% hint style="info" %}
That’s it! Share the Client ID and Client Secret with your customer success manager so that they can get started!
{% endhint %}
# Integrating with Paylocity (SFTP)
### Prerequisites
To connect **Paylocity** to **Drivetrain** using **SFTP**, you need:
1. A **Paylocity account** with access to **Report & Analytics and Reporting Settings**
2. Your **Drivetrain-assigned SFTP credentials:**
1. **Username:** `dtuserXXX`
2. **Private key** (.ppk file)
3. At least one **Paylocity report (Dynamic)** that you want to sync to Drivetrain
### Paylocity Setup
#### Step 1: Create the Drivetrain SFTP Integration
1. In Paylocity, navigate to **Report & Analytics.**
2. Click the **Reporting Settings tab.**
3. Click **Add Integration.**
4. Enter the following details:
1. **Name:** Drivetrain
2. **Server/Host Name:** sftp1.drivetrain.ai
3. **Directory:** paylocity
4. **Port:** 22
5. **User Name:** `dtuserXXX` *(you can get this from the Drivetrain team)*
6. **Authentication option:** Upload key file
7. **Upload file**: Select the **.ppk file** provided by Drivetrain
5. Click **Run Now** to test the connection.
#### Step 2: Create or Select a Report
You can send any Paylocity report to Drivetrain, including **Saved Reports** or newly created **Dynamic Reports.**
**To create a Dynamic Report:**
1. Go to **Create Report → Dynamic.**
2. **Select the dataset** you want to use (e.g., Employee Record Information, Employee Position History, Employee Status History).
3. **Choose the fields** you want to include. Commonly included fields are:
1. Employee ID
2. First name / Last name
3. Company code
4. Employment status
5. Hire date
6. Termination date
7. Department
8. Job title
9. Tenure
4. **Save** the report.
#### Step 3: Schedule the Report for Delivery
1. **Open the report** you want to send to Drivetrain.
2. Click the **⋮ (More Options)** menu and select **Schedule**.
3. Configure the schedule:
1. **Frequency:** Daily
2. **Time:** Choose a time early in the morning (e.g., 3:00 AM Pacific)
3. **Exclude Weekends:** Optional
4. **Time Zone:** Set according to your region
4. Under **What Reports Will Be Included**, ensure your report is selected.
5. Scroll to **Delivery Options** and select:
1. Deliver to integration: Drivetrain
2. Send Notification: Off (optional)
6. Click **Save**.
**To test the delivery immediately:**
1. Navigate to **Schedules**.
2. Clic**k Run Now** on the newly created schedule.
Once the integration is set up, you can schedule as many reports as needed using the same Drivetrain SFTP integration. No additional configuration is required.
# Integrating with Paychex
### Overview
To authenticate Paychex, Drivetrain requires:
* **API Key**
* **Client Secret**
These credentials are created directly in your **Paychex account.**
### Prerequisites
Before you begin, ensure the following:
* **Admin permissions** in your **company’s Paychex instance** (or access shared with you by an Admin).
* **Admin access to Drivetrain** with permission to **add data sources**.
* If payroll data is required, your Paychex account must include access to the Payroll and Check APIs.
### Step 1: Generate Your API Key and Client Secret
* Log in to **Paychex** and go to **Company Settings**.
* Select **Integrated Apps**.
* Click **Create App**.
* Enter an **Application Name** and **Description**.
* Select **Read only** for the **Company and worker APIs**
* If you also need to sync payroll information, select **Read only** for the **Payroll and check APIs**
* If Payroll API toggles are missing, contact your Paychex account manager for access.
* Review and accept the **Legal Notice** and **Paychex API License Agreement**, then **Save**.
* After saving, Paychex will display your **API Key** and **Client Secret**.
* **Copy these credentials — you will share them with Drivetrain in the next step.**
### Step 2: Share Your Credentials With Drivetrain
Instead of entering the API Key and Client Secret directly into Drivetrain:
1. Send your **API Key** and **Client Secret** to your Drivetrain implementation contact or customer success team using your agreed secure channel.
2. Drivetrain will configure the connector and validate access using the credentials you provide.
3. Once connected, you will see Paychex listed under **Data → Data Sources** in your workspace.
### Notes and Special Cases
#### Requesting Payroll API Access
If your Paychex account does not show the **Payroll** or **Check** **API** toggles:
Your **application provider (Drivetrain)** may need to **contact Paychex** using this message:
> We are using Merge API as a third-party integration provider and are looking to integrate {customer} payroll data into our system. We need access to the Payroll and Check APIs toggle in the Access settings for an application. Please advise what information you need from us and whether a form is required.
### Linking Multiple Companies
To link multiple companies under a Paychex parent account:
1. Ensure you are a **Super Admin** or **Security Admin** in the parent account.
2. Create the app in the **parent** account using the steps outlined above.
3. Open the app from **Company Settings → Integrated Apps → {Your App Name}**.
4. Scroll to **Company Access** and select **Add or Remove Company**.
5. Select all companies that should use the same credential set and **Save**.
6. Switch into each child company using the company dropdown in the upper-left corner.
7. In each child account, open the app under **Integrated Apps**, toggle **Access** on, and **Save**.
Once completed, share the API Key and Client Secret with Drivetrain as described in [Step 2.](#step-2-share-your-credentials-with-drivetrain) Drivetrain will configure the connector for all selected companies.
# Integrating with Paycom
This guide walks you through the steps required to connect your Paycom instance with Drivetrain. The process is simple and requires minimal setup on your end.
### Prerequisites
Before you begin, ensure that:
* You have an **active Paycom account**
* You have access to your **Paycom Account Manager** or **Customer Success representative**
* **Admin access** in Drivetrain with **permission to add data sources**
### Step 1: Request API Credentials From Paycom
To enable the Paycom → Drivetrain integration, Paycom must issue:
* Client ID
* Client Secret
These credentials can only be generated by Paycom and must be requested through your Paycom Account Manager.\
Reach out to your Paycom representative and request API credentials for third-party integration.
### Step 2: Integrate in Drivetrain
* Go to the **Data page** in Drivetrain
* Click the **+** **icon** in the top-left corner to **add a new data source**
* Select **Paycom** from the list of available integrations
* Click **I am an admin**
* Check the permissions and click **Next**
* Enter your **Client ID** as the **Username**
* Enter your **Client Secret** as the **Password**
* Click **Next** to finish integrating
### Support
If you encounter any issues not covered here, please contact your dedicated Customer Success Manager (CSM) for help.
# Integrating with Paycor
How to provision API access in Paycor and share credentials with the Drivetrain engineering team.
[Prerequisites](#prerequisites)
[Paycor Setup](#paycor-setup)
[Step 1 - Register for the Paycor Developer Portal](#step-1-register-for-the-paycor-developer-portal)
[Step 2 - Create a New Application](#step-2-create-a-new-application)
[Step 3 - Configure Data Access (Scopes)](#step-3-configure-data-access-scopes)
[Step 4 - Configure Security Connections](#step-4-configure-security-connections)
[Step 5 - Activate the Application Against Your Production Tenant](#step-5-activate-the-application-against-your-production-tenant)
[Share Credentials with the Drivetrain Team](#share-credentials-with-the-drivetrain-team)
### Prerequisites
To connect Paycor to Drivetrain, you need:
* Paycor administrator access. You must hold a Company Admin, HR Admin, or Payroll Admin role in Paycor. Without this role, the production activation step will fail with a 403 error.
* An active Paycor subscription for the modules whose data you intend to share (for example: Core HR, Payroll, Time).
* Access to the Paycor Developer Portal at developers.paycor.com. If you have not used the portal before, you will register as part of Step 1 below.
* A secure channel to share credentials with the Drivetrain engineering team. The engineering team will provide a secure intake link. Do not send credentials over plain email or Slack.
### Paycor Setup
Complete the following steps in the Paycor Developer Portal to create and configure an OAuth application that Drivetrain will use to access your data. Once done, you will have four credentials to share with the Drivetrain engineering team: Client ID, Client Secret, Subscription Key, and Legal Entity ID.
#### Step 1 - Register for the Paycor Developer Portal
1. Navigate to .
2. Under "Are you an existing Paycor client?" click Get started.
3. Sign in with your Paycor username and password.
4. Select the client(s) you want to be able to activate apps for.
5. Choose an administrator for the Developer Portal account (typically yourself) and click Request Access.
6. Sign out and sign back in. This step is required for your new permissions to take effect.
{% hint style="info" %}
If you do not see the Applications tab after signing back in, your access request is still pending. Wait a few minutes and refresh, or contact your internal Paycor administrator.
{% endhint %}
#### Step 2 - Create a New Application
1. From the Developer Portal home screen, click Applications.
2. Click the + Application button.
3. Enter an application name (recommended: YourCompany – Drivetrain Tap) and select Standard Application as the type.
4. Click Create Application.
5. Immediately copy the Client ID and Client Secret shown in the confirmation pop-up. The Client Secret is shown only once. If you miss it, you will need to regenerate it from the Security Connections tab.
6. Click Got it to dismiss the dialog.
{% hint style="warning" %}
Save your Client Secret now. Paycor does not display it again after this dialog closes. Paste both the Client ID and Client Secret into a secure password manager before continuing. If lost, the secret can be regenerated, but the previous value will stop working immediately.
{% endhint %}
#### Step 3 - Configure Data Access (Scopes)
Scopes control which Paycor objects the integration can read. Configure these on the Data Access tab of your application.
1. Open your application and click the Data Access tab.
2. Click + Scope and give it a descriptive name, for example: native-tap-read.
3. Select the permissions listed in the Required Scopes table below. Apply read-only permissions wherever possible.
4. Click Save.
5. Switch to the General tab and copy the Scope name that now appears. You will need it in Step 5.
### Required Scopes
Enable the following data permissions. If a permission is not listed in your Paycor instance, you do not subscribe to that module. Skip it.
| Object / Domain | Permission | Why we need it |
| -------------------------- | ---------- | ----------------------------------------------------------------------- |
| Employees | Read | Core employee records (name, status, hire date, work location, manager) |
| Person / Demographics | Read | Contact info, addresses, phone numbers, emergency contacts |
| Employments / Jobs | Read | Job title, FLSA status, employment type, manager hierarchy |
| Pay Rates | Read | Current and historical pay rate information |
| Earnings | Read | Earnings history per pay period |
| Deductions | Read | Pre- and post-tax deductions |
| Taxes | Read | Federal, state, and local tax records |
| Direct Deposits | Read | Bank account routing information for verification only |
| Departments / Cost Centers | Read | Organizational structure and reporting hierarchy |
| Legal Entities | Read | Required for any company-scoped API call |
| Time Off Requests | Read | PTO balances and time-off events (if Time module enabled) |
| Time Card Punches | Read | Worked-hours data (if Perform Time module enabled) |
#### Step 4 - Configure Security Connections
1. Open the Security Connections tab on your application.
2. Copy the APIm Subscription Key. This is the value sent in the Ocp-Apim-Subscription-Key header on every API call. Save it alongside your Client ID and Client Secret.
3. In the Approved Return OAuth URL field, paste this redirect URI :
4. Save your changes.
{% hint style="danger" %}
The redirect URI must be an exact match. Paycor checks it character by character.
A trailing slash, mixed casing, or http vs https mismatch will cause an invalid\_grant error during OAuth.
{% endhint %}
#### Step 5 - Activate the Application Against Your Production Tenant
Activation links your application to a specific Paycor legal entity. This step requires Company Admin, HR Admin, or Payroll Admin privileges.
1. Navigate to .
2. Enter the Application OAuth Client ID (from Step 2) and the Application Scope name (from Step 3, General tab).
3. Click Initiate.
4. Review the access scopes shown on the confirmation screen. These should match what you configured in Step 3.
5. Click Next.
6. Select the legal entity (client) you want to grant access to, then click Integrate.
7. Record the Legal Entity ID. This is the numeric identifier for the legal entity you selected. The Drivetrain engineering team will need it to scope API calls.
{% hint style="warning" %}
If you see a 403 error, the signed-in user does not have the required administrator role.
Have an authorized administrator complete this step, or request the role from your Paycor account manager.
{% endhint %}
### Share Credentials with the Drivetrain Team
Send the following four values to the Drivetrain team using the secure intake link they provided. Do not share credentials over email, Slack, or any unencrypted channel.
| Credential | Where to find it |
| ------------------------- | ------------------------------------------------------------------------------------------------ |
| Client ID | Application detail page, or the confirmation pop-up shown at creation in Step 2 |
| Client Secret | Captured at creation time in Step 2. Can be regenerated on the Security Connections tab if lost. |
| Ocp-Apim-Subscription-Key | Application Security Connections tab (Step 4) |
| Legal Entity ID | Recorded during the activation step in Step 5 |
# Integrating with Personio
Drivetrain uses Client ID and Secret of a custom integration created in Personio, it enables user to select the objects and fields they want to share.
[Prerequisites](#prerequisites)\
[Personio Setup](#personio-setup)\
[Generating API Credentials](#step-1-generating-api-credentials)
## Prerequisites
To connect Personio to Drivetrain, you need:
1. An active Personio admin account
## Personio Setup
### Step 1: Generating API Credentials
1. Log in to your Personio account and click on **Settings** in the bottom left.
2. Click **API Credentials** on Integrations Tile
3. Click **Create Custom Integration**
4. Enter name as **"Drivetrain Integration"** and click **Next.**
5. Under **Select the attributes you want to grant access rights for**, select the attributes you want to sync
{% hint style="info" %}
**Important:** To ensure the integration functions accurately, the following objects must be selected:
* Employees
* Attendances
* Absences
* Custom Reports
* Org Units
{% endhint %}
6. Under Readable employee attributes, click select all or select the individual fields you want to sync.
Commonly used fields include:
* Email
* First name
* Last Name
* Gender
* Hire date
* Office
* Profile Picture
* Termination date
* Status
* Supervisor
* Occupation type (optional)
7. Click Create integration once done. You will then see your API Credentials populate. Copy and save these in a secure document.
{% hint style="info" %}
That's it, please share the Client ID and Client Secret via a secured link or doc to your Customer Success Manager
{% endhint %}
# Integrating with PeopleHR
### Prerequisites
To connect PeopleHR to Drivetrain, you need:
* An active PeopleHR account
* Admin privileges on PeopleHR
* Admin privileges in Drivetrain
### PeopleHR Setup
Drivetrain supports integration with PeopleHR via an API key. You generate the key from an account with administrator access and scope it to the data Drivetrain should read.
#### Step 1: Create an API key
1. In your PeopleHR account, open **HR Admin**.
2. Go to **Settings > API** and click the **+** icon to create a new key.
3. Enter a **Key Name** (for example, *Drivetrain*) and, optionally, restrict the key to specific **IP Addresses**.
4. Under **Application Access**, select the areas Drivetrain should read — **Employee**, **Salary**, **Absence**, and **Holiday** — based on your use case.
{% hint style="info" %}
The **Salary** area controls access to compensation data. Include it only if your Drivetrain use case requires salary or pay information. To pull salary or employment **history**, also include the **History** area, as historical fields are only returned on the per-employee detail call.
{% endhint %}
5. Click **Save**.
6. Click the copy icon to copy the key, and store it securely.
### Drivetrain Setup
#### Step 1: Add the API key and complete the integration
1. Log in to Drivetrain as an administrator.
2. Click **+ New Data Source**.
3. Select **PeopleHR** from the list of connectors.
4. Enter the **PeopleHR API key** you copied.
5. Click **Finish Setup**.
Drivetrain validates the key and begins the initial sync. Once the sync completes, the PeopleHR datasets appear on the Data page.
# Integrating with Rippling (via API Key)
## Overview
### What is the value of the integration?
The Rippling–Drivetrain integration automatically syncs your workforce data from Rippling into Drivetrain, ensuring that headcount and employment changes stay fully up-to-date in your financial models and workforce plans.
This removes manual data entry, reduces errors, and helps Finance and People Ops maintain a single source of truth for workforce planning.
### Why should customers use the integration?
Use this integration if you want to:
* Keep headcount models automatically current.
* Build accurate workforce planning scenarios that reflect hires, exits, and promotions.
* Avoid manual CSV uploads or reconciliations between HR and Finance systems.
* Reduce planning cycle time and improve forecast accuracy.
### When should customers use this integration?
Customers should use this integration when:
* Rippling is the system of record for HR.
* Workforce-related drivers significantly impact budgets, forecasts, and scenario plans.
* Multiple teams depend on accurate employee data for planning (Finance, HR, FP\&A, Operations).
{% hint style="info" %}
If your organization manually manages workforce information or uses another HRIS as the primary source of truth, this integration may not be required.
{% endhint %}
## Installation
### Prerequisites
Before setting up the integration, ensure:
* You have admin permissions in Rippling to install and authorize API access.
* You have permissions in Drivetrain to configure integrations.
### How to Install the Integration
Log in to Drivetrain: Navigate to **Data** → **+** Add Data Source → HRIS → Rippling.
#### Choose “API Key”
To connect using an API key, first generate a key in Rippling, then paste it into the Drivetrain connector.
#### How to get your Rippling API key
Using Rippling’s API requires the Rippling API Key Package. If it is not already enabled on your account, contact your Rippling account representative to turn it on.
1. Sign in to your Rippling account at [app.rippling.com](http://app.rippling.com).
2. Go to Company Settings → API access. (Alternatively, open Tools → Developer → API Access.)
3. Click Create API key.
4. Enter a Description (for example, Drivetrain Integration).
5. Under Permissions, grant Drivetrain read access to all of the following scopes. Missing any one of these (for example `level`) will cause the sync to fail:
* `compensation`
* `user`
* `department`
* `teams`
* `level`
* `employment_type`
* `manager`
* `legal_entity`
* `custom_fields`
{% hint style="warning" %}
Grant read access for every scope listed above. A common cause of failed syncs is the level scope not being enabled, so please double-check it is included before saving the API key.
{% endhint %}
6. Click Save — you will be redirected to the API access page.
7. Copy the generated API token and store it securely (you may not be able to view it again).
Then paste the API token into the Drivetrain Rippling connector’s API Key field and click Submit to start the sync.
### Data Flows
#### What data flows are available?
The integration supports the following flows:
1. **Employee Directory Sync**\
Imports employee profiles, status, start/end dates, departments, and reporting structure.
2. **Job Sync**\
Imports job titles, job levels.
3. **Org Structure Sync**\
Imports departments and managers for modeling reporting and cost allocation.
#### When and how do data flows trigger?
* **Automatic Syncs**:\
Trigger based on the frequency chosen during setup (default is daily; other sync frequencies can also be set).
* **Event-based Changes (Rippling)**:\
When changes occur in Rippling, such as new hires, terminations, promotions, Drivetrain picks them up during the **next scheduled sync**.
* **Manual Sync**:\
Users can trigger an immediate resync anytime from the Drivetrain Data page.
#### How to manually trigger a sync
1. Go to Data page
2. Click **Resync** icon
3. Select Rippling from the list and click Sync\
### FAQs
What happens if I update an employee field in Rippling?
The next scheduled sync will automatically update the employee record in Drivetrain. You can also [manually trigger a sync](#how-to-manually-trigger-a-sync) for an immediate refresh.
Does Drivetrain write any data back to Rippling?
No. The integration is read-only. Drivetrain does not modify or push data into Rippling.
Can I choose which fields to sync?
Yes. During setup, you can select the entities and fields relevant to your planning models.
What if a field required by my Drivetrain model does not exist in Rippling?
Please contact your customer success manager. A joint request to access the scope(s) needed needs to raised with Rippling.
If I change sync frequency later, will it affect my existing data?
No. Only the timing changes. Historical data stays intact.
The sync failed—what should I do?
The reason for sync failure is displayed on the dataset page for Rippling.
Common issues are:
* Rippling access needs to be reauthorized.
* One or more of the required fields were deleted or renamed or the datatype was modified in Rippling—you can correct this from the [**Manage Schema**](https://handbook.drivetrain.ai/getting-started/data/managing-data-schema#accessing-the-manage-schema-window) page.
In case of additional queries, please reach out to your dedicated Customer Success Manager (CSM) or send an email to .
### Support
If you encounter any issues not covered here, please contact your dedicated Customer Success Manager (CSM) or reach out to .
# Integrating with Rippling (SFTP)
This guide walks you through sending your Rippling data to Drivetrain on an automated daily schedule using SFTP. You'll pick a Rippling report and use Rippling's **Workflow Studio** to export it as a CSV and deliver it to Drivetrain's secure SFTP server — so your headcount models and workforce plans always reflect the latest data, with no manual uploads.
Prefer a direct connection? Use the [API Key method](/integration-guide/readme/hris-and-ats/integrating-with-rippling-via-api-key).
{% hint style="info" %}
Choose the **SFTP method** when your team standardizes on scheduled file feeds, or when **direct API access isn't available.**
{% endhint %}
### How it works
1. You pick (or build) a Rippling report with the employee fields Drivetrain needs.
2. In Workflow Studio, a **daily schedule** triggers a **Send a report via SFTP** action.
3. Rippling exports the report as a **CSV** and drops it into Drivetrain's SFTP folder every day.
4. Drivetrain ingests the file and refreshes your models automatically.
### Prerequisites
* **Admin access** to Rippling — required to build reports and workflows in Workflow Studio.
* The **SFTP connection details** from your Drivetrain customer success manager (CSM):
* SFTP Hostname
* SFTP Username
* SFTP Password
* Destination folder (example: `/sftp-XXX/rippling`)
* Port: `22`
{% hint style="info" %}
Request these **SFTP credentials** from your **Drivetrain CSM** before you begin, and treat them like passwords — share and store them only through a secure channel.
{% endhint %}
#### Step 1 — Identify the report to send
Choose (or create) the Rippling report that contains the workforce data you want in Drivetrain. Typical fields include:
* Employee name, Preferred name, Employee ID, Work email
* Job title, Employee type, Department, Location
* Start date and End / Termination date
* Manager name, Manager email, Manager ID
#### Step 2 — Build the scheduled workflow in Workflow Studio
1. Open **Workflow Studio** — use the **search bar at the top** of Rippling to search for “Workflow Studio”, then open it.
2. From the left sidebar, add a **Schedule trigger** and pick a suitable time for the workflow to run **daily**.
3. Drag the **Send a report via SFTP** action onto the canvas, between the desired steps.
4. Click the step you just added to open its settings, then configure it as follows:
1. **Select the report** you want to send (from Step 1).
2. Select **password-based authentication**.
3. Enter the **SFTP hostname** provided by your CSM.
4. Enter the **SFTP username** provided by your CSM.
5. Enter the **SFTP password** provided by your CSM.
6. Set **Port** to `22`.
7. Set a **filename** — keep it **without spaces** (for example, `rippling_employees`).
8. Set the **Destination folder** as provided (for example, `/sftp-XXX/rippling`).
9. Set **File type** to **CSV**.
10. **Skip** the date and time format.
11. **Skip** the total and subtotal rows.
12. Click **Test step** to confirm the connection and delivery.
13. Click **Save** to activate the workflow.
{% hint style="info" %}
If the test fails, re-check the hostname, username, and password, confirm the **port is 22**, and make sure the **destination folder path exactly matches** what your CSM provided (no trailing spaces).
{% endhint %}
#### Step 3 — Notify Drivetrain
Inform the Drivetrain team that the workflow is live so they can verify the file lands in the SFTP folder and complete the setup on the Drivetrain side.
### What happens next
Once verified, the report is delivered to Drivetrain's SFTP **automatically every day at your scheduled time** — no manual work required. Drivetrain ingests each file and keeps your models up to date.
### Troubleshooting
* **Test step fails:** double-check the credentials and that the port is `22`; confirm the destination path is exact.
* **File doesn't arrive:** make sure the workflow is turned **on** and the schedule trigger is enabled, and that the filename has no spaces.
* **Columns look wrong or missing in Drivetrain:** keep the report structure stable and notify your CSM before changing report columns.
### Support
If you run into any issues not covered here, contact your Drivetrain CSM or email [**support@drivetrain.ai**](mailto:support@drivetrain.ai).
# Integrating with Sapling
[Prerequisites](#prerequisites)
[Sapling Setup](#sapling-setup)\
[Locating and Generating New API Keys](#locating-and-generating-new-api-keys)
## Prerequisites
To connect Sapling to Drivetrain, you need:
* An active Sapling account
* Super-Admin privileges on Sapling
* Admin privileges in Drivetrain
## Sapling Setup
Drivetrain supports in-built integration with Sapling. You would need to generate and enter API Keys from an account with administrator access to get started.
### Locating and Generating New API Keys
Users with Super Admin permissions can generate and view their own API keys.
1. Go to the **Integrations** page of your Sapling account
2. Navigate to the **API Keys** tab
3. Copy an existing API key, or click on the **Create New Key** button
4. Be sure to name your key descriptively, so you know how each application uses that key
{% hint style="danger" %}
API Key expires in 90 days.
The keys don’t get automatically renewed for security reasons, however, an email is sent to the owner of the API key 7 days before its expiration.
{% endhint %}
{% hint style="info" %}
That’s it! Inform your Drivetrain customer success manager so that they can get started!
{% endhint %}
# Integrating with Keka HR
[Prerequisites](#prerequisites)
[Keka HR Setup](#sapling-setup)\
[Locating and Generating New API Keys](#locating-and-generating-new-api-keys)
[Drivetrain Setup](#sapling-setup-1)\
[Setting up Keka HR Integration](#locating-and-generating-new-api-keys-1)
## Prerequisites
To connect Keka HR to Drivetrain, you need:
* An active Keka HR account
* Global-Admin privileges on Keka HR
* Admin privileges in Drivetrain
## Keka HR Setup
Drivetrain supports in-built integration with Keka HR. You would need to generate and enter API Keys from an account with administrator access to get started.
{% hint style="info" %}
Please note Keka's API access is currently in a closed beta phase and requires your account to include the API & Webhooks Add-On, which may have associated costs. Please reach out to to inquire about the status of this add-on with your account if it is not already enabled.
{% endhint %}
### Locating and Generating New API Keys
1. Navigate to **Settings** by selecting the gear icon in the upper left-hand corner of the page.
2. Under **Integrations and Automation** navigate to the **API Access** tab.
3. Enable API Access if you have not yet done so.
4. Copy the **Client Id** and **Client Secret** as it will be displayed only once, and they are mandatory for accessing the API.
5. Create an API Key by selecting the **Create key** button, enter the name as "Drivetrain Integration" and select an expiry date (preferably a year or more from the day you are creating).
6. Select the necessary scopes you need for the implementation and copy the **API key** and store it in a secure document along with Client ID and Client Secret.
7. Get the subdomain of your Keka HR account, for example if you login keka at mycompany.keka.com then your subdomain is "**mycompany**"
{% hint style="info" %}
Please note the following details are required for setting up Keka HR:
1. Client ID
2. Client Secret
3. API Key
4. Subdomain
{% endhint %}
## Drivetrain Setup
### Setting up Keka HR Integration
1. Go to Drivetrain's data page and Click on **+** button on top left corner
2. Select the Keka HR connector from the list of integrations and enter the **Subdomain** of your account and click **Next**
3. Enter Client ID, Client Secret and API key generated from previous steps and click **Next**
4. After a successful authentication, you will be directed back to Drivetrain's **Connected Integrations** page. Once the data sync is completed, you will be able to see the Keka HR Datasets.
# Integrating with UKG Pro
[Prerequisites](#prerequisites)
[UKG Pro Setup](#ukg-pro-setup)\
[Step 1: Find your UKG Pro Customer API Key](#step-1-find-your-ukg-pro-customer-api-key)\
[Step 2: Create your Service Account](#step-2-create-your-service-account)\
[Step 3: Find your UKG Web Service Domain](#step-3-find-your-ukg-web-service-domain)
## Prerequisites
* An active UKG Pro account.
* Admin privileges on UKG Pro.
* Admin privileges in Drivetrain.
## UKG Pro Setup
Drivetrain connects to UKG Pro via an API key and a Service Account. To create this integration, you need to log in using an admin account to find the API key, create a Service Account with the relevant permissions, and then provide the Web Services URL. This guide will cover the steps for the above requirements.
### Step 1: Find your UKG Pro Customer API Key
1. Log in to your UKG pro account and search “**Service Account Administration**” on the top right.
2. Copy the Customer API Key from under the header and copy it in a secure document.
### Step 2: Create your Service Account
1. On the Service Account Administration Page, Click “**+ add**” on the top rig
2. Enter the username as “Drivetrain Integration” and reach out to your CSM for email.
3. Under the Web Services section, enable the relevant permissions. To capture complete employee and payroll-related information, refer to the permissions listed below. Note that the "Employee Person Details" permission is mandatory.
* Employee Person Details \[This is required for integration, Permissions Needed: View]
* Employee Pay Statement \[Permissions Needed: View]
* Employee Employment Information \[Permissions Needed: View]
* PTO Plan Integration \[Permissions Needed: Add & View]
* Company Configuration Integration \[Permissions Needed: Add & View]
* Payroll Integration \[Permissions Needed: Add & View]
* Personnel Integration \[Permissions Needed: Add & View]
* Employee Job History Details \[Permissions Needed: View]
* Employee Compensation Details \[Permissions Needed: View]
4. Click on Save on top right. Your new password will pop-up, save the password in a secure document along with the API key found in Step 1
### Step 3: Find your UKG Web Service Domain
1. Go back to home, click on Search Bar and search for “**Web Services**”.
2. Copy any one of the URL present on the page and add in the same document where you stored password and API key. As an example below your URL may look something like this: [http://Servicet.ultipro.com/services/BIDataService](http://servicet.ultipro.com/services/BIDataService)
***
### Drivetrain Setup
After completing the UKG Pro setup above, connect UKG Pro as a data source in your Drivetrain instance. You must be a **Drivetrain administrator** to add a data source.
#### Step 1: Go to the Data page and add a data source
1. Sign in to your Drivetrain instance as an administrator.
2. In the left navigation, click **Data**.
3. At the top of the data sources panel, click the **+** (Add data source) button.
#### Step 2: Select the UKG Pro connector
1. In the **Connect a datasource** window, search for **UKG** (or open the **HRIS & ATS** category).
2. Click the **UKG Pro** connector card.
#### Step 3: Confirm administrator access
1. The UKG Pro connection window opens with the message **"Administrator role required."**
2. Click **I am an admin** to continue.
#### Step 4: Enter your API Key
Paste the **Customer API Key** you acquired from Step 1 of the UKG Pro setup, then click **Next**
#### Step 5: Finish setup
1. Once the credentials are validated, the connection is created and you are returned to the **Data** page.
2. **UKG Pro** now appears in your list of connected data sources and begins syncing.
3. When the sync completes, your UKG Pro data is available across Drivetrain.
{% hint style="info" %}
If you have any questions or run into any issues during setup, please contact your customer success manager for assistance.
{% endhint %}
# Integrating with UKG Ready
Step-by-step guide to authenticate and connect UKG Ready with Drivetrain.
To authenticate your UKG Ready account, you will need to provide the following information:
* Domain
* Company Short Name
* API Key
* User ID
* Password
This guide will walk you through finding or creating those credentials within UKG Ready.
### Prerequisites
Please ensure you fulfill all the requirements to set up the integration:
* You are an **Administrator** in your company's UKG Ready instance, or someone has shared their access with you.
### Instructions
#### Step 1: Get Your Domain
1. For example, if you sign in at "acme.com/ta/Default.login", your domain is "acme.com".
2. Store your domain in a document to be shared with your Drivetrain team.
#### Step 2: Find your Company Short Name
* Log into your UKG Ready account and open the menu in the upper left. Then, go to your **settings ico**n and click on **Global Setup**, followed by **Company Setup**
* Open **Company Info**
* Scroll down to find **Company Short Name** under **Company Address**. Copy your **Company Short Name**
* Store your **Company Short Name** in the document
#### Step 3: Find your API Key
* In your **Company Setup** page, go to **Login Config**
* Scroll to find **API Keys** and click the **eye icon** to reveal the key. Copy the API Key and store it in a secure place
{% hint style="info" %}
If there is no key, you can click **GENERATE** to create one. If there are existing integrations using this key, **DO NOT click generate**
{% endhint %}
* Store your **API Key** in a secure document.
#### Step 4: Create a security profile
* In your menu on the left, go to **Settings**, **Profiles/Policies**, and then **Security**.
* Click **NEW SECURITY PROFILE** on the upper right-hand side
* In this profile, we want to ensure all relevant permissions are enabled for the following endpoints.
{% hint style="info" %}
These permissions may be different based on your specific use case.
{% endhint %}
* In your HR Tab:
* Find **Employee Management**, **Base Compensation**.
* Select **View** from the drop-down menu.
* Find **Benefit Management (Plans)**.
* Select **View**.
* Find **Cost Centers**.
* Select **View**.
* Find **Total Compensation**.
* Select **View**.
* Find **HR Custom Values**.
* Select **View**.
* Under **Leave of Absence Management** near the bottom, select **Manage Requests** (if applicable)
* In your Modules tab (if applicable):
* Scroll to **Rest API Resources.**
* Select **Employee Demographics, Employee HR Custom Fields, Employee Profiles, Employee Pay Information, Employees, Employees (Changed),** and **Employees (me)**
* In your **Global tab** (if applicable):
* In **Global Setup**, find **Company EINs, Cost Center Definitions** and **Leave of Absence Custom Fields Definitions.**
* Select **View** for them
* In **Object Lists**, find **Company EINs, Cost Centers, Leave of Absence Categories,** and **Pay Period Profile**
* Select **View** for all
* In your **Payroll tab** (if applicable):
* Find the **Payroll** section. Click **Create/Edit Payroll** and **View/Edit/Add** next to payroll adjustment
* Select **Payroll Prep Process**
#### Step 5: Create your service account
* From **Settings > Global Setup > Company Setup**, go to **Edit** **Tabs**
* From the **Available Windows** box on the right side of the screen, scroll down to **Service Accounts.** Drag it to the Top section in the middle. Click **Save**
* Click **Add Service Account**. To create a new account, enter the following details:
* Username: Drivetrain Integration.
* Password: Generate a secure password.
* Store these 2 details in a secure document.
* Then, enter the **Security Profile** you created. Click the **magnifying glass** for Account Groups and **select All Company Employees**
#### Step 6: Share details with your Drivetrain team
Share the following credentials via a secure document with your Drivetrain team:
* Domain
* Company Short Name
* API Key
* User ID / Username
* Password
# Integrating with Workday (SFTP)
To configure SFTP (Secure File Transfer Protocol) in Workday for securely transferring data to Drivetrain, please follow these steps:
### Step 1: Generate an SSH Key Pair in Workday
1. In Workday, navigate to the **Create x509 Private Key Pair** task.
2. Provide a name and optional description for the key pair.
3. After creation, Workday will display both the **Public Key** and the **RSA-SSH** **Formatted Key**.
4. Copy the **RSA-SSH Formatted Key** and share it with the Drivetrain Team (e.g., SFTP server administrator) to authorize the connection.
### Step 2: Create a Custom Report for Data Extraction
1. Search for and select Create Custom Report in Workday.
2. Configure the report with the following settings:
1. **Report Type:** Advanced
2. **Enable As Web Service:** Yes
3. **Data Source:** All Active and Terminated Workers
3. Add necessary fields to the report, such as Employee ID, Name, Email, Job Title, etc.
4. You can use **Column Heading Overrides** to change the field names for Drivetrain.
### Step 3: Create an Outbound EIB (Enterprise Interface Builder)
1. In Workday, search for and select **Create EIB**.
2. Set the **Name** and choose **Outbound** for the direction.
3. Under the **Get Data** section, select the custom report created in Step 2.
4. In the **Transform** section, choose **None** unless specific transformations are needed.
5. Proceed to the **Deliver** section:
1. **Delivery Method:** SFTP
2. **SFTP Address:** `sftp://sftp1.drivetrain.ai`
3. **Directory:** /sftp-XXX/workday
4. **Authentication Method:** SSH Authentication
5. **User ID:** `dtuserXXX` (Replace with the username provided by the Drivetrain Team)
6. **SSH Authentication Key Pair:** Select the key pair generated in Step 1
### Step 4: Schedule the Integration
1. Navigate to the **Integration System** page for your EIB.
2. Click on the **Actions** button, then select **Integration > Launch/Schedule**.
3. In the scheduling screen, configure the desired frequency (e.g., daily) and time for the integration to run.
4. Confirm and save the schedule.
### Step 5: Test and Monitor the Integration
1. Manually launch the integration to perform a test run.
2. Verify with the Drivetrain team that the file is successfully transferred to Drivetrain.
# Integrating with Zenefits
[Prerequisites](#prerequisites)
[Zenefits Setup](#zenefits-setup)\
[Add a New User](#add-a-new-user)
## Prerequisites
To connect Zenefits to Drivetrain, you need:
* An active Zenefits account
* Admin privileges on Zenefits
* Admin privileges in Drivetrain
## Zenefits Setup
Drivetrain supports integration with Zenefits via **API** from a read-only external **admin** user account.
To get started you would need to create a new user on Zenefits for Drivetrain with read-only administrative access.
### Add a New User
To grant an External Admin, (someone who is not listed as an employee in Zenefits) Admin Permissions, follow these steps:
1. Click on the **Company Profile** app on your admin dashboard.
2. Select the **Administrators** link on the left-hand side of the page and then click **Add Administrator.**
3. Since the external Admin is not listed as an employee at the company, click the **No** button and enter their name and contact info.
* Zenefits will automatically send them an email to register their new **Zenefits Admin profile**.
4\. Select which **Roles** you want this individual to have and click **Continue**.
5\. Select which **Permissions** you want this individual to have and click **Add Admin**.
{% hint style="info" %}
That’s it! Inform your customer success manager so that they can get started!
{% endhint %}
# Integrating with Zoho People
### **Prerequisites**
To connect Zoho People to Drivetrain, you need:
1. A **Zoho People account** with **administrator** **access**
2. **Admin access** in Drivetrain with **permission to add data sources**
### **Zoho People Setup**
#### **Step 1:** Navigating to the Zoho People connector
* Log in to Drivetrain and go to the **Data page.**
* Click on **+ Add Data Source.**
* From the list of available integrations, select **Zoho People.**
#### **Step 2: Sign in to Zoho People**
* Select **I am an admin**
* **Review the permissions** pulled by Drivetrain and click on **Next**
* Select your **account type** based on **location**
* Click on **Open window** to sign in to finish signing in to your **Zoho People account**
Once connected, Drivetrain will **sync** your **Zoho People datasets** for use in models, dashboards, and workforce planning.
# Spreadsheets
Drivetrain seamlessly integrates with Google Sheets and allows you to upload CSVs, too. Right now, you can also integrate the following tools directly by following the instructions provided below:
* [Airtable](/integration-guide/readme/spreadsheets/integrating-with-airtable)
* [Google Drive](/integration-guide/readme/spreadsheets/integrating-with-google-drive)
* [Google Sheets](/integration-guide/readme/spreadsheets/integrating-with-google-sheets)
* [Microsoft OneDrive](/integration-guide/readme/spreadsheets/integrating-with-microsoft-onedrive)
* [SharePoint](/integration-guide/readme/spreadsheets/integrating-with-sharepoint)
To connect other spreadsheet applications with Drivetrain, please contact your onboarding partner to help you get set up.
# Integrating with Airtable
[Prerequisites](#prerequisites)
[Drivetrain Setup](#drivetrain-setup)\
[Step One: Connect your Airtable account on Drivetrain](#step-one-connect-your-airtable-account-on-drivetrain)\
[Step Two: Grant necessary permissions](#step-two-grant-necessary-permissions)\
[Step Three: Complete the integration](#step-three-complete-the-integration)
## Prerequisites
1. An active Airtable account.
2. Admin Privileges in Drivetrain.
## Drivetrain Setup
### Step One: Connect your Airtable account on Drivetrain
1. Select the Airtable Data Connector from the list of connectors by clicking + Connect
2. In the pop-up, click **Login to connect**
3. You will be redirected to the Airtable login page where you can sign in with your username and password.
### Step Two: Grant necessary permissions
Select the necessary bases from which you want to pull data into Drivetrain and click on **Grant access**.
{% hint style="info" %}
You’ll be directed directly to this page if you are already logged into Airtable.
{% endhint %}
### Step Three: Complete the integration
1. You will be redirected back to Drivetrain, please wait until Drivetrain starts fetching data from Airtable.
2. Once the connection is established, your Airtable connection will show up on the **Data** page. Once the sync is complete, your Airtable data will be visible on Drivetrain!
# Integrating with Google Drive
[Prerequisites](#prerequisites)
[Google Drive Setup](#google-drive-setup)\
[Step 1: Share Google Drive Folder](#step-1-share-google-drive-folder)
## Prerequisites
To connect Google Drive to Drivetrain, you need:
1. A Google Drive folder containing files with supported file types and encodings.
2. The URL of your Google Drive folder that you want to sync.
## Google Drive Setup
### Step 1: Share Google Drive Folder
Log in to your Google Drive account and navigate to the folder you want to sync the files.
{% hint style="info" %}
**NOTE**: Make sure that the folder is not empty. We can't sync empty folders.
{% endhint %}
2. Click the folder you want to sync and click Share from the drop-down menu.
3. In the **Share with people** and **groups** pop-up window, enter the email address provided by your Customer Success Manager or Data Integrations Manager.
4. Select Viewer permissions and then click Send.
{% hint style="info" %}
That’s it share the URL of the folder with your Customer Success Manager or Data Integrations Manager. Please note the URL specifies the folder path in your Google Drive containing the files which you want to import in Drivetrain. We examine any files under the specified folder, except the nested subfolders, for files we can sync
{% endhint %}
# Integrating with Google Sheets
Use the Google Sheets connector to import your spreadsheets into Drivetrain.
### Prerequisites
Before connecting your Google account, ensure the following:
* You have **Admin privileges** in Drivetrain.
* Your **Google account** has access to the Sheets you want to import.
* You are **signed into the same Google account** in your browser that you’ll connect to Drivetrain.
* Your organization’s Google settings allow **third-party app connections**.
### Setting Up the Integration
#### Step 1: Connect your Google Account
1. In Drivetrain, go to the **Data** **page** and click **+** to add a new connector.
2. Select **Google Sheets** from the list.
3. In the pop-up, click **Connect Google Account**.
4. **Sign in to your Google account** (or select it if already signed in).
5. **Grant Drivetrain permission** to access your Sheets and click **Continue**.
6. You’ll be **redirected back to Drivetrain** once the connection is successful.
{% hint style="success" %}
Your **Google account** is now linked to **Drivetrain**.
{% endhint %}
#### Step 2: Import a Google Sheet
1. **Open the Google Sheet** you want to import.
2. **Copy the URL** of the sheet.
3. Back in Drivetrain, **paste the sheet’s URL** in the field provided and click **Add**.
4. Once added, the sheet will appear as a **table** in your data workspace.
#### Step 3: Add More Sheets
You can import additional sheets from the same Google account anytime.
1. Click **Add data** within the **Google Sheets connector.**
2. Paste **another sheet’s URL.**
3. Click **Add**.
### Best Practices for Uploading Datasets
When importing a Google Sheet, Drivetrain automatically detects whether it’s a Transaction or Time series dataset. To ensure the upload completes successfully and the data is structured correctly, follow the format requirements below.
#### General requirements
These apply to all Google Sheets datasets:
* The table starts from **cell A1**.
* **Row 1** contains clear, unique column headers.
* **Column A** is the first data column.
* Each sheet contains **only one table**.
* Supported date formats: `YYYY-MM-DD`, `MM-DD-YYYY`, `YYYY/MM/DD`, `MM/DD/YYYY`.
* The sheet must be accessible from the **same Google account** you connected to Drivetrain.
#### If your sheet is a Transaction dataset
Use this format when each row represents a **record or event** — for example, a deal, invoice, or journal entry.
* Each row corresponds to a **unique transaction or record**.
* Include all relevant columns for that record (such as dates, IDs, and status fields).
#### If your sheet is a Time series dataset
Use this format when your data tracks **values across time periods** — for example, ARR by month or sales by week.
* Each row corresponds to a **unique entity** (such as a customer, account, or region).
* The first column lists **names or identifiers** for each entity.
* Each time period (e.g., month) appears as a **separate column**.
* Use consistent, valid date headers for time columns.
* Drivetrain will automatically **unpivot or flatten** your data to make it suitable for analysis.
### Syncing and Refresh
Once connected, your Google Sheets data is automatically synced with Drivetrain at regular intervals.\
You can also trigger a **manual refresh** at any time from the data workspace.
### FAQ
Can I automatically refresh data from a Google Sheet?
Yes. Once a Google Sheet is connected, Drivetrain will sync it automatically at predefined intervals. You can also trigger a manual sync if you’ve updated the sheet recently.
Can I connect multiple Google Sheets?
Yes. You can connect multiple sheets from the same Google account by clicking **Add data** on the connector. See the exact steps [here](#step-3-add-more-sheets).
What if my Google Sheet dataset isn’t loading?
Check that:
* The sheet starts at cell A1 and has headers in the first row.
* It’s shared with the Drivetrain service account or has link access enabled.
* You’ve connected the same Google account that owns or can view the sheet.
* The sheet’s URL is accessible from your Drivetrain workspace.
# Integrating with Microsoft OneDrive
[Prerequisites](#prerequisites)
[MS Admin Consent for Connecting OneDrive Accounts](#drivetrain-setup)
[Drivetrain Setup](#drivetrain-setup)\
[Step 1: Connect your OneDrive Account](#step-1-connect-your-onedrive-account)\
[Step 2: Import File to Drivetrain](#step-2-import-file-to-drivetrain)\
[Step 3: Add more Files to Drivetrain](#step-3-add-more-files-to-drivetrain)
## Prerequisites
* The table you want to import should start from the first cell (A1) on the sheet
* None of the column headers should be empty
* There should only be one table per file
* Only .XLSX and .CSV files are supported
* Admin privileges in Drivetrain
## MS Admin Consent for Connecting OneDrive Accounts
Before a user can connect their OneDrive account, Drivetrain requires MS admin's consent from the user's Microsoft 365 organisation. This consent allows Drivetrain to access and read files from the user's OneDrive account as part of the integration.
Please use this [link](https://login.microsoftonline.com/common/oauth2/v2.0/authorize?client_id=e91b7619-1c8c-4455-8071-aedf6ca84954\&response_type=code\&redirect_uri=https://id.drivetrain.ai\&response_mode=query\&scope=offline_access%20Files.ReadWrite.All%20User.Read\&state=service~117) to grant the consent, once you click on this link a new tab will open and will ask you to sign with your admin account if your are not already signed in. Select **Consent on behalf of your organization** and click on **Accept,** after clicking on Accept it will redirect to you to your Drivetrain's tenant.
## Drivetrain Setup
### **Step 1: Connect your OneDrive Account**
1. Click on **+** button on top left corner
2. Select the OneDrive connector under Spreadsheets category
3. On the pop-up, click **Open Window**, you will be redirected to the Microsoft login page.
4. If you're not signed into Microsoft, do that now, then select the account from which you want to import the data If you are already signed in, simply select the account from which you want to import the data.
6. Or select the account from which you want to upload the sheet if you are already signed in
7. After a successful login, you will be redirected back to Drivetrain **Connected Integrations** page which will ask you to paste the URL of the sheet you want to import
### **Step 2: Import File to Drivetrain**
1. Open OneDrive and navigate to the file you want to import
2. Copy the URL of the file which needs to be imported
{% hint style="info" %}
Please copy the URL using the address bar (see below image) and not using the copy link option available in OneDrive
{% endhint %}
3. Paste your OneDrive File Link into the field provided and click **Add**
4. Please wait for some few mins until the sync is completed, the file you added will now show up in the list of tables on OneDrive connector
### Step 3: Add more Files to Drivetrain
You can add more tables by using the **Add data** option as shown below
## FAQ Can I load/refresh data from a OneDrive File?
Yes, you can connect your OneDrive Account to Drivetrain. It'll be synced (i.e, refreshed) with the changes at predefined intervals. Alternatively, you can also [trigger a manual sync](https://docs.drivetrain.ai/getting-started/data/explore-your-datasets#resync). Refer to the above guide for more details
# Integrating with SharePoint
[Prerequisites](#prerequisites)
[Azure Setup](#drivetrain-setup)\
[Step 1: Register an Application in Azure](#step-1-connect-your-onedrive-account)
[Drivetrain Setup](#drivetrain-setup)\
[Step 1: Connect your SharePoint Account](#step-1-connect-your-onedrive-account-1)\
[Step 2: Import File to Drivetrain](#step-2-import-file-to-drivetrain)
## Prerequisites
* Admin privileges in Azure Portal
* Admin privileges in Drivetrain
* The table you want to import should start from the first cell (A1) on the sheet
* None of the column headers should be empty
* There should only be one table per file
* Only .XLSX and .CSV files are supported
## Azure Setup
### **Step 1: Register an Application in Azure**
1. Login to [Azure Portal](https://portal.azure.com/#home) and search for "**App Registrations**" on the Azure home page.
2. Click on **+ New registration**
3. Enter the name as "**Drivetrain SharePoint Integration**" and select **Accounts in this organizational directory only** as the supported account types and click **Register**
4. On the next page, note down the **Application (client) ID** and **Directory (tenant) ID** in a secure document, these will be needed to configure SharePoint in Drivetrain.
5. On the left navigation menu, under manage click on "**Certificates & secrets**" and click on **+ New client secret**
6. Enter the description as "**Drivetrain SharePoint App**" and select maximum expiry date and click on **Add**
7. Note Value and Secret ID of the SharePoint application.
8. Navigate to **API Permissions** and click on **+ Add a Permission** and select **Microsoft Graph**
9. Under **Application Permissions,** search files and select **Files.Read.All** permissions
10. Once you save the permissions, click on Grant admin consent to apply the permissions.
11. Go to your SharePoint account, and go to the home page of your site which stores files to be pulled into Drivetrain and get the URL of that site. For eg: your sample URL will be yourcompany.sharepoint.com/sites/YourSiteName
{% hint style="info" %}
Please note that you have all the four details, as these will be needed to configure Sharepoint connector in Drivetrain:
1. Client ID
2. Client Secret (Value of SharePoint Application, generated in step 7 of SharePoint Setup)
3. Tenant ID
4. Site URL
{% endhint %}
## Drivetrain Setup
### **Step 1: Connect your SharePoint Account**
1. Click on **+** button on top left corner
2. Select the SharePoint connector under Spreadsheets category
3. Enter the details received in SharePoint Setup i.e. Client ID, Client Secret, Tenant ID and Site URL
4. Once your SharePoint connector is authenticated, you will be redirected back to Drivetrain **Connected Integrations** page.
5. To add files, click on ‘**Add Data**’ and enter the URL of the file you want to import.
### **Step 2: Import File to Drivetrain**
1. Open SharePoint and navigate to the file you want to import
2. Copy the URL of the file which needs to be imported
{% hint style="info" %}
Please copy the URL using the address bar (see below image) and not using the copy link option available in OneDrive
{% endhint %}
3. Paste your SharePoint File Link into the field provided and click **Add**
3. Please wait for some few mins until the sync is completed, the file you added will now show up in the list of tables on SharePoint connector
## FAQ Can I load/refresh data from a SharePoint File?
Yes, you can connect your Sharepoint Account to Drivetrain. It'll be synced (i.e, refreshed) with the changes at predefined intervals. Alternatively, you can also [trigger a manual sync](https://docs.drivetrain.ai/getting-started/data/explore-your-datasets#resync). Refer to the above guide for more details
# Others
Drivetrain integrates with 500+ other tools. You can integrate the following tools directly by following the instructions provided below:
* [Amazon S3](/integration-guide/readme/others/integrating-with-amazon-s3)
* [Brex](/integration-guide/readme/others/integrating-with-brex)
* [Clari](/integration-guide/readme/others/integrating-with-clari)
* [Drivetrain's SFTP](/integration-guide/readme/others/integrating-with-drivetrains-sftp)
* [Jira](/integration-guide/readme/others/integrating-with-jira)
* [NetSuite (Role Based Access)](/integration-guide/readme/others/integrating-with-netsuite-role-based-access)
* [Officevibe](/integration-guide/readme/others/integrating-with-officevibe)
* [Oracle Fusion](/integration-guide/readme/others/integrating-with-oracle-fusion)
* [SFTP](/integration-guide/readme/others/integrating-with-sftp)
* [Shopify](/integration-guide/readme/others/integrating-with-shopify)
* [SkySlope](/integration-guide/readme/others/integrating-with-skyslope)
* [SSO](/integration-guide/readme/others/setting-up-sso)
* [Twilio](/integration-guide/readme/others/integrating-with-twilio)
For any other business application that you would like to connect to Drivetrain, contact your customer success manager to help you get them connected.
# Integrating with Amazon S3
### Overview
This guide explains how customers can securely push data into Drivetrain’s Amazon S3 bucket.\
Drivetrain supports two integration methods:
1. **Access Key ID & Secret Access Key**
2. **Role-Based IAM Access**
Both methods allow you to upload files into a dedicated folder within Drivetrain’s S3 environment.
### Method 1: Integration Using Access Key ID & Secret Key
#### Required Information
Your Drivetrain integration team will provide the following:
* S3 Bucket Name: `dt-helm42`
* Folder Path: `dt-helm42/XXX`
* **AWS Access Key ID** & **Secret Access Key**
#### How to Use This Method
1. Configure your system, ETL tool, or script with:
2. Access Key ID
3. Secret Access Key
4. Bucket name
5. Folder path
6. Upload your files to the S3 folder exactly as shared by Drivetrain.
### Method 2: Integration Using Role-Based IAM
This method avoids storing long-lived keys and is the preferred, more secure option.
#### Required Information
To enable role-based access, you must provide Drivetrain with your:
* **AWS Account ID**
Drivetrain will then:
1. **Whitelist your AWS account**
2. **Create an IAM role** that your account is allowed to assume
3. **Grant that role permissions** to upload files into your designated S3 folder
#### How to Use This Method
1. Provide Drivetrain with your AWS Account ID.
2. Drivetrain will share:
1. **S3 Bucket Name:** `dt-helm42`
2. **Folder Path:** `dt-helm42/XXX`
3. Configure your system to:
1. **Upload files** to the designated folder path
# Integrating with Brex
[Prerequisites](#prerequisites)\
[Brex Setup](#brex-setup)\
[Generate a user token](#generate-a-user-token)
### Prerequisites
To connect Brex to Drivetrain, you need:
* An active Brex admin account.
### Brex Setup
Drivetrain uses user/API token to pull data from Brex into Drivetrain’s data warehouse. To generate an API token, please follow the following steps:
#### Generate a user token
1. Log into the your Brex account.
2. Go to **Settings > Developer**, then click **Create Token**.
3. Enter "Drivetrain Integration" as the **Token Name**.
4. Select the necessary data you want to pull into drivetrain and provide **Read** permission.
5. After selecting **Create token**, click **Allow Access** in the below window.
6. Once your token is created, store the token in a secure location. You won’t be able to access the token again.
{% hint style="info" %}
That’s it! Share your user token with your customer success manager so they can get started!
{% endhint %}
# Integrating with Clari
[Prerequisites](#prerequisites)
[Clari Setup](#clari-setup)\
[Creating an Authentication Token](#creating-an-authentication-token)
### Prerequisites
To connect Clari to Drivetrain, you need:
* An active Clari account
* Admin privileges on Clari
* Admin privileges in Drivetrain
### Clari Setup
Drivetrain can connect to Clari using an **API token** from an admin account. To generate an API token, please follow the following steps:
#### Creating an Authentication Token
1. Log into your Clari account.
2. Go to **User Settings.**
3. Navigate to the **API Token** tab and click **Generate New API Token**.
4. Enter a **Token Name** and click **Generate New Token**.
5. After generating a token, make sure to keep it in a secure location as you won't be able to access it again.
{% hint style="danger" %}
1. If you revoke a token, any active integration that is using that token will break.
2. When deactivating a user, any tokens created by the user will be revoked (and thus break any active integration).
{% endhint %}
{% hint style="info" %}
That’s it! Inform your customer success manager so that they can get started!
{% endhint %}
# Integrating with Drivetrain's SFTP
You can connect to Drivetrain’s SFTP server using the below mentioned details, this guide contains the steps requires to connect to the server:
With XXX being a number provided by the Drivetrain team.
### **SFTP Details**
* **SFTP Host & Port**: Please use the below host and port details to access Drivetrain’s SFTP server:
Host Name: `sftp1.drivetrain.ai`
Port: `22`
* **SFTP Username**: `dtuserXXX`
* **Authentication Method**: Drivetrain uses SSH-key based authentication, to authenticate with our private key and passphrase. These will be shared by the Drivetrain team with you.
Below is the command to authenticate our server:
```
sftp -i sftp_pvtkey_XXX
dtuserXXX@sftp1.drivetrain.ai
```
* **SFTP Folder Path**: “/” is the folder path
* **File Name(s)**: You can place your file as one file that gets overwritten each time (eg. Orders.csv) or a timestamped one (eg: orders\_YYYYMMDD.csv).
# Integrating with Jira
[Overview](#overview)
[Prerequisites](#prerequisites)
[Jira Setup](#jira-setup)
[Method 1: Basic](#method-1-basic)
[Method 2: OAuth 2.0 (3LO)](#method-2-oauth-2.0-3lo)
[Troubleshooting](#troubleshooting)
### **Overview**
This guide will walk you through connecting your Jira account to **Drivetrain**. Drivetrain supports two integration methods:
1. **Method 1: Basic Authentication**
Connect using Jira credentials (Jira On-Premises) or an Atlassian email + basic API token (Jira Cloud).
2. **Method 2: OAuth 2.0 (3LO)**
Connect using an authorisation flow for Jira Cloud.
Both methods require that the credentials provided have the appropriate permissions to read the specified objects.
### **Prerequisites**
Before beginning the integration, ensure you have the following:
1. An active Jira account.
2. Admin privileges in Drivetrain.
3. The Jira user account that you use to connect must have the following permissions:
| Entities | Roles & Permissions |
| ----------------------------------------------------------------------------------------------- | --------------------------------------------------------- |
|
Projects Issues Related entities like versions, components, and boards
| **Administer Projects** or **Browse Projects** permission |
|
Project roles Project role actors
| **Administer Projects** permission |
|
Users Groups
| **Browse users and groups** global permission |
| Entities related to Jira Service Management (formerly Jira Service Desk) | **Administrators** or **Service Desk Team** project role |
|
Permission and issue security schemes Related entities Webhooks (for registration)
| **Administer Jira** global permission |
### **Jira Setup**
Follow the steps below basis the method chosen to integrate your Jira instance on Drivetrain:
#### **Method 1**: **Basic**
How you set up Basic authentication depends on which type of Jira installation you have:
1. **Jira On-Premises**
* **Step 1: Configure Jira for authentication**
1. Store your `Username` and `Password`.
* **Step 2**: **Integrating with Drivetrain**
1. Share the following details securely with your **Drivetrain implementation team**:
* Username & Password (created in Step 1)
* Jira Host
* Port number
2. **Jira Cloud**
* **Step 1: Configure Jira for authentication**
1. In your Atlassian account, create a **basic API token** by clicking `Create API token` and store it.
* In order to create an API token with scopes:
* Log in to .
* Select `Create API token` with scopes.
* Give your API token a name that describes its purpose.
* Select an **expiration date** for the API token.
* Select the **app** you’d like the API token to access.
* Select the **scopes** to determine what the API token can do in Jira or Confluence.
* Select `Create`.
* Select `Copy to clipboard`, then paste the token to your script, or save it somewhere safe.
1. Store the **email address** for the Atlassian account you used to create the API token.
* **Step 2**: **Integrating with Drivetrain**
1. Share the following details securely with your **Drivetrain implementation team**:
* Email Address & API Token from your Atlassian Account (created in Step 1)
* Jira Host
* Port number
{% hint style="warning" %}
Token expiration is **1 to 365 days.**
{% endhint %}
#### **Method 2**: **OAuth 2.0 (3LO)**
Follow the steps below to integrate your Jira instance on Drivetrain:
1. The Drivetrain team will send you the authentication link for Jira.
2. In the setup form, enter your Jira **Host**, **Port** number and set the `Authentication Type` to `OAuth` .
3. Click **Authorize** to start the OAuth 2.0 authorization flow.
4. Log in with the Atlassian account that has access to the Jira Cloud instance you are connecting to.
5. Review on the Permissions page, the requested scopes and click `Allow access` to grant Drivetrain access to your Jira data.
6. Upon granting access, you are automatically redirected back to the Drivetrain dashboard.
{% hint style="info" %}
No further manual configuration is required. The Jira source will start syncing data using the granted OAuth 2.0 access.
{% endhint %}
### **Troubleshooting**
If you’re unable to connect Jira to Drivetrain after completing the steps above, reach out to your Drivetrain onboarding partner. In most cases, no additional configuration is required.
{% hint style="warning" %}
Include a **screenshot** or **brief description** of the error message. We'll help you troubleshoot and guide you through next steps.
{% endhint %}
# Integrating with NetSuite (Role Based Access)
[Prerequisites](#prerequisites)
[NetSuite Setup](#netsuite-setup)\
[Step 1: Create a New Role](#step-1-create-a-new-role)\
[Step 2: Assign Relevant Permissions](#step-2-assign-relevant-permissions)\
[Step 3: Create a User and assign the above Role to that User](#step-3-create-a-user-and-assign-the-above-role-to-that-user)\
[Step 4: Create an Integration](#step-4-create-an-integration)\
[Step 5: Generate the Token Key and Token Secret](#step-5-generate-the-token-key-and-token-secret)\
[Step 6: Get Account ID](#step-6-get-account-id)\
[Step 7: Set up NetSuite Saved Search](#step-7-set-up-netsuite-saved-search)
[Drivetrain Setup](#step-7-set-up-netsuite-saved-search)\
[Step 1: Navigating to the NetSuite connector](#step-1-navigating-to-the-netsuite-connector)\
[Step 2: Entering Credentials](#step-2-entering-credentials)
### Prerequisites
To connect NetSuite to Drivetrain, you need:
* An active Oracle NetSuite account
* Allowed access to all Account permissions options on the NetSuite account, with Administrator access to perform the setup
* Admin privileges in Drivetrain
### NetSuite Setup
{% hint style="info" %}
To integrate NetSuite with Drivetrain, please share the below information with your Drivetrain customer success manager:
* Username and password of NetSuite account with frontend access
* Consumer key and secret of the integration account
* Account ID of the integration account
* Token key and secret of the integration guide
* Script ID and deploy ID after deploying the saved search script
Follow the steps below to get this information.
{% endhint %}
#### **Step 1: Create a New Role**
* Sign in to your NetSuite instance. Make sure you are logged in as an Administrator.
* From the menu bar, navigate to **Setup** > **User/Roles** > **Manage Roles** > **New.**

* In the Role page, fill in a name for the Role, ensure that *Accounting Center* is selected as '**CENTER TYPE'** and click **Save.**
{% hint style="info" %}
*The "Name" field is a field for your reference. We recommend using "DrivetrainIntegrationRole"*
{% endhint %}

* In case you have subsidiaries enabled, please select '**ALL'** subsidiaries and '**ALLOW CROSS SUBSIDIARY RECORD VIEWING'.**
* Please select **ALL** Accounting Books.
#### Step 2: Assign Relevant Permissions
* Now you'll add permissions for the Role as per the **List of Permissions with Levels** given below. The exact list may vary depending on the fields required for metric calculations specific to your use cases.
* Transactions and Lists fields require 'View' permission.
* Reports fields require 'View' permission. However, Report Customization requires 'Full' access.
* Setup fields requires 'Full' access.
{% hint style="info" %}
If your sync uses NetSuite saved-search extraction (see Step 7), upgrade these four permissions from View to the level shown: **Find Transaction** (Create), **Publish Search** (Full), **Documents and Files** (Full), and **SuiteScript** (Full) — in addition to **Report Customization** (Full) and **Perform Search** (Full), which are already required above. Skip this if your sync doesn't use saved-search extraction.
{% endhint %}
{% embed url="" %}
{% hint style="danger" %}
Note: Permission **Rest Web Services** is mandatory. In case you do not find it under Setup, please follow the steps below to enable them first.
{% endhint %}
Enable the feature at Setup > Company > Setup Tasks > Enable Features, in the SuiteTalk (Web Services) section, on the SuiteCloud subtab.
#### **Step 3: Create a User and assign the above Role to that User**
* From the menu bar, navigate to **Lists** > **Employees** > **Employees** > **New.**

* Enter your name and the email address provided to you by your customer success manager.
{% hint style="info" %}
Prefer the customer's own service account email where possible. Creating an account with a Drivetrain-provided email is optional — you can skip it and use the service-account token method in Step 5 instead.
{% endhint %}
* Click the **Access** subtab.
* Check **Give Access** and **Send Notification Email.**
* Assign a password of your choice.
* Select the Role you created in Step 1 and click **Add.**
* Click on **Save.**
#### **Step 4: Create an Integration**
* From the menu bar, navigate to **Setup** → **Integration** → **Manage** **Integrations** → **New.**

* On the Integration page,
* Fill in the **Name** field. We recommend using "DrivetrainIntegration".
* In the Token-based Authentication section, check **TOKEN-BASED AUTHENTICATION** and uncheck **TBA: AUTHORIZATION FLOW.**
* In the **OAuth 2.0** section, uncheck **AUTHORIZATION CODE GRANT.**
* Click on **Save.**
After you've saved the settings above, scroll down to the bottom of the page to get:
* **Consumer Secret**
* **Consumer Key**
{% hint style="info" %}
Please make note of these items, as they will be required later.
{% endhint %}
#### Step 5: Generate the Token Key and Token Secret
* Log into NetSuite with the user account you set up in Step 2.
* Click the **Home** icon.
* Scroll to the bottom.
* Click **Manage Access Tokens.**
* Click **New My Access Token.**
* In the dropdown list for **APPLICATION NAME**, select the integration you created in Step 3.
Click **Save** and scroll down to the bottom of the page to get the:
* **Token Key**
* **Token Secret**
{% hint style="info" %}
Please make note of these items, as they will be required later.
{% endhint %}
{% hint style="info" %}
**Alternative — service account (no login required):** Instead of logging in as the integration user, an administrator can generate the token directly at **Setup** → **Users/Roles** → **Access Tokens** → **New**, selecting the **User** (the service account), the **Role** (DrivetrainIntegrationRole), and the **Application** (the integration from Step 4). This skips logging in as the created user.
{% endhint %}
#### **Step 6: Get Account ID**
* From the menu bar, navigate to **Setup** → **Company** → **Company** **Information.**

You will find the **Account ID** here. Please note it down.
{% hint style="info" %}
This completes your NetSuite setup. If you have any questions or run into any issues with this part of the integration process, please contact your customer success manager for assistance.
{% endhint %}
#### Step 7: Set up NetSuite Saved Search
This step is only required if your sync uses saved-search extraction (see Step 2).
1. Download the Script from and unzip it.
2. To install the script, navigate to **Customization** > **Scripting** > **Scripts** > **New**. You'll see the Upload Script File form.
3. Hover over the Script File field, and you'll see a "**+"** button appear to the right of the field. Click the button and the File upload form will appear.
4. By default, the script will be uploaded to SuiteScripts folder in your File Cabinet (or to the last folder that you uploaded a script to). If you'd like to install the script in an alternative folder, select it from the Folder field.
5. Next, click the **Choose File** button in the Select File field. Then navigate to the folder that you unzipped the file to, and select the file.
6. Then click the **Save** button. The file will be uploaded, and then the Upload Script File form will reappear, with the Script File field loaded.
7. Upon save, the script file will be populated in the Upload Script File form and then click on **Create Script Record** button. The Script form will appear.
8. In the script form, enter **Name** and **ID** as follows. Click on the **Deployments** tab, and enter the Title as "DrivetrainSavedSearch**"**.
9. Mark the status as **Released**.
10. Click **Save** to finish the installation process.
11. After saving, click on the Deployment title to view the Script Deployment Form.
12. Make a note of **External URL**.
13. Edit the Script Deployment and update the role for the script (which you created for Drivetrain Integration) and click on **Save**.
14. Go to **File Cabinet** and select **New** Folder.
15. Add a folder “DrivetrainExports” in the root of File Cabinet and click **Save**.
### Drivetrain Setup
#### Step 1: Navigating to the NetSuite Connector
* Sign in to your Drivetrain instance. Make sure you are logged in as an administrator.
* Click on **+ New Data Source.**
* Select the NetSuite Data Connector from the list of integrations by clicking **+Connect.**
#### Step 2: Entering Credentials
* Enter the keys, secrets and account ID you generated when setting up your NetSuite account, and click **Submit.**
* **Consumer Secret**
* **Consumer Key**
* **Account ID**
* **Token Key**
* **Token Secret**
* You will be redirected to the **Connected Integrations** page where you will be able to see your new NetSuite connection. Once the sync is complete, you will be able to see your NetSuite data on Drivetrain!
---
[Next Page](/llms-full.txt/1)